

Unity 2022.3.5f1 + Oculus Integration 56.0 (Locomotion Retry)
VR/Oculus Integration 2023. 10. 3. 21:24다시 Locomotion 도전 !
일단 정리를 먼저 해보고
1. 씬을 생성하고 Main Camera를 제거 하고 OVRCameraRig를 하이어라키에 드래그 한뒤 Tracking Origin Type을 Floor Level로 변경 하고 Quest Feature에서 Hand Tracking Support/Frequency/Version을 다음과 같이 변경 한다

2. OVRHandPrefab 프리팹을 찾아 OVRCameraRig/TrackingSpace/LeftHandAnchor와 RightHandAnchor에 넣어줌
3. 하이어라키에서 두개의 OVRHandPrefab 선택후 OVRHand, OVRSkeleton컴포넌트를 제외하고 모두 제거
4. RightHandAnchor자식으로 있는 OVRHandPrefab을 선택후 Hand Type을 Hand Right로 변경

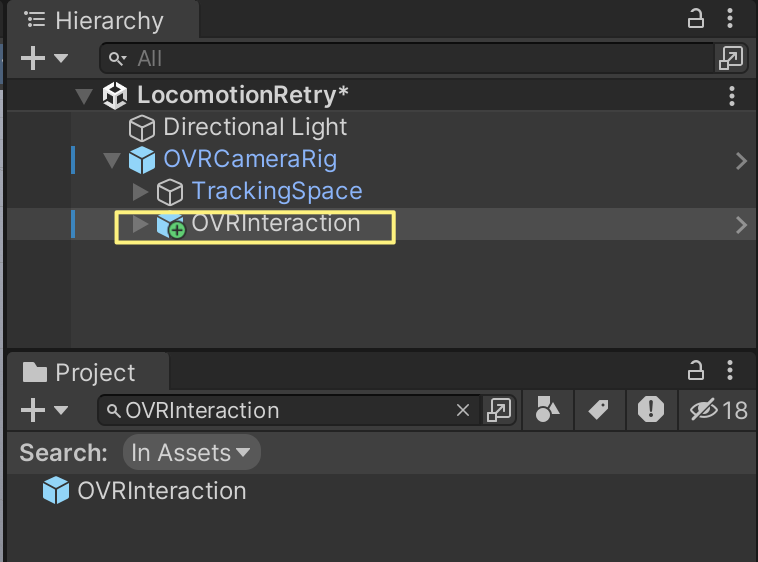
5. Project 창에서 OVRInteraction 프리팹을 찾아 OVRCameraRig자식으로 넣기
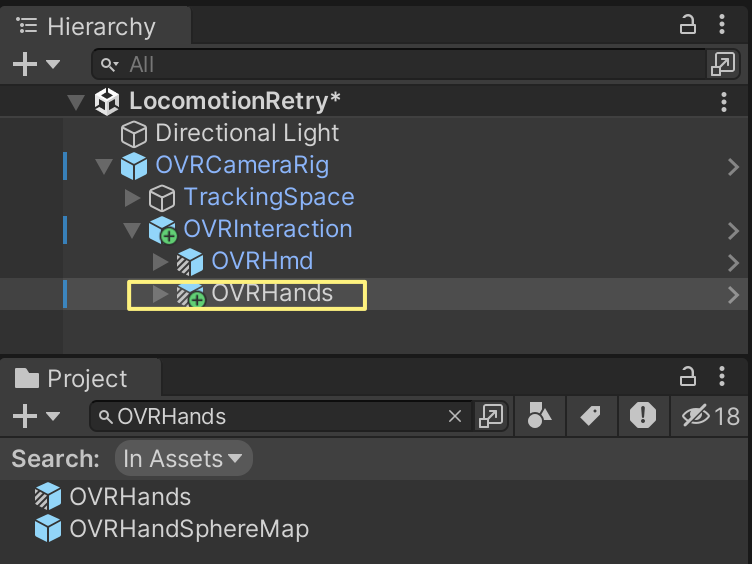
6. Project창에서 OVRHands 프리팹을 찾아 OVRInteraction 자식으로 넣기
여기까지 하고 빌드 하면 핸드 트래킹만 될거다
컨트롤러 쥐고 있어도 아무것도 안보임, 인터렉션 아무것도 할수 없는 상태
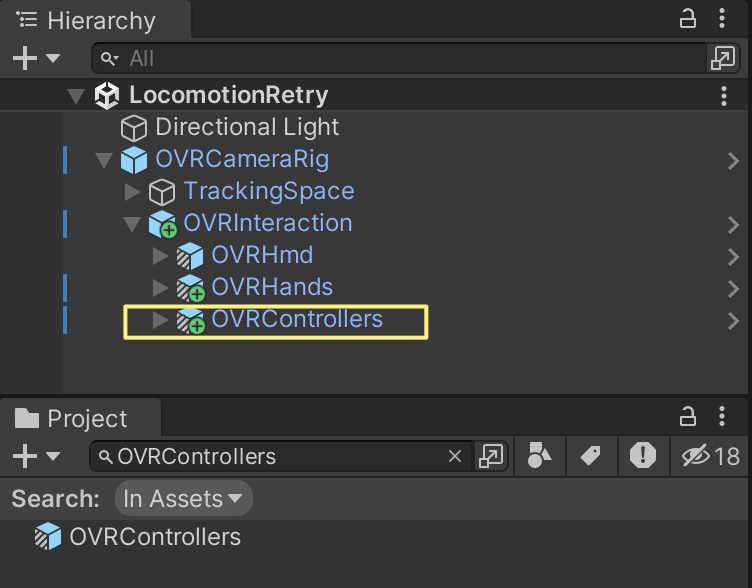
7. Project창에서 OVRControllers 프리팹을 찾아 OVRInteraction 자식으로 넣기
그리고 너무 가깝게 컨트롤러를 놓으면 손이 안보인다
난 먼저 살짝 두번 맞대서 부딪히고 멀찌감치 놓는게 편한거 같다
여기까지가 기본 셋팅
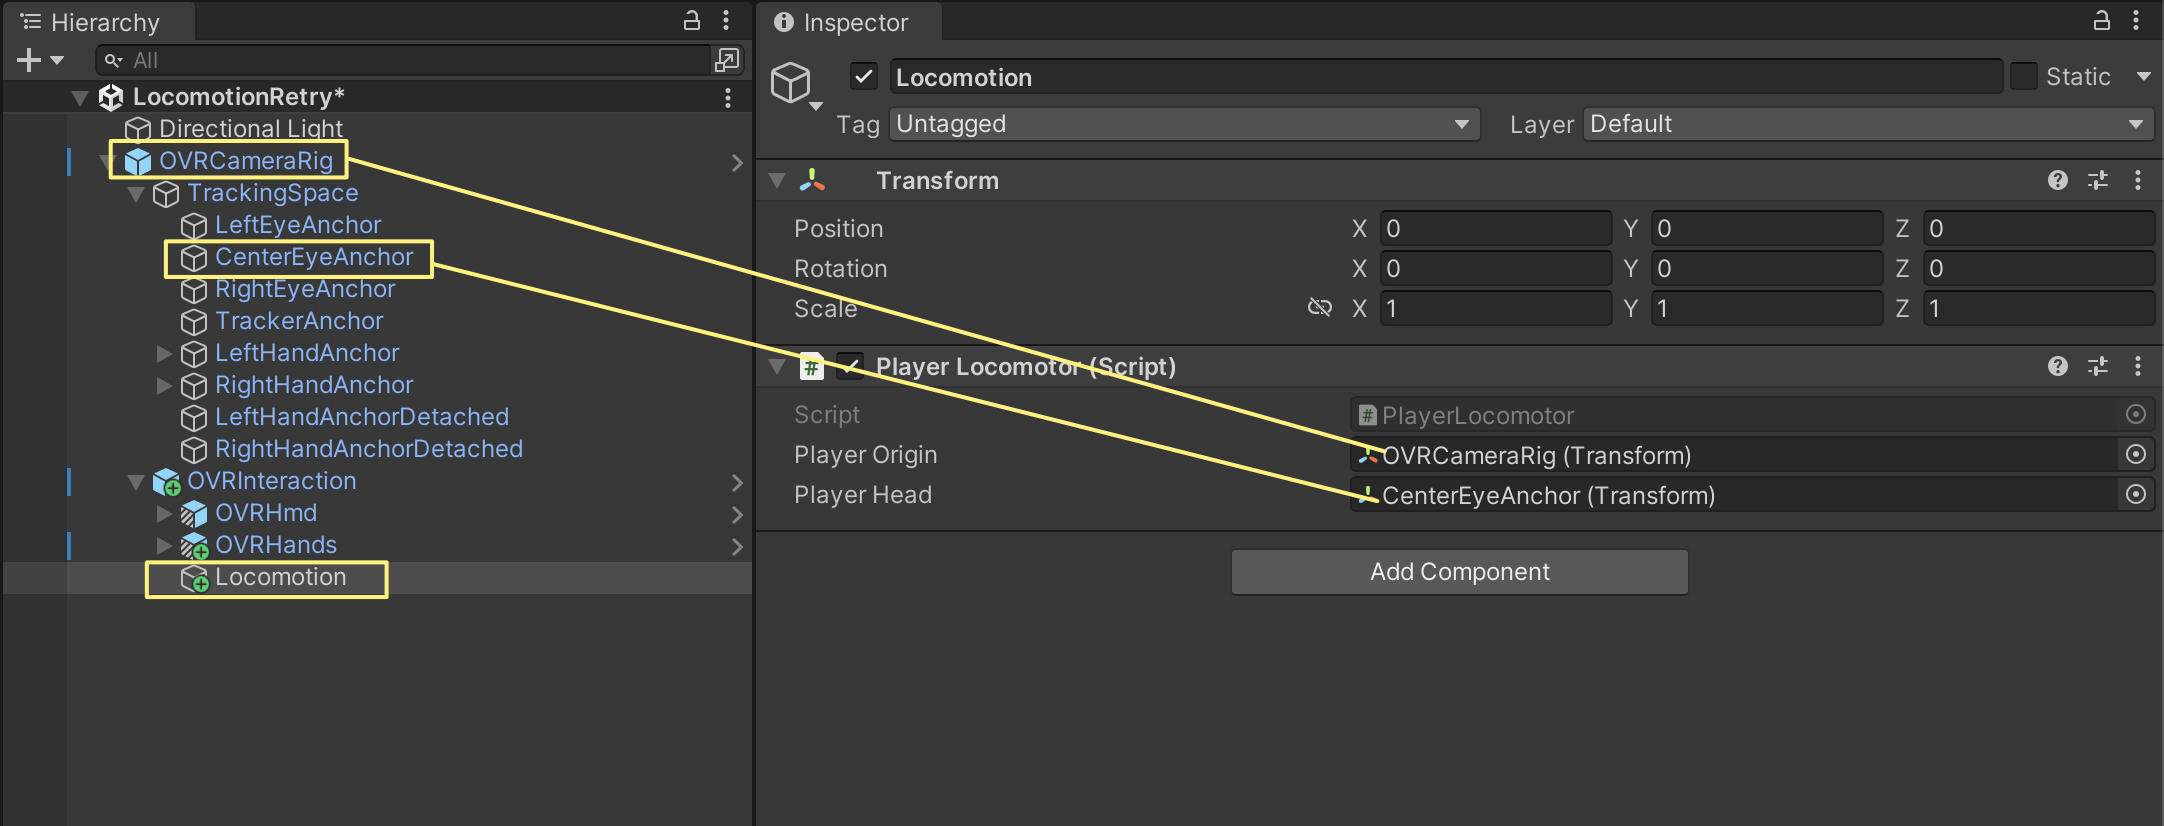
8. OVRInteraction자식으로 빈오브젝트 (Locomotion)을 만들고 PlayerLocomotor 컴포넌트를 추가
- Player Origin 필드에 OVRCameraRig를 넣고
- Player Head 필드에 CenterEyeAnchor를 넣어 준다
PlayerLocomotor스크립트는 대충 이렇다
이벤트를 전달 받아 텔레포트 하고 스냅 턴 하는 부분이 보인다
나중에 필요 하면 참고 해서 커스텀 하면 될듯 하다
/*
 * Copyright (c) Meta Platforms, Inc. and affiliates.
 * All rights reserved.
 *
 * Licensed under the Oculus SDK License Agreement (the "License");
 * you may not use the Oculus SDK except in compliance with the License,
 * which is provided at the time of installation or download, or which
 * otherwise accompanies this software in either electronic or hard copy form.
 *
 * You may obtain a copy of the License at
 *
 * https://developer.oculus.com/licenses/oculussdk/
 *
 * Unless required by applicable law or agreed to in writing, the Oculus SDK
 * distributed under the License is distributed on an "AS IS" BASIS,
 * WITHOUT WARRANTIES OR CONDITIONS OF ANY KIND, either express or implied.
 * See the License for the specific language governing permissions and
 * limitations under the License.
 */

using System;
using System.Collections.Generic;
using UnityEngine;

namespace Oculus.Interaction.Locomotion
{
    /// <summary>
    /// Moves a player when receiving events from ILocomotionEventBroadcasters.
    /// The movement can be a combination of translations and rotations
    /// and it happens at the very end of the frame (after rendering).
    /// </summary>
    public class PlayerLocomotor : MonoBehaviour,
        ILocomotionEventHandler
    {
        [SerializeField]
        private Transform _playerOrigin;
        [SerializeField]
        private Transform _playerHead;

        private Action<LocomotionEvent, Pose> _whenLocomotionEventHandled = delegate { };
        public event Action<LocomotionEvent, Pose> WhenLocomotionEventHandled
        {
            add
            {
                _whenLocomotionEventHandled += value;
            }
            remove
            {
                _whenLocomotionEventHandled -= value;
            }
        }

        protected bool _started;

        private Queue<LocomotionEvent> _deferredEvent = new Queue<LocomotionEvent>();

        protected virtual void Start()
        {
            this.BeginStart(ref _started);
            this.AssertField(_playerOrigin, nameof(_playerOrigin));
            this.AssertField(_playerHead, nameof(_playerHead));

            this.EndStart(ref _started);
        }

        private void OnEnable()
        {
            if (_started)
            {
                this.RegisterEndOfFrameCallback(MovePlayer);
            }
        }

        private void OnDisable()
        {
            if (_started)
            {
                _deferredEvent.Clear();
                this.UnregisterEndOfFrameCallback();
            }
        }

        public void HandleLocomotionEvent(LocomotionEvent locomotionEvent)
        {
            _deferredEvent.Enqueue(locomotionEvent);
        }

        private void MovePlayer()
        {
            while (_deferredEvent.Count > 0)
            {
                LocomotionEvent locomotionEvent = _deferredEvent.Dequeue();
                Pose originalPose = _playerOrigin.GetPose();
                MovePlayer(locomotionEvent.Pose.position, locomotionEvent.Translation);
                RotatePlayer(locomotionEvent.Pose.rotation, locomotionEvent.Rotation);
                Pose delta = PoseUtils.Delta(originalPose, _playerOrigin.GetPose());
                _whenLocomotionEventHandled.Invoke(locomotionEvent, delta);
            }
        }

        private void MovePlayer(Vector3 targetPosition, LocomotionEvent.TranslationType translationMode)
        {
            if (translationMode == LocomotionEvent.TranslationType.None)
            {
                return;
            }
            if (translationMode == LocomotionEvent.TranslationType.Absolute)
            {
                Vector3 positionOffset = _playerOrigin.position - _playerHead.position;
                positionOffset.y = 0f;
                _playerOrigin.position = targetPosition + positionOffset;
            }
            else if (translationMode == LocomotionEvent.TranslationType.AbsoluteEyeLevel)
            {
                Vector3 positionOffset = _playerOrigin.position - _playerHead.position;
                _playerOrigin.position = targetPosition + positionOffset;
            }
            else if (translationMode == LocomotionEvent.TranslationType.Relative)
            {
                _playerOrigin.position = _playerOrigin.position + targetPosition;
            }
            else if (translationMode == LocomotionEvent.TranslationType.Velocity)
            {
                _playerOrigin.position = _playerOrigin.position + targetPosition * Time.deltaTime;
            }
        }

        private void RotatePlayer(Quaternion targetRotation, LocomotionEvent.RotationType rotationMode)
        {
            if (rotationMode == LocomotionEvent.RotationType.None)
            {
                return;
            }
            Vector3 originalHeadPosition = _playerHead.position;
            if (rotationMode == LocomotionEvent.RotationType.Absolute)
            {
                Vector3 headForward = Vector3.ProjectOnPlane(_playerHead.forward, _playerOrigin.up).normalized;
                Quaternion headFlatRotation = Quaternion.LookRotation(headForward, _playerOrigin.up);
                Quaternion rotationOffset = Quaternion.Inverse(_playerOrigin.rotation) * headFlatRotation;
                _playerOrigin.rotation = Quaternion.Inverse(rotationOffset) * targetRotation;
            }
            else if (rotationMode == LocomotionEvent.RotationType.Relative)
            {
                _playerOrigin.rotation = targetRotation * _playerOrigin.rotation;
            }
            else if (rotationMode == LocomotionEvent.RotationType.Velocity)
            {
                targetRotation.ToAngleAxis(out float angle, out Vector3 axis);
                angle *= Time.deltaTime;

                _playerOrigin.rotation = Quaternion.AngleAxis(angle, axis) * _playerOrigin.rotation;
            }
            _playerOrigin.position = _playerOrigin.position + originalHeadPosition - _playerHead.position;
        }

        #region Inject
        public void InjectAllPlayerLocomotor(Transform playerOrigin, Transform playerHead)
        {
            InjectPlayerOrigin(playerOrigin);
            InjectPlayerHead(playerHead);
        }

        public void InjectPlayerOrigin(Transform playerOrigin)
        {
            _playerOrigin = playerOrigin;
        }

        public void InjectPlayerHead(Transform playerHead)
        {
            _playerHead = playerHead;
        }

        #endregion
    }
}
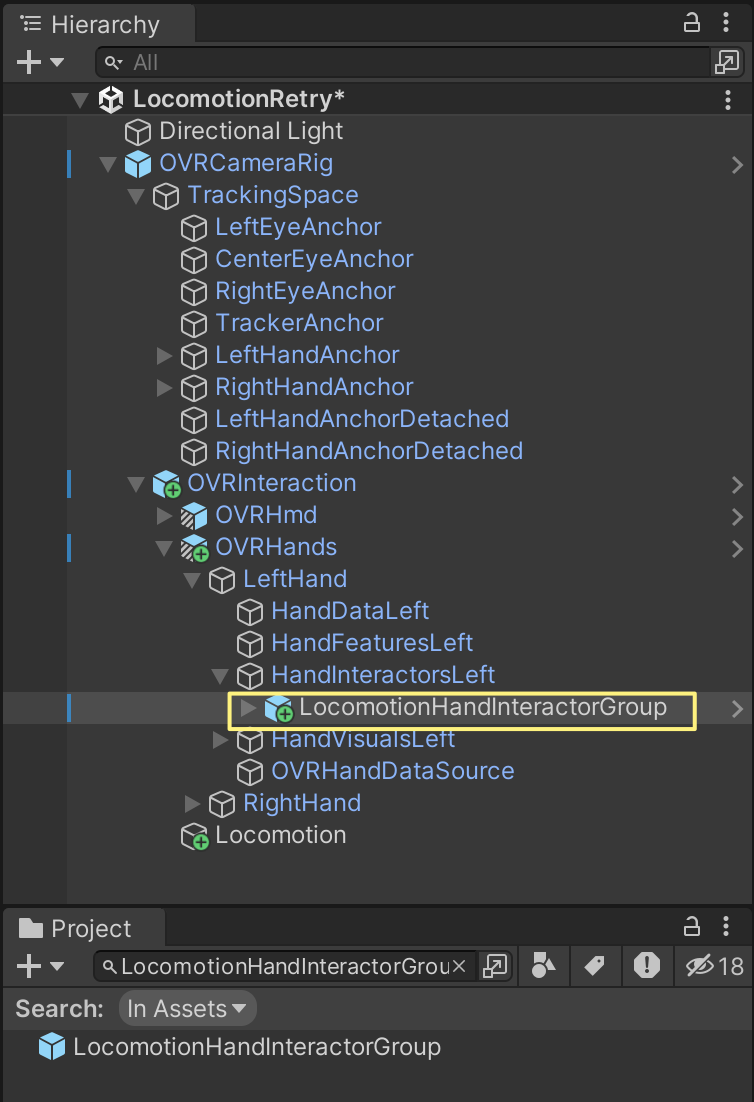
9. Project 창에서 LocomotionHandInteractorGroup 프리팹을 찾아 OVRInteraction/OVRHands/LeftHand/HandInteractorsLeft 자식으로 넣어준다
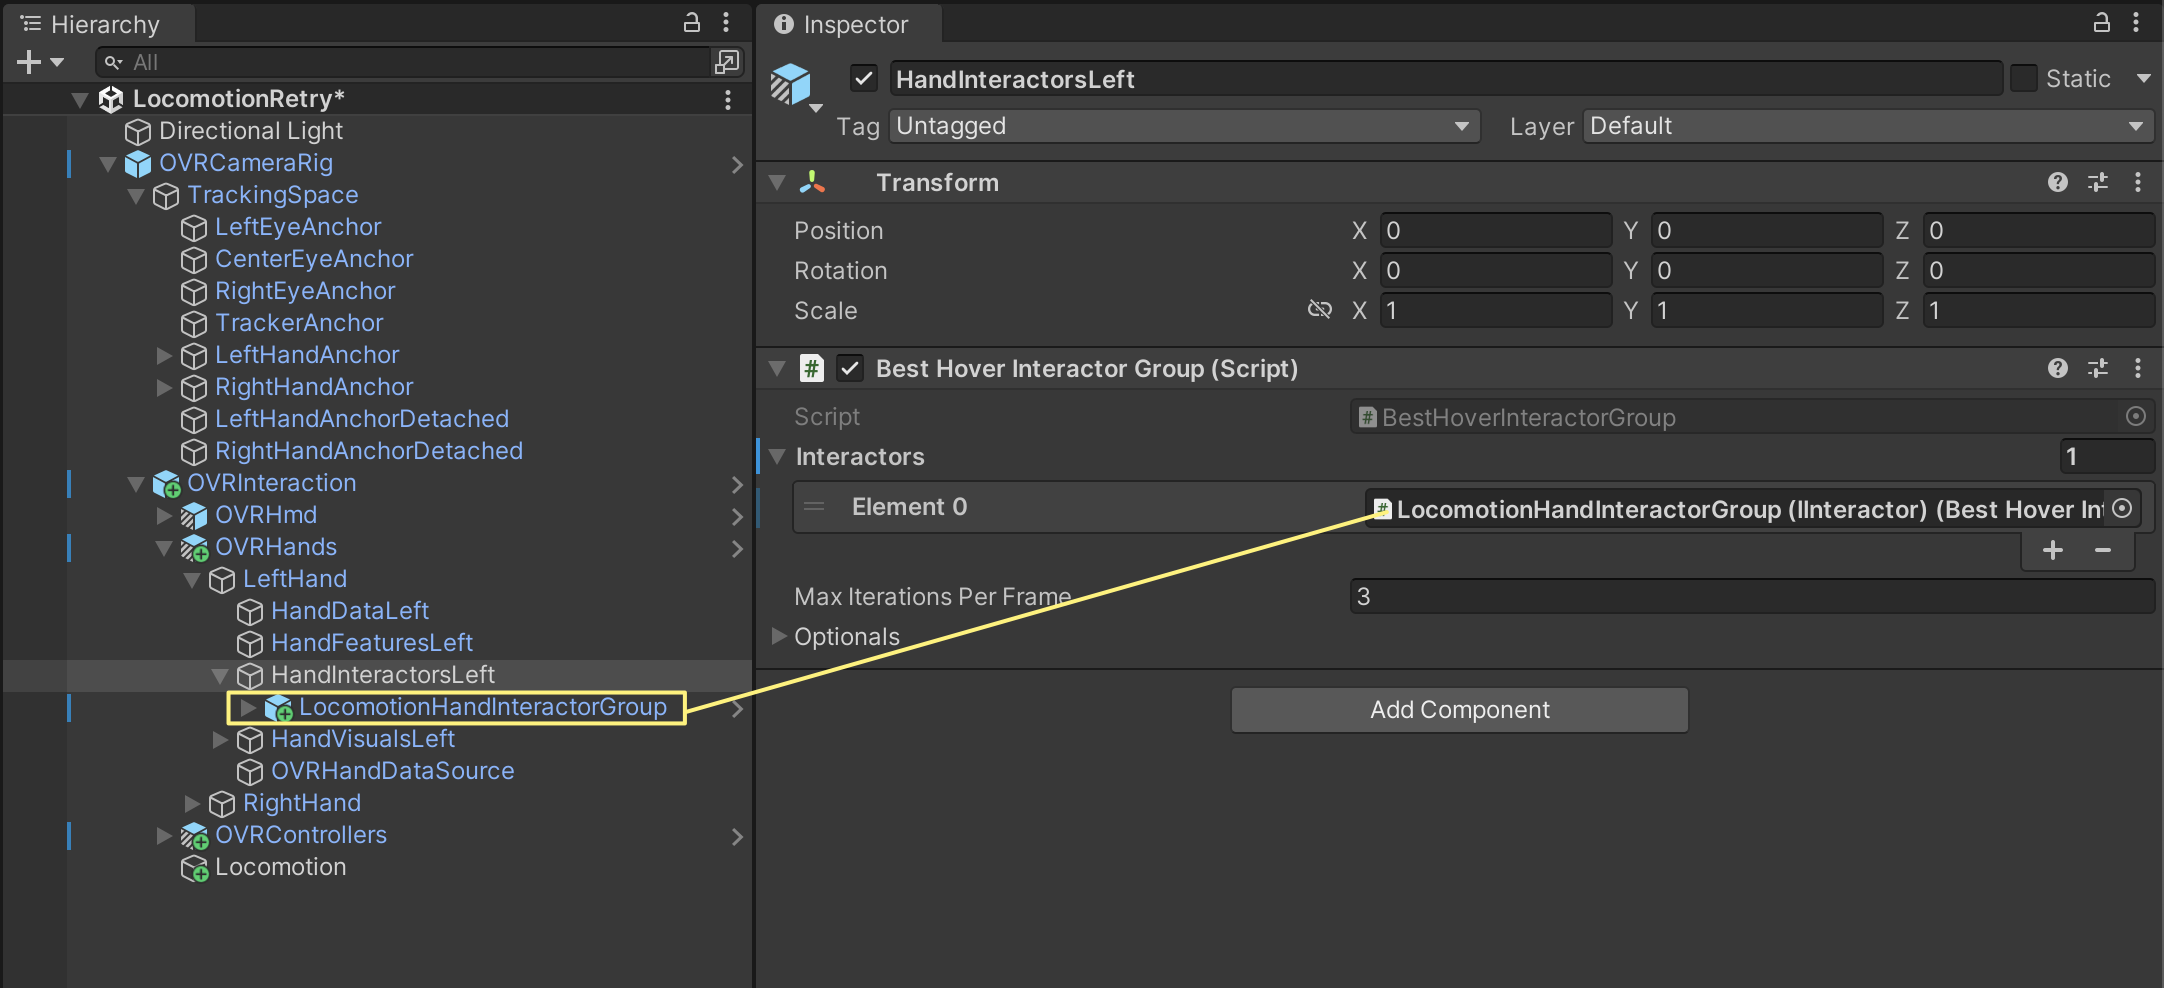
10. 하이어라키에서 HandInteractorsLeft를 선택 하고 Best Hover Interactor Group컴포넌트의 Interactors 속성에 + 버튼을 눌러 필드를 만들어 주고 위에서 넣은 LocomotionHandInteractorGroup을 할당한다
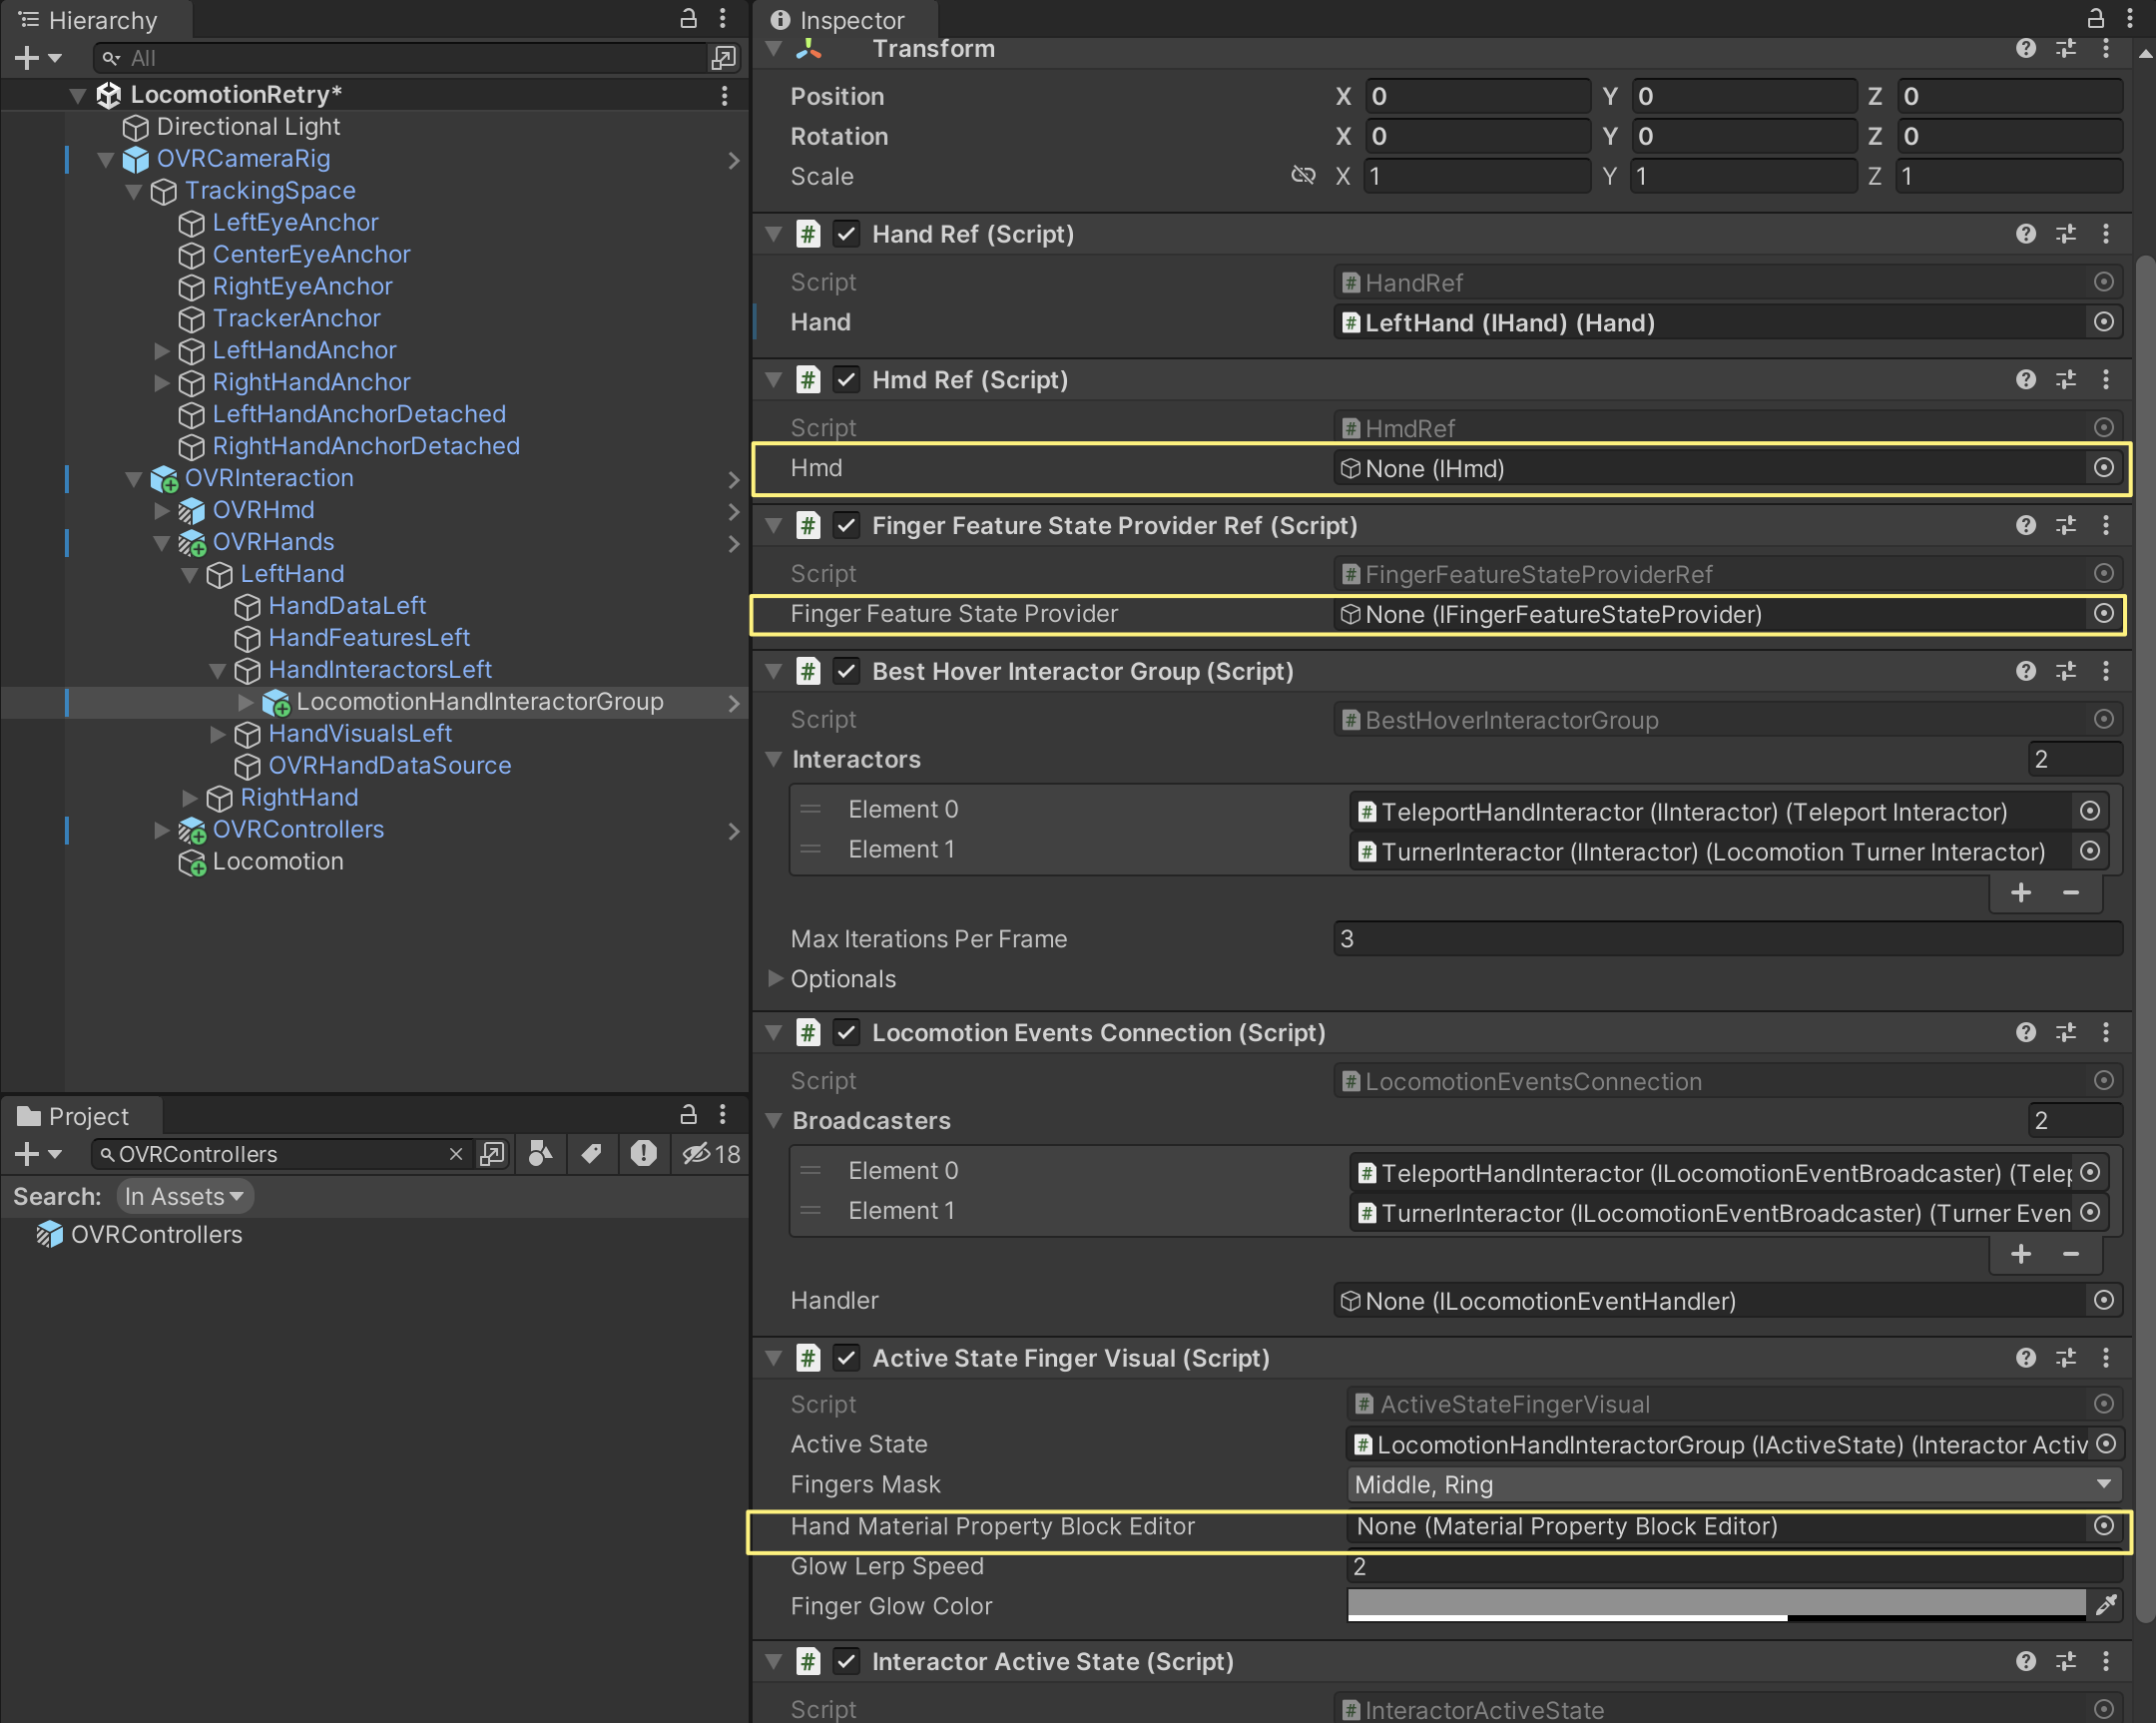
다음이 조금 복잡 한데 LocomotionHandInteractorGroup를 선택 하고 인스펙터를 보면 다음 3가지가 빠져 있다
이걸 모두 채워 넣으면 된다
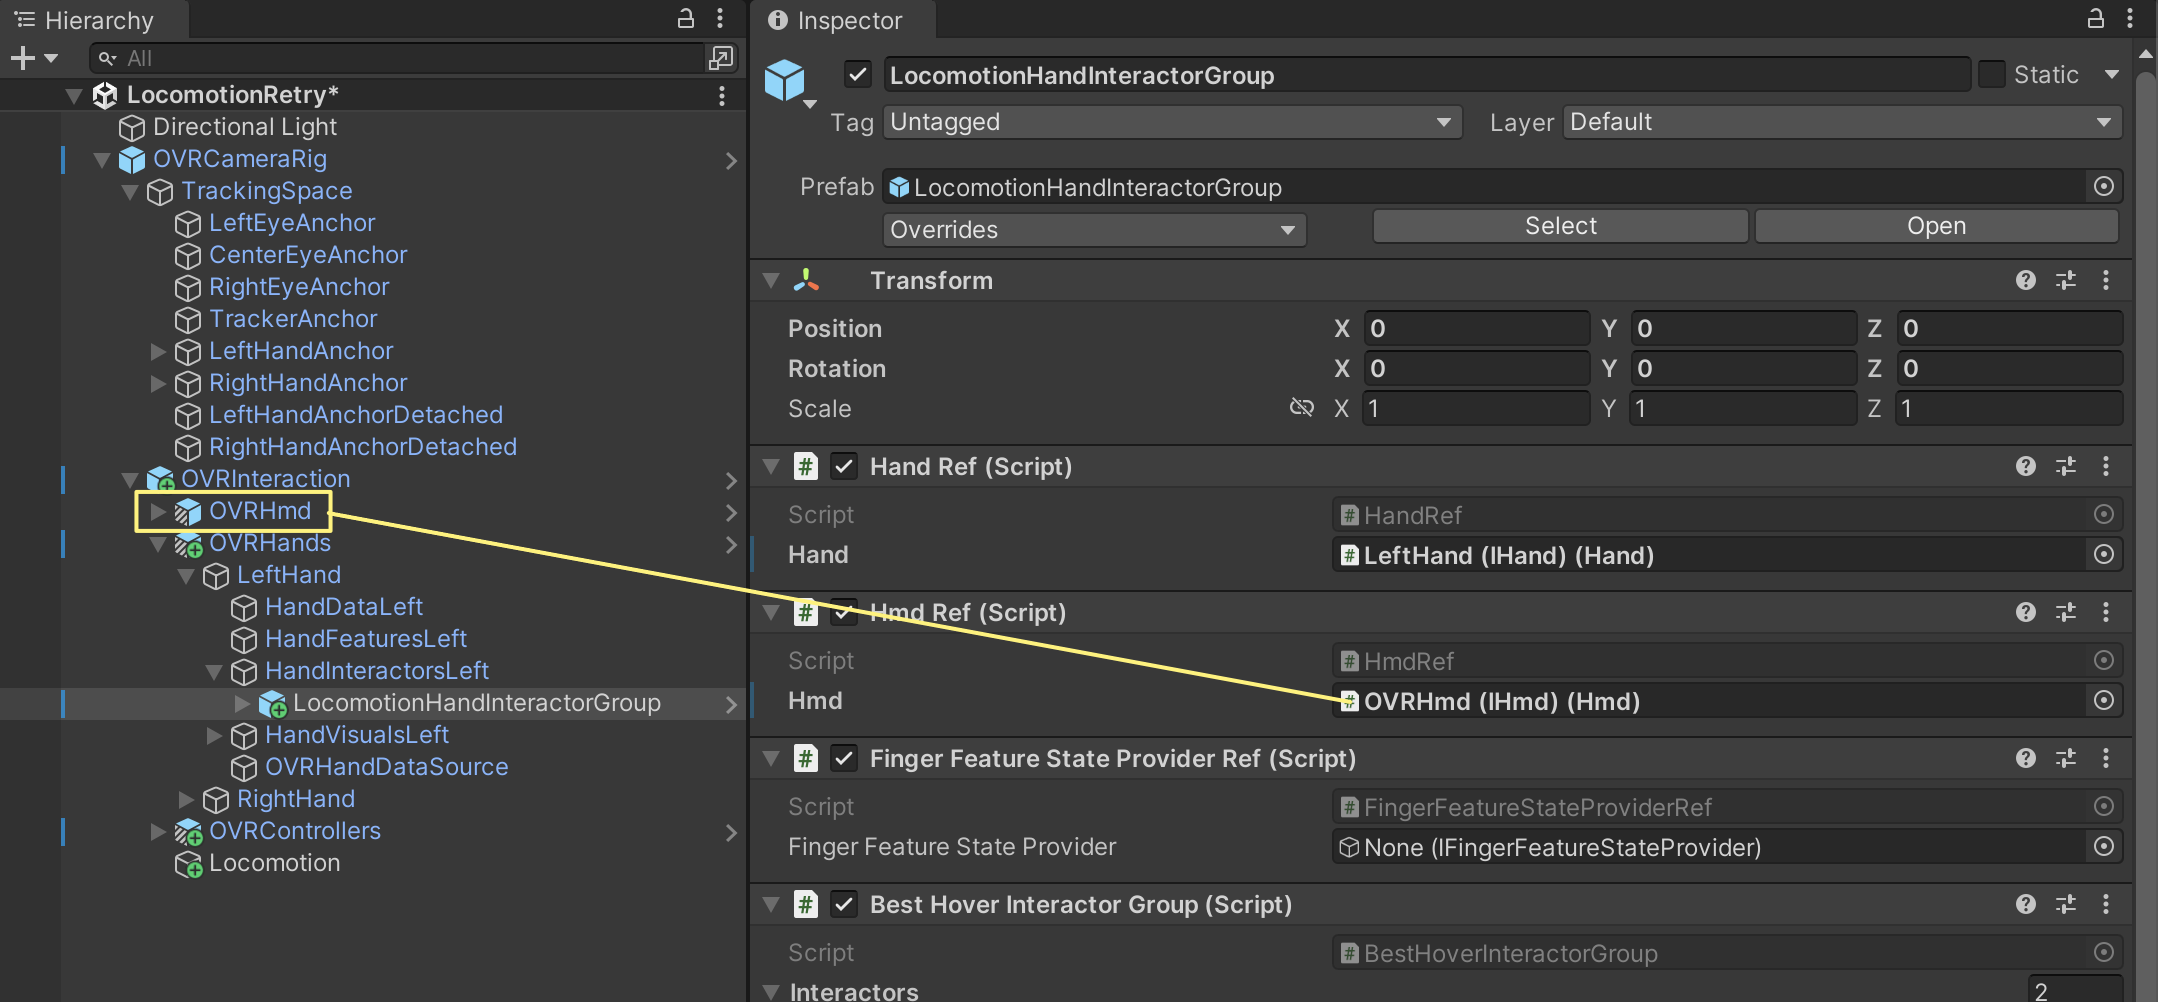
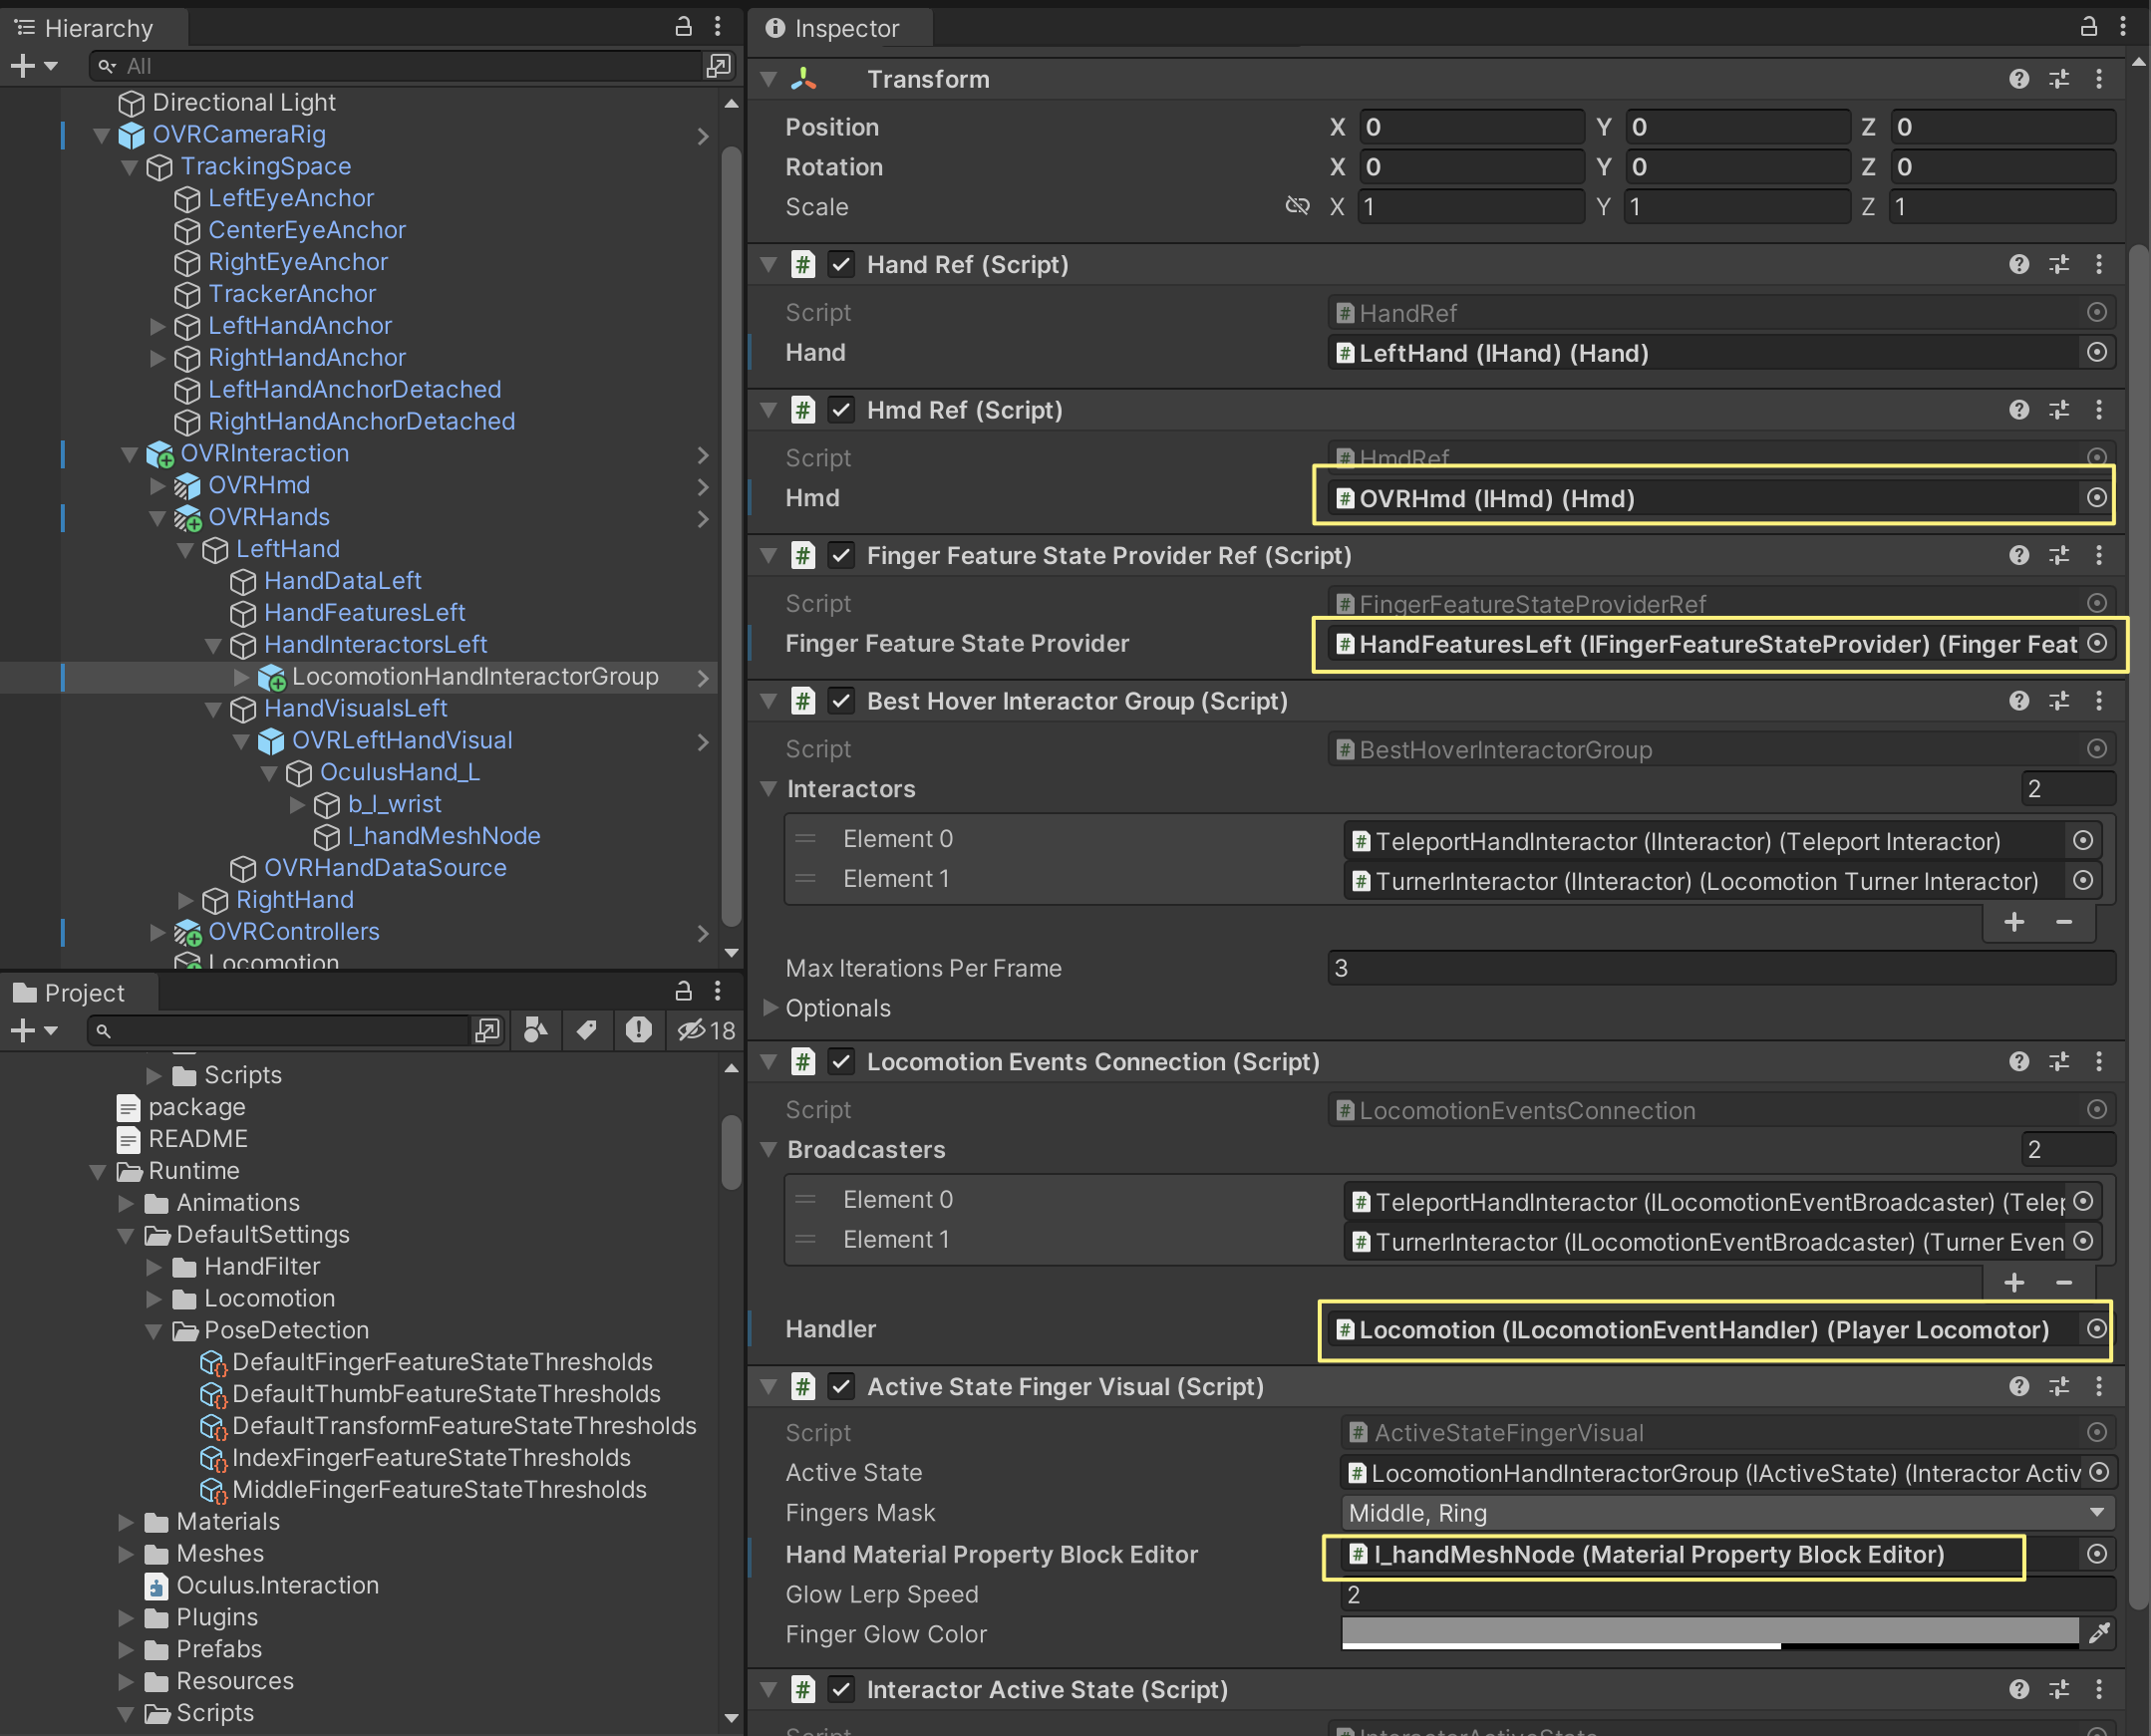
11. LocomotionHandInteractorGroup을 선택 하고 Hmd Ref컴포넌트의 Hmd 필드에 OVRInteraction/OVRHmd 를 넣어 준다
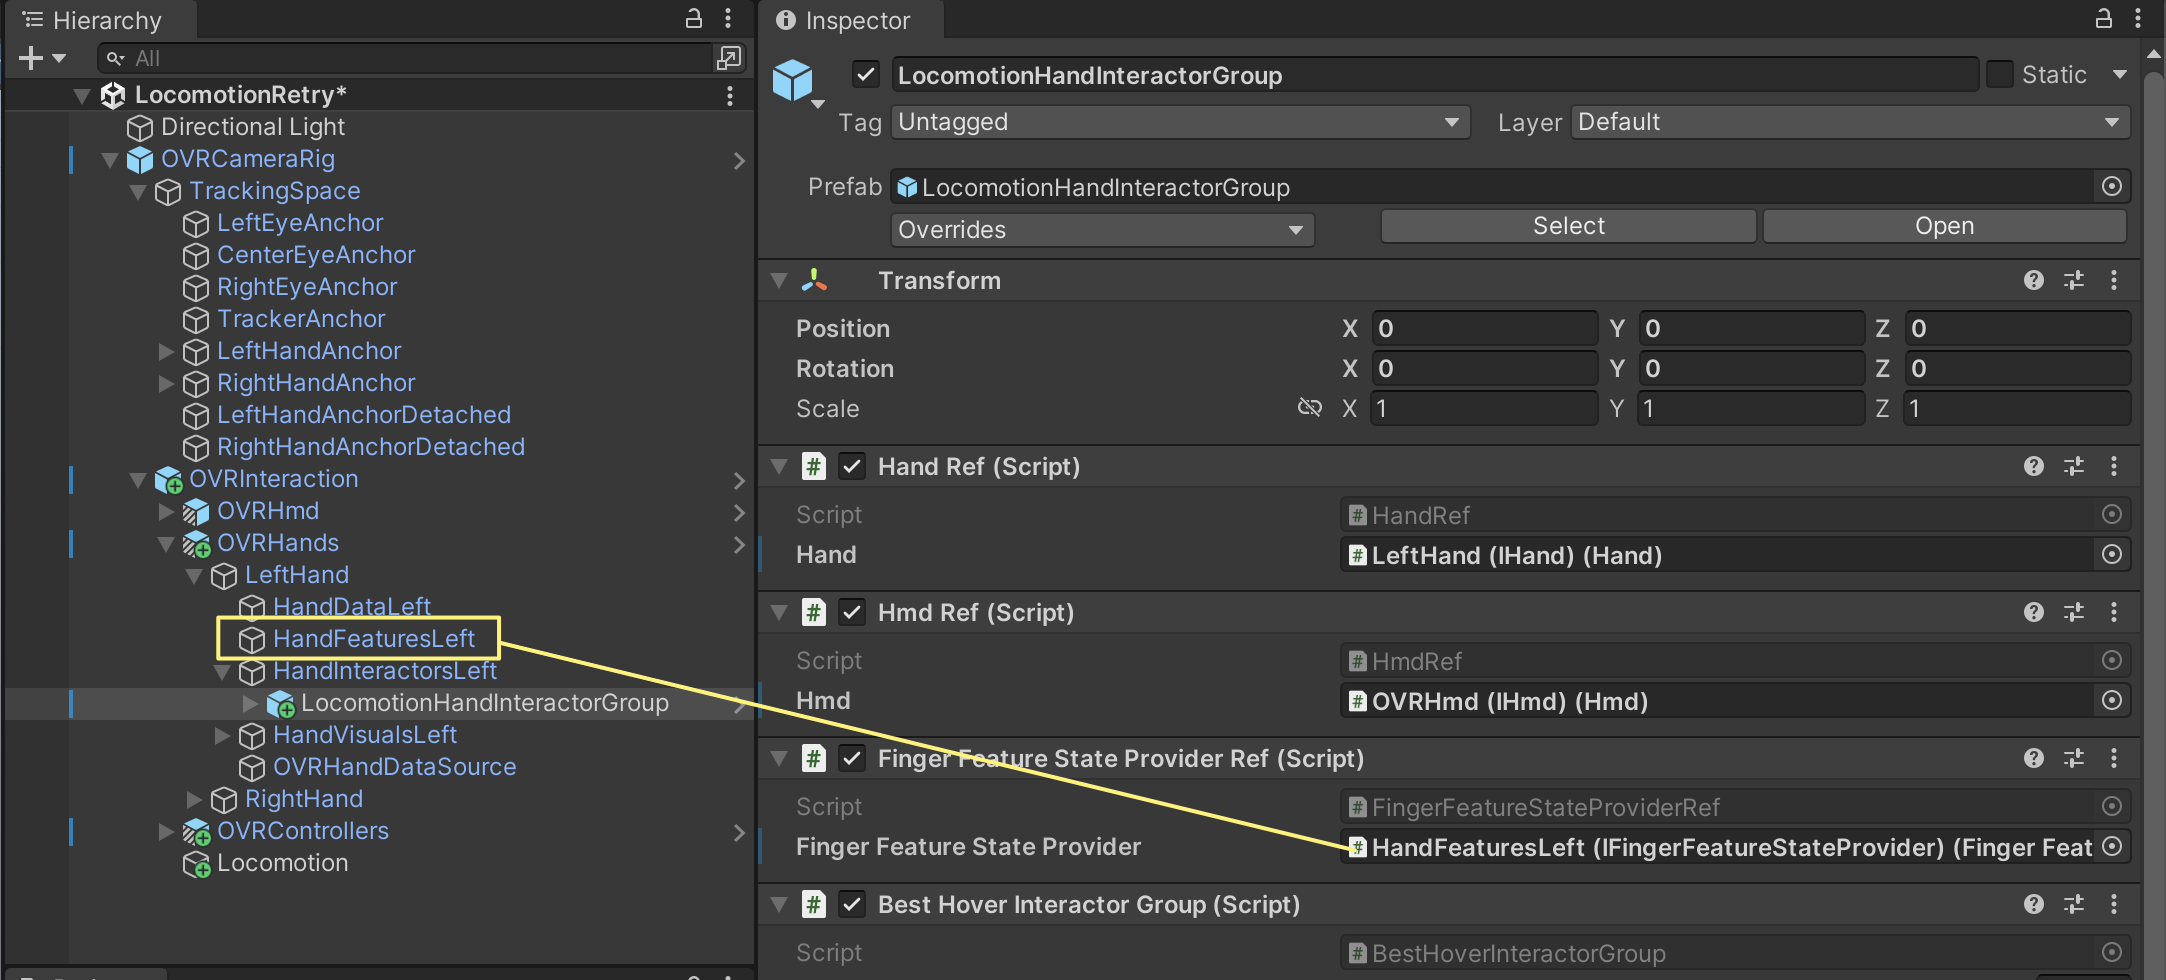
12. Finger Feature State Provider Ref 컴포넌트의 Finger Feature State Provider 필드에 LeftHand/HandFeaturesLeft를 넣어줘야 하는데 안들어 갈거다
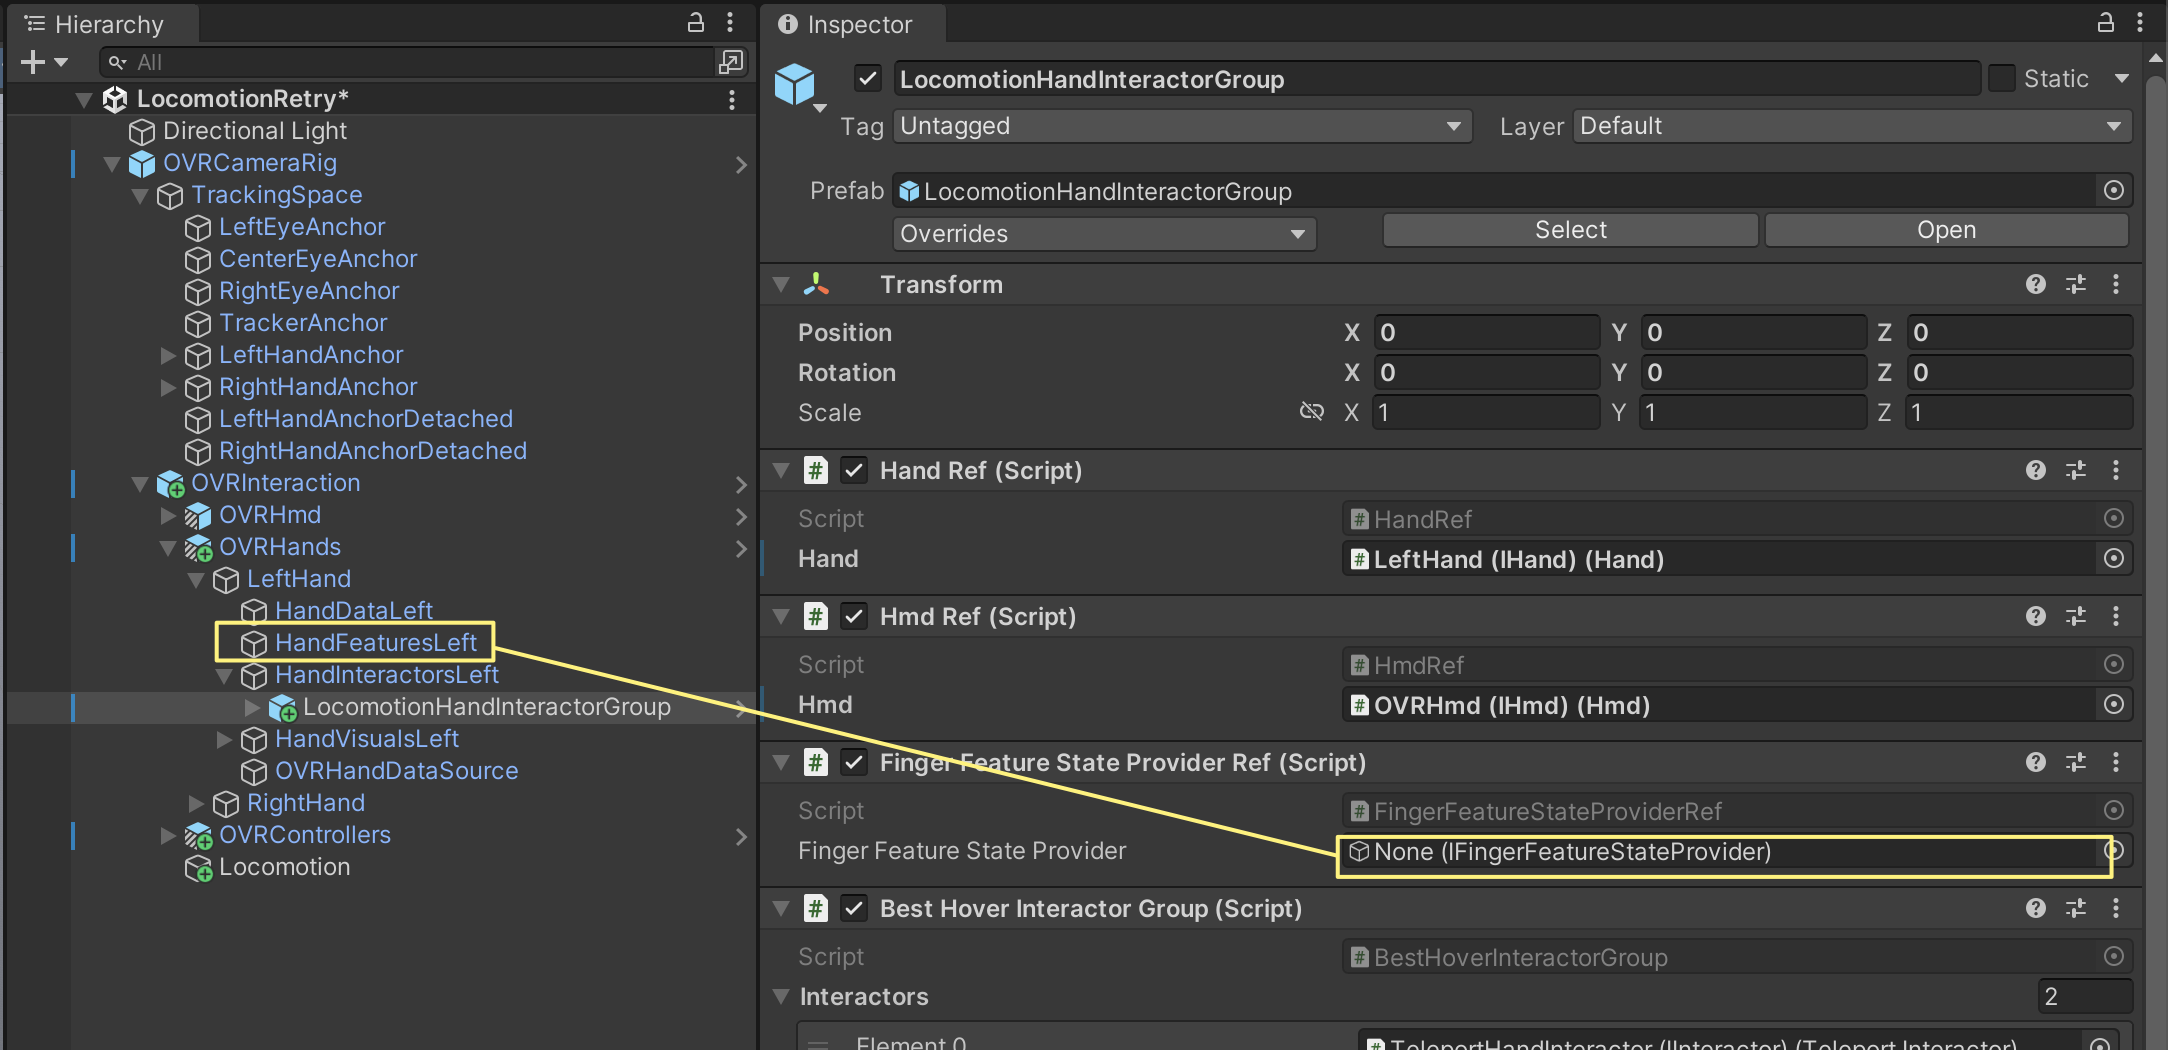
Finger Feature State Provider 컴포넌트가 없어서 그런거다
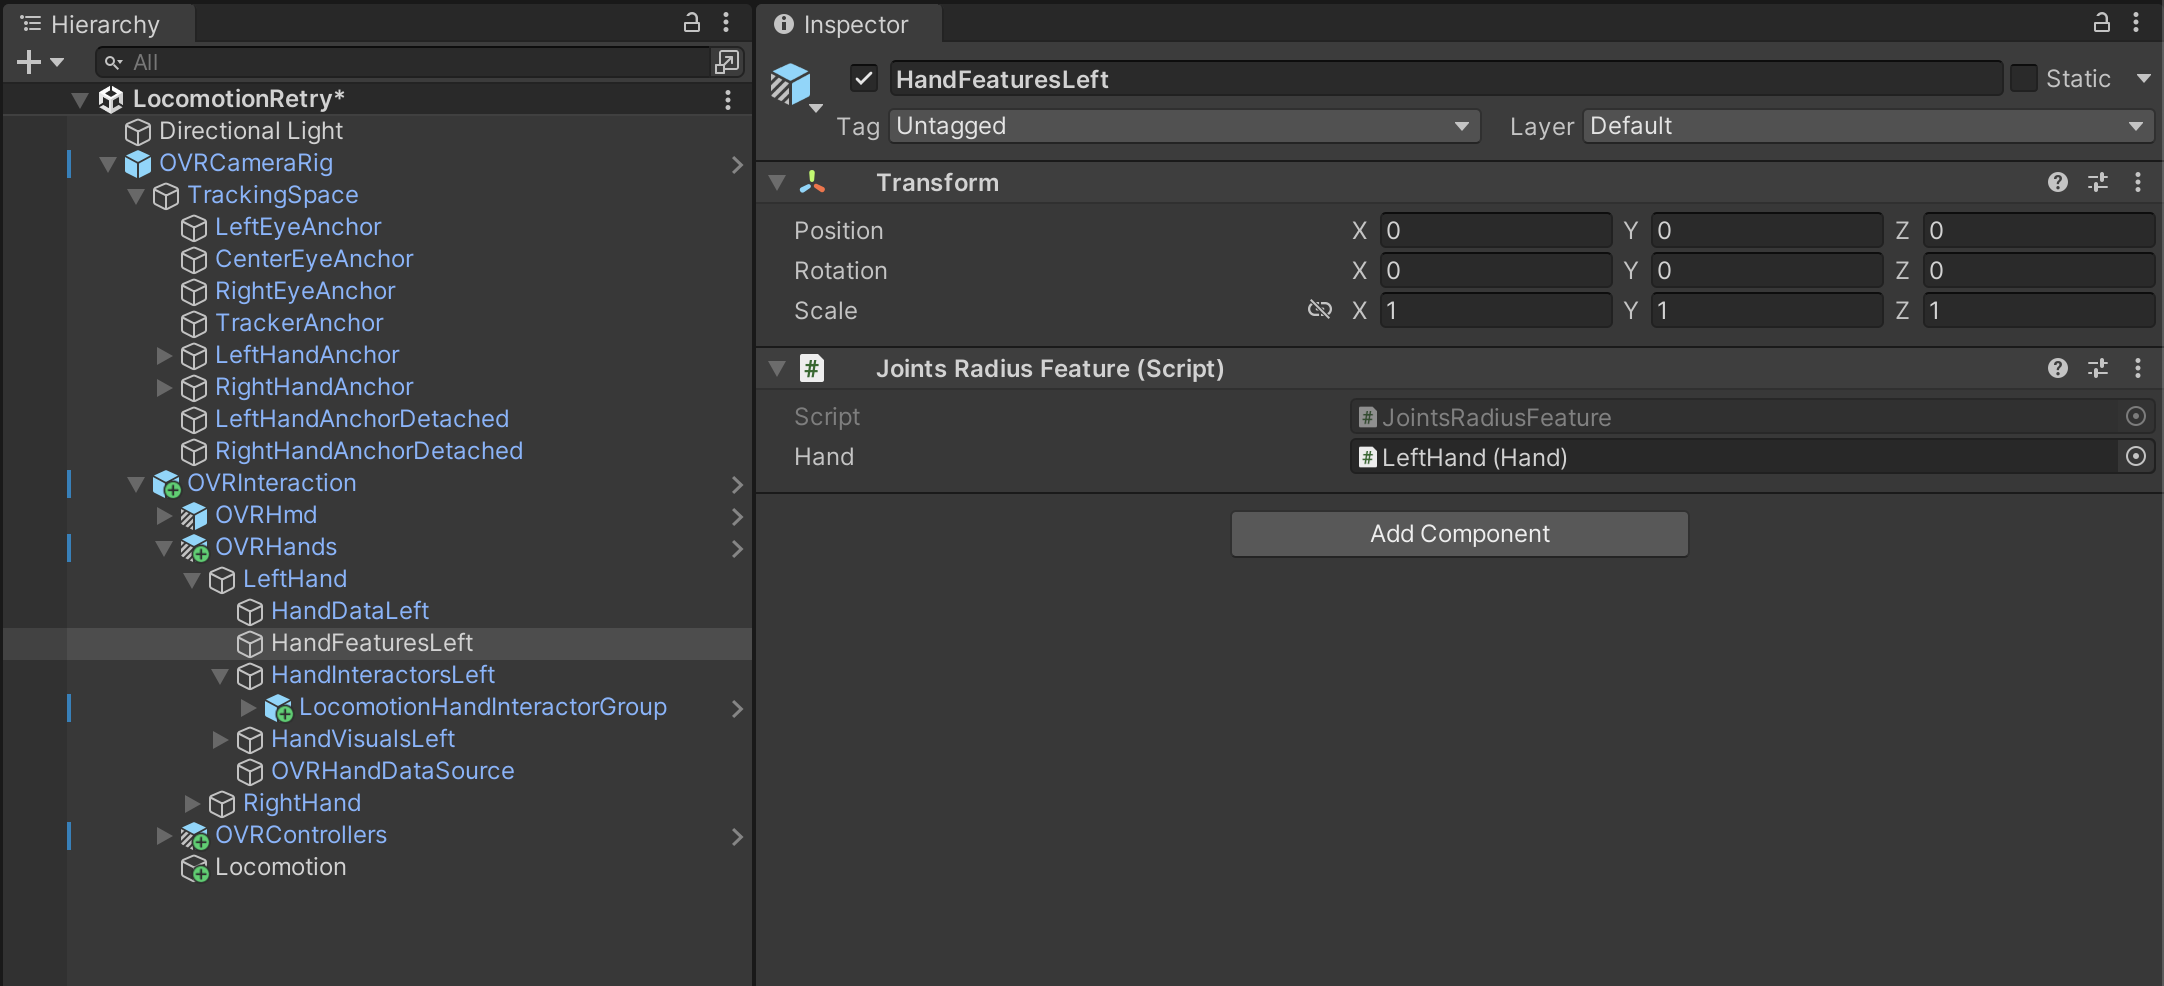
Add Component를 눌러 추가 해주자
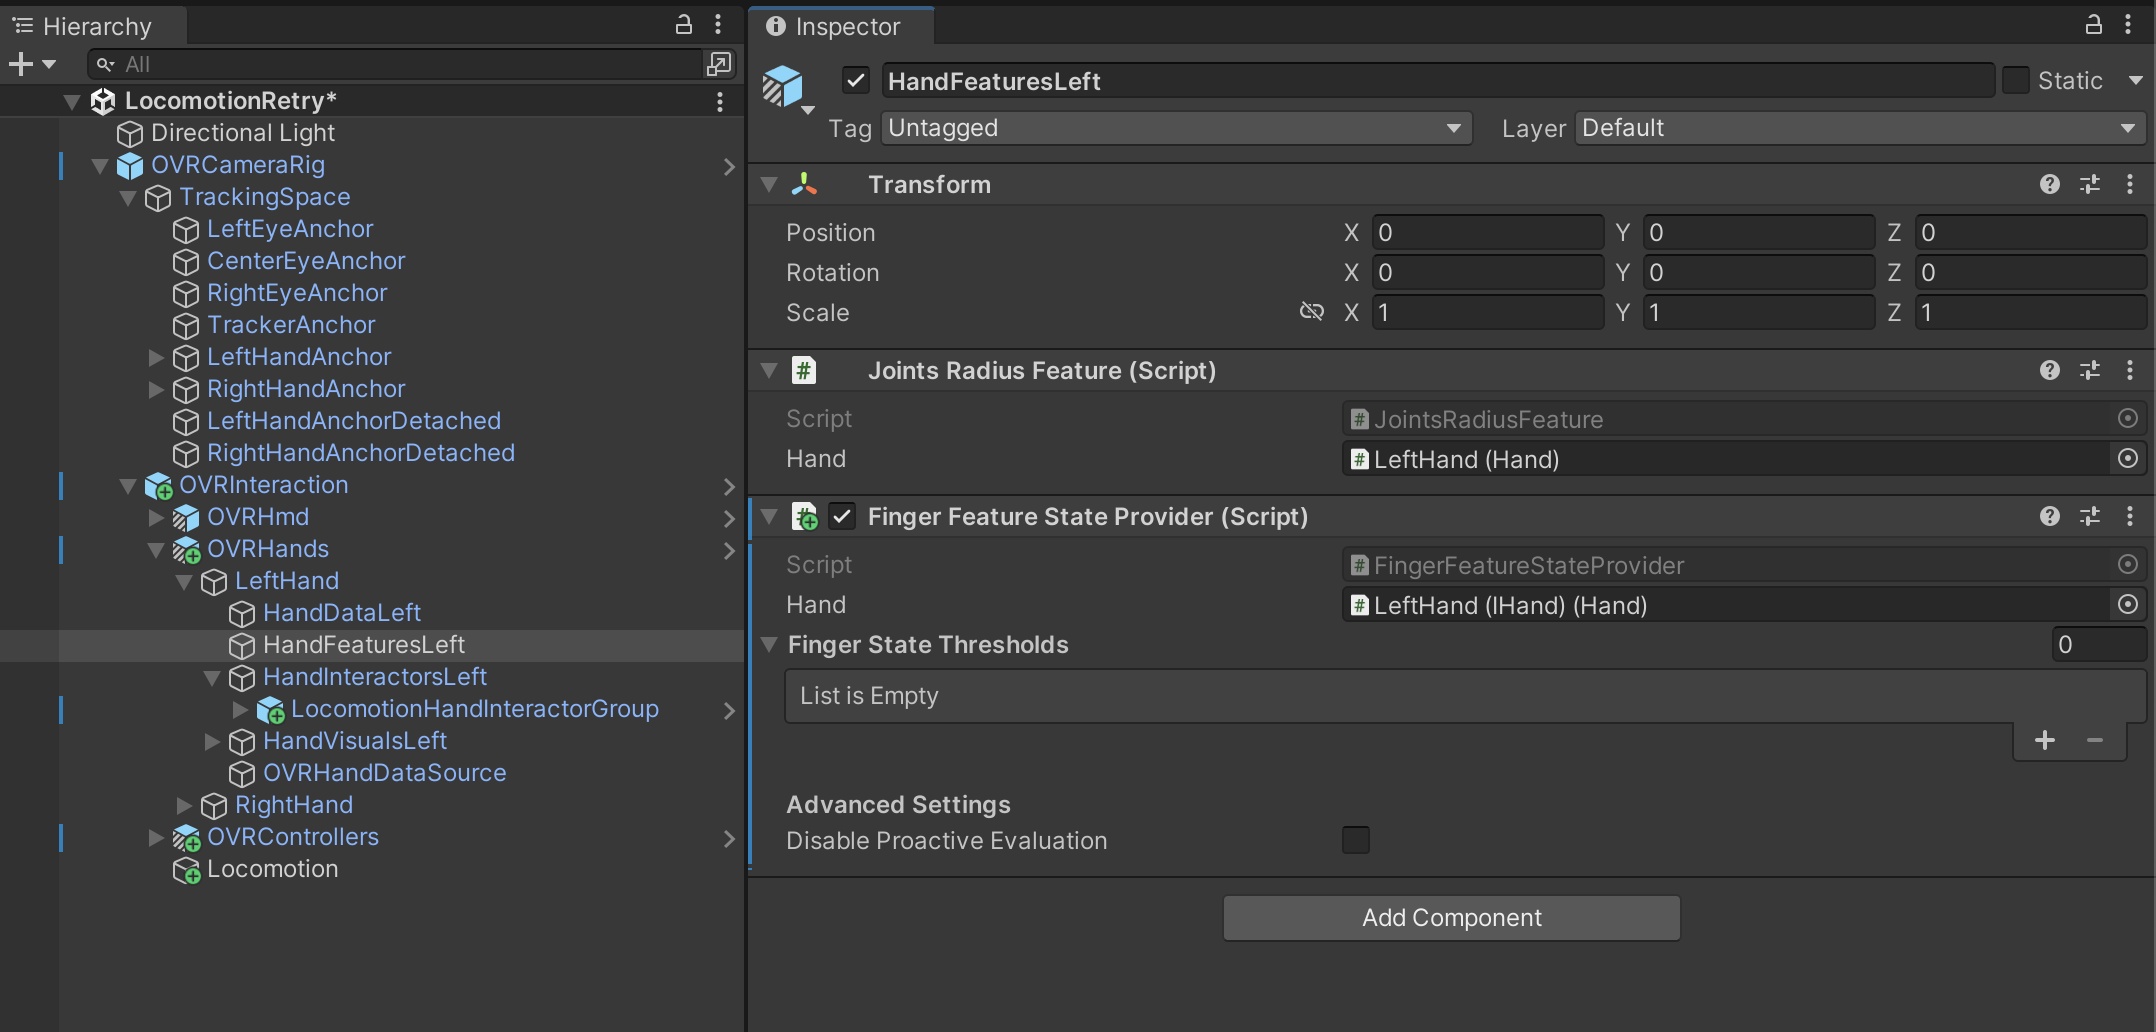
13. Finger State Thresholds 필드를 5개 만들어 주고
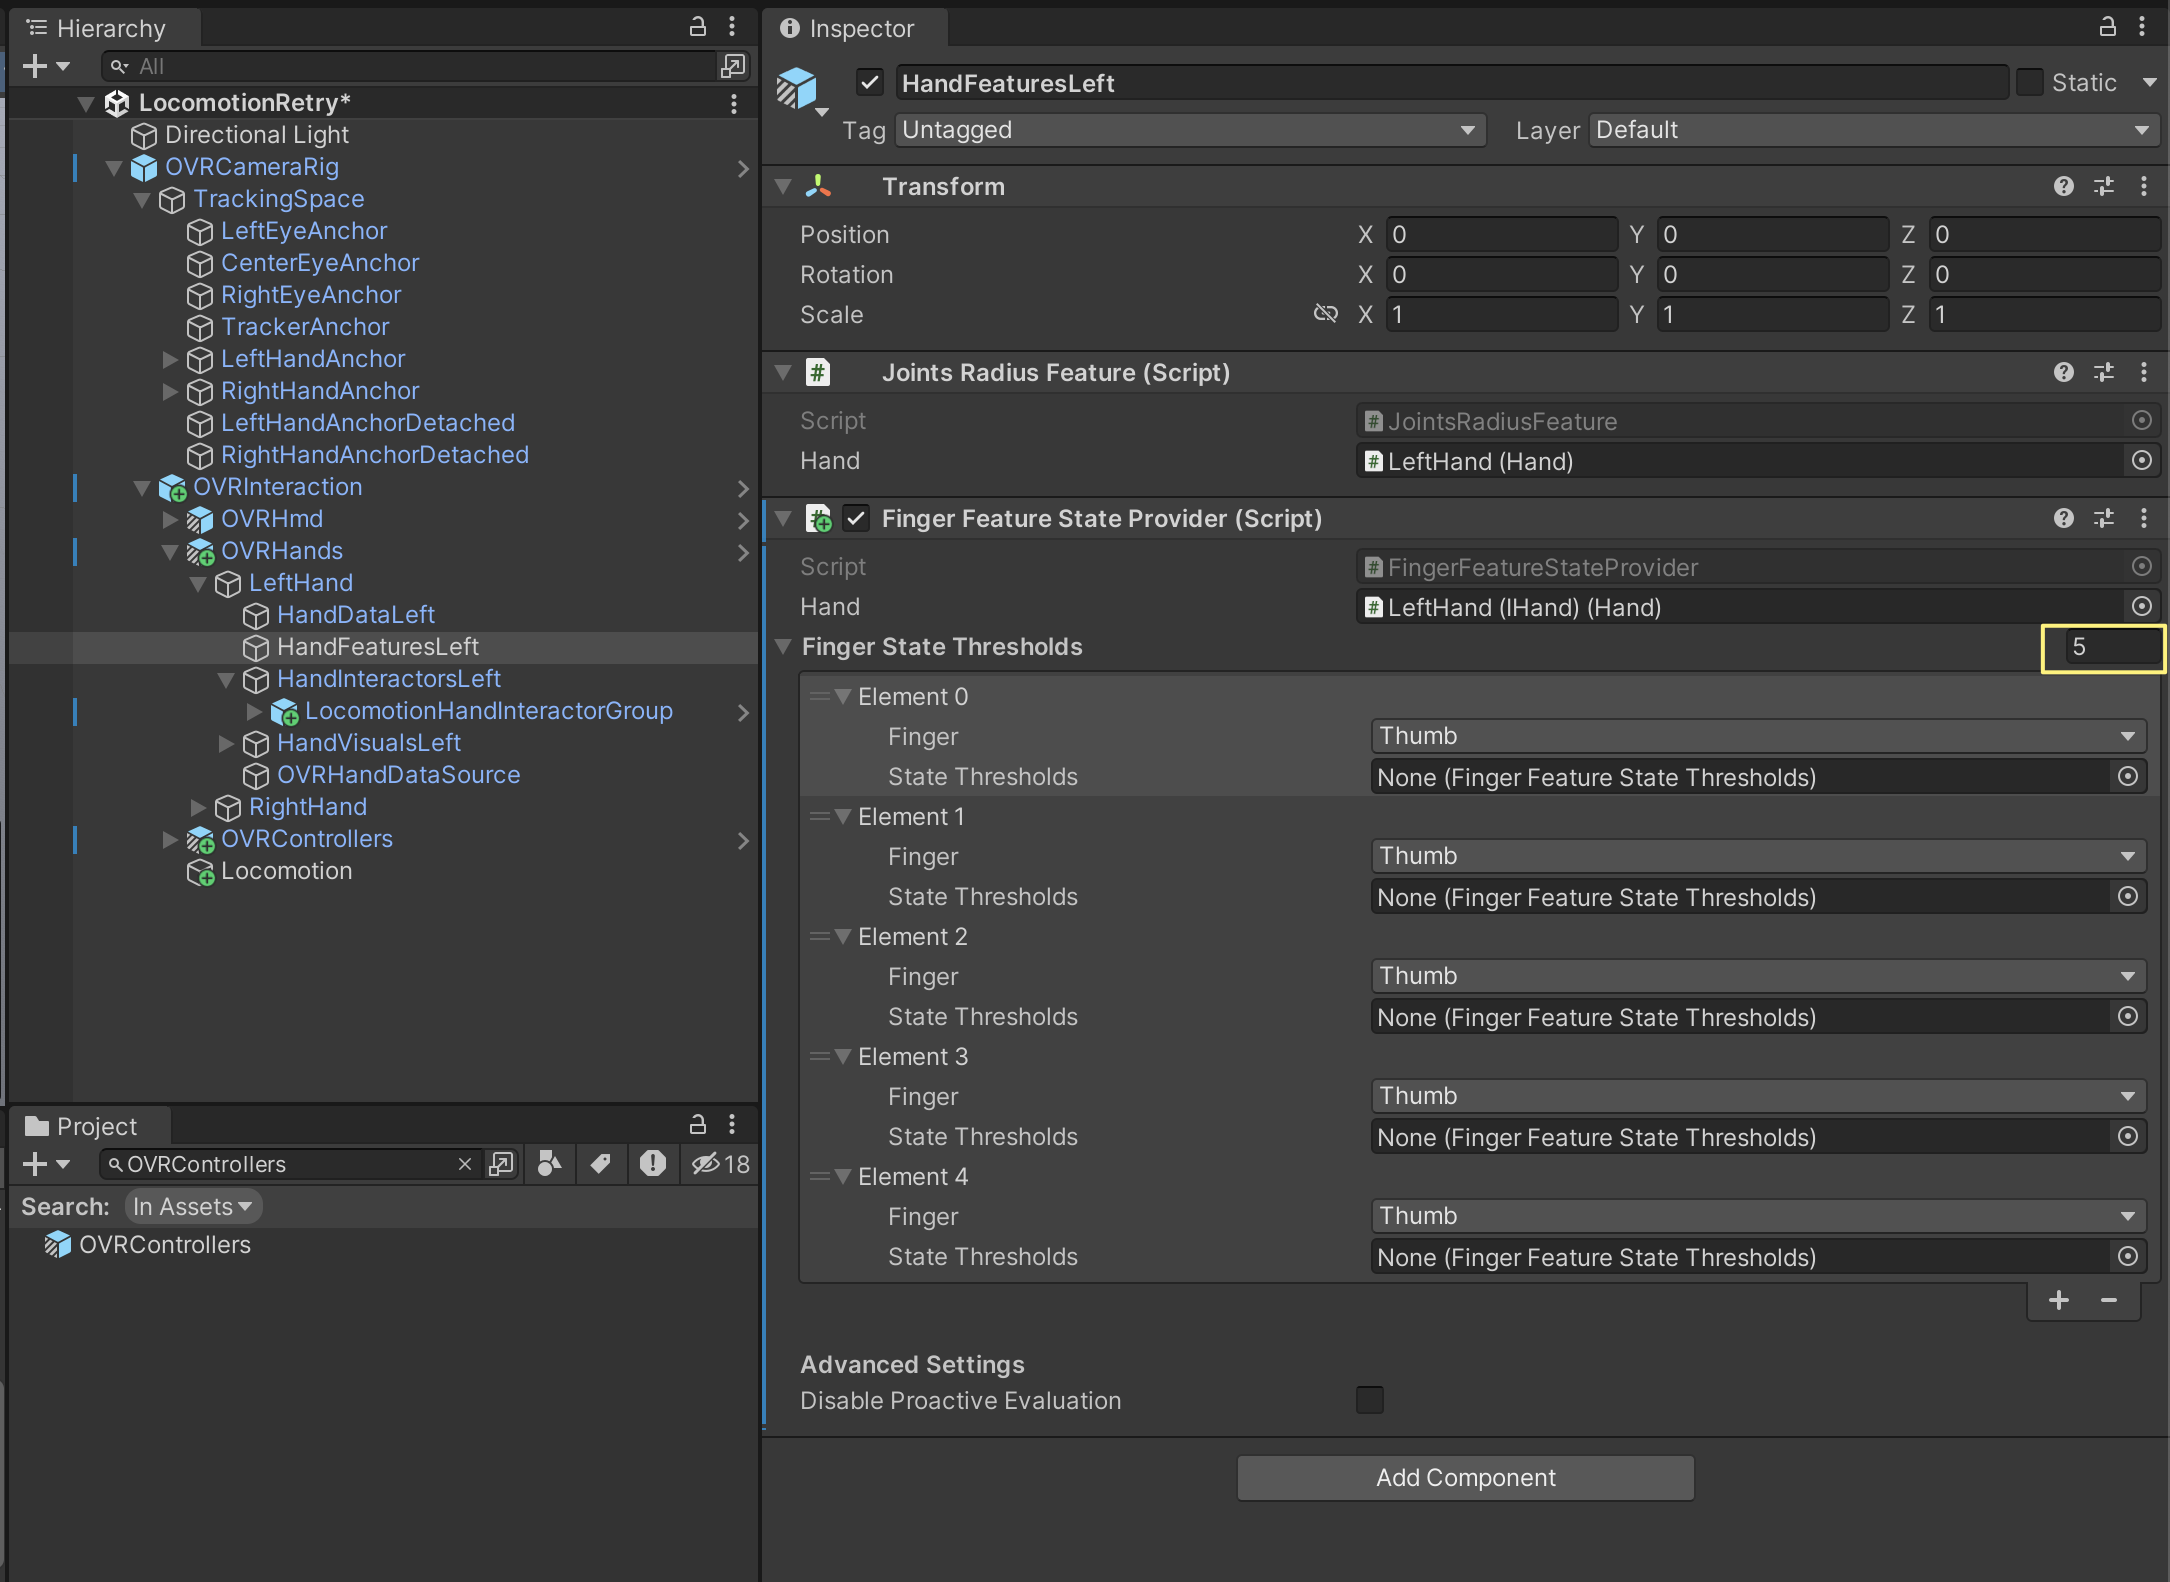
Finger를 각각 Thumb, Index, Middle, Ring, Pinky를 차레대로 설정 하고
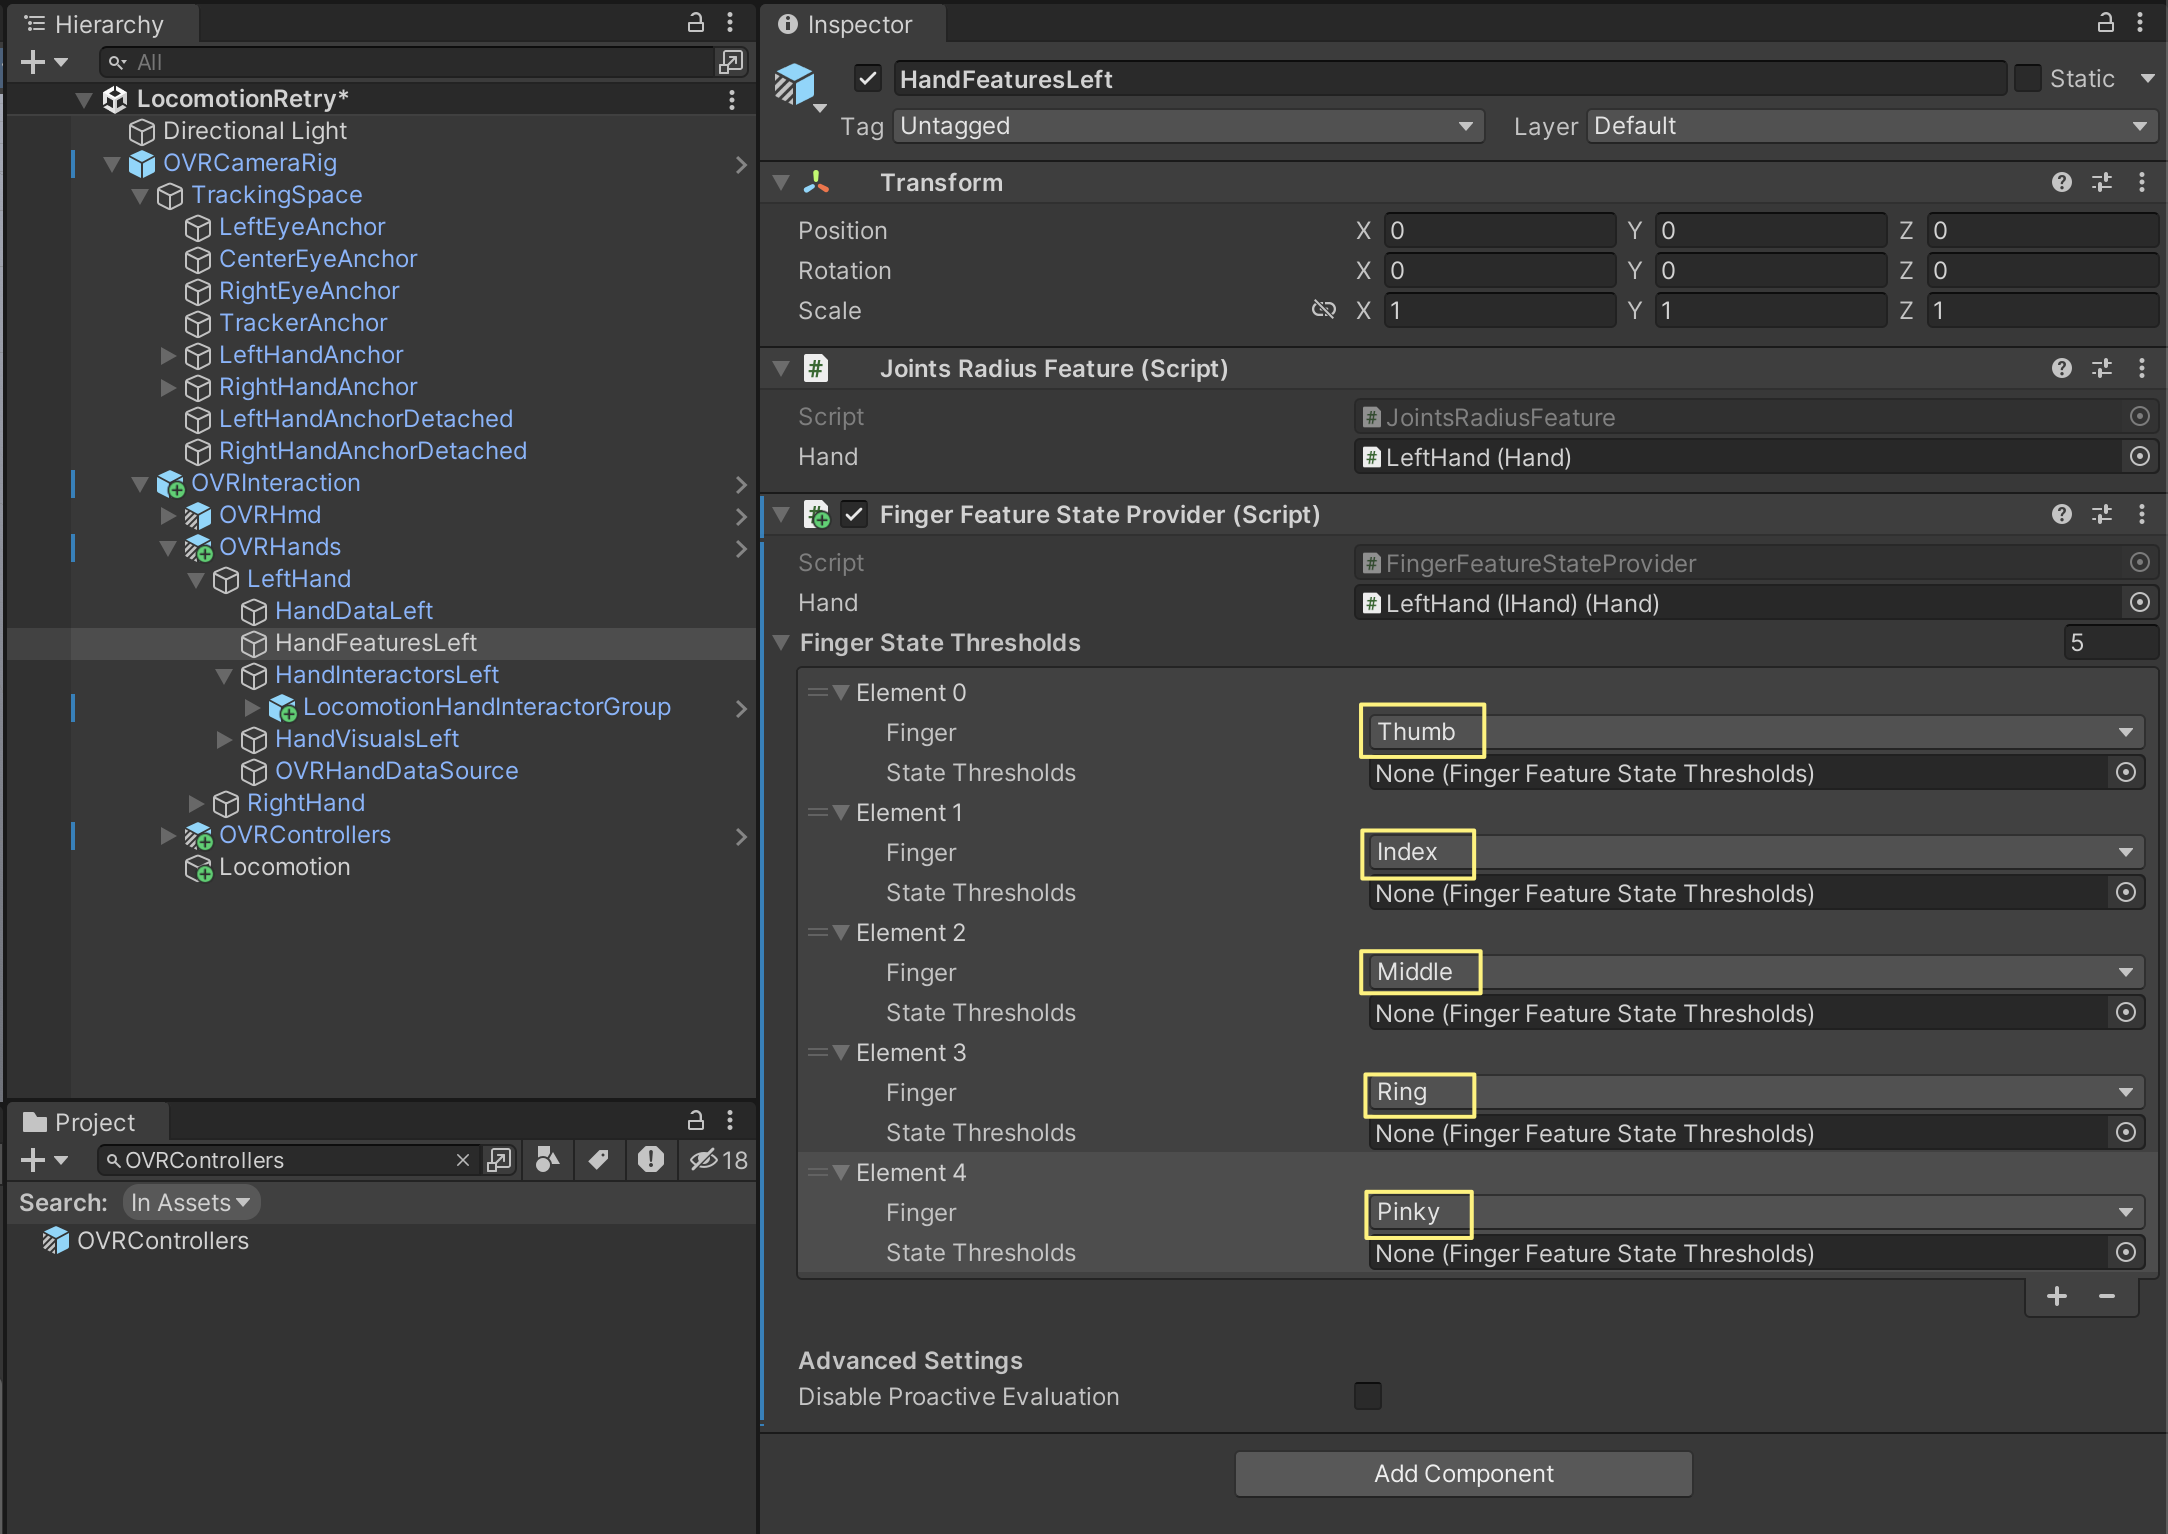
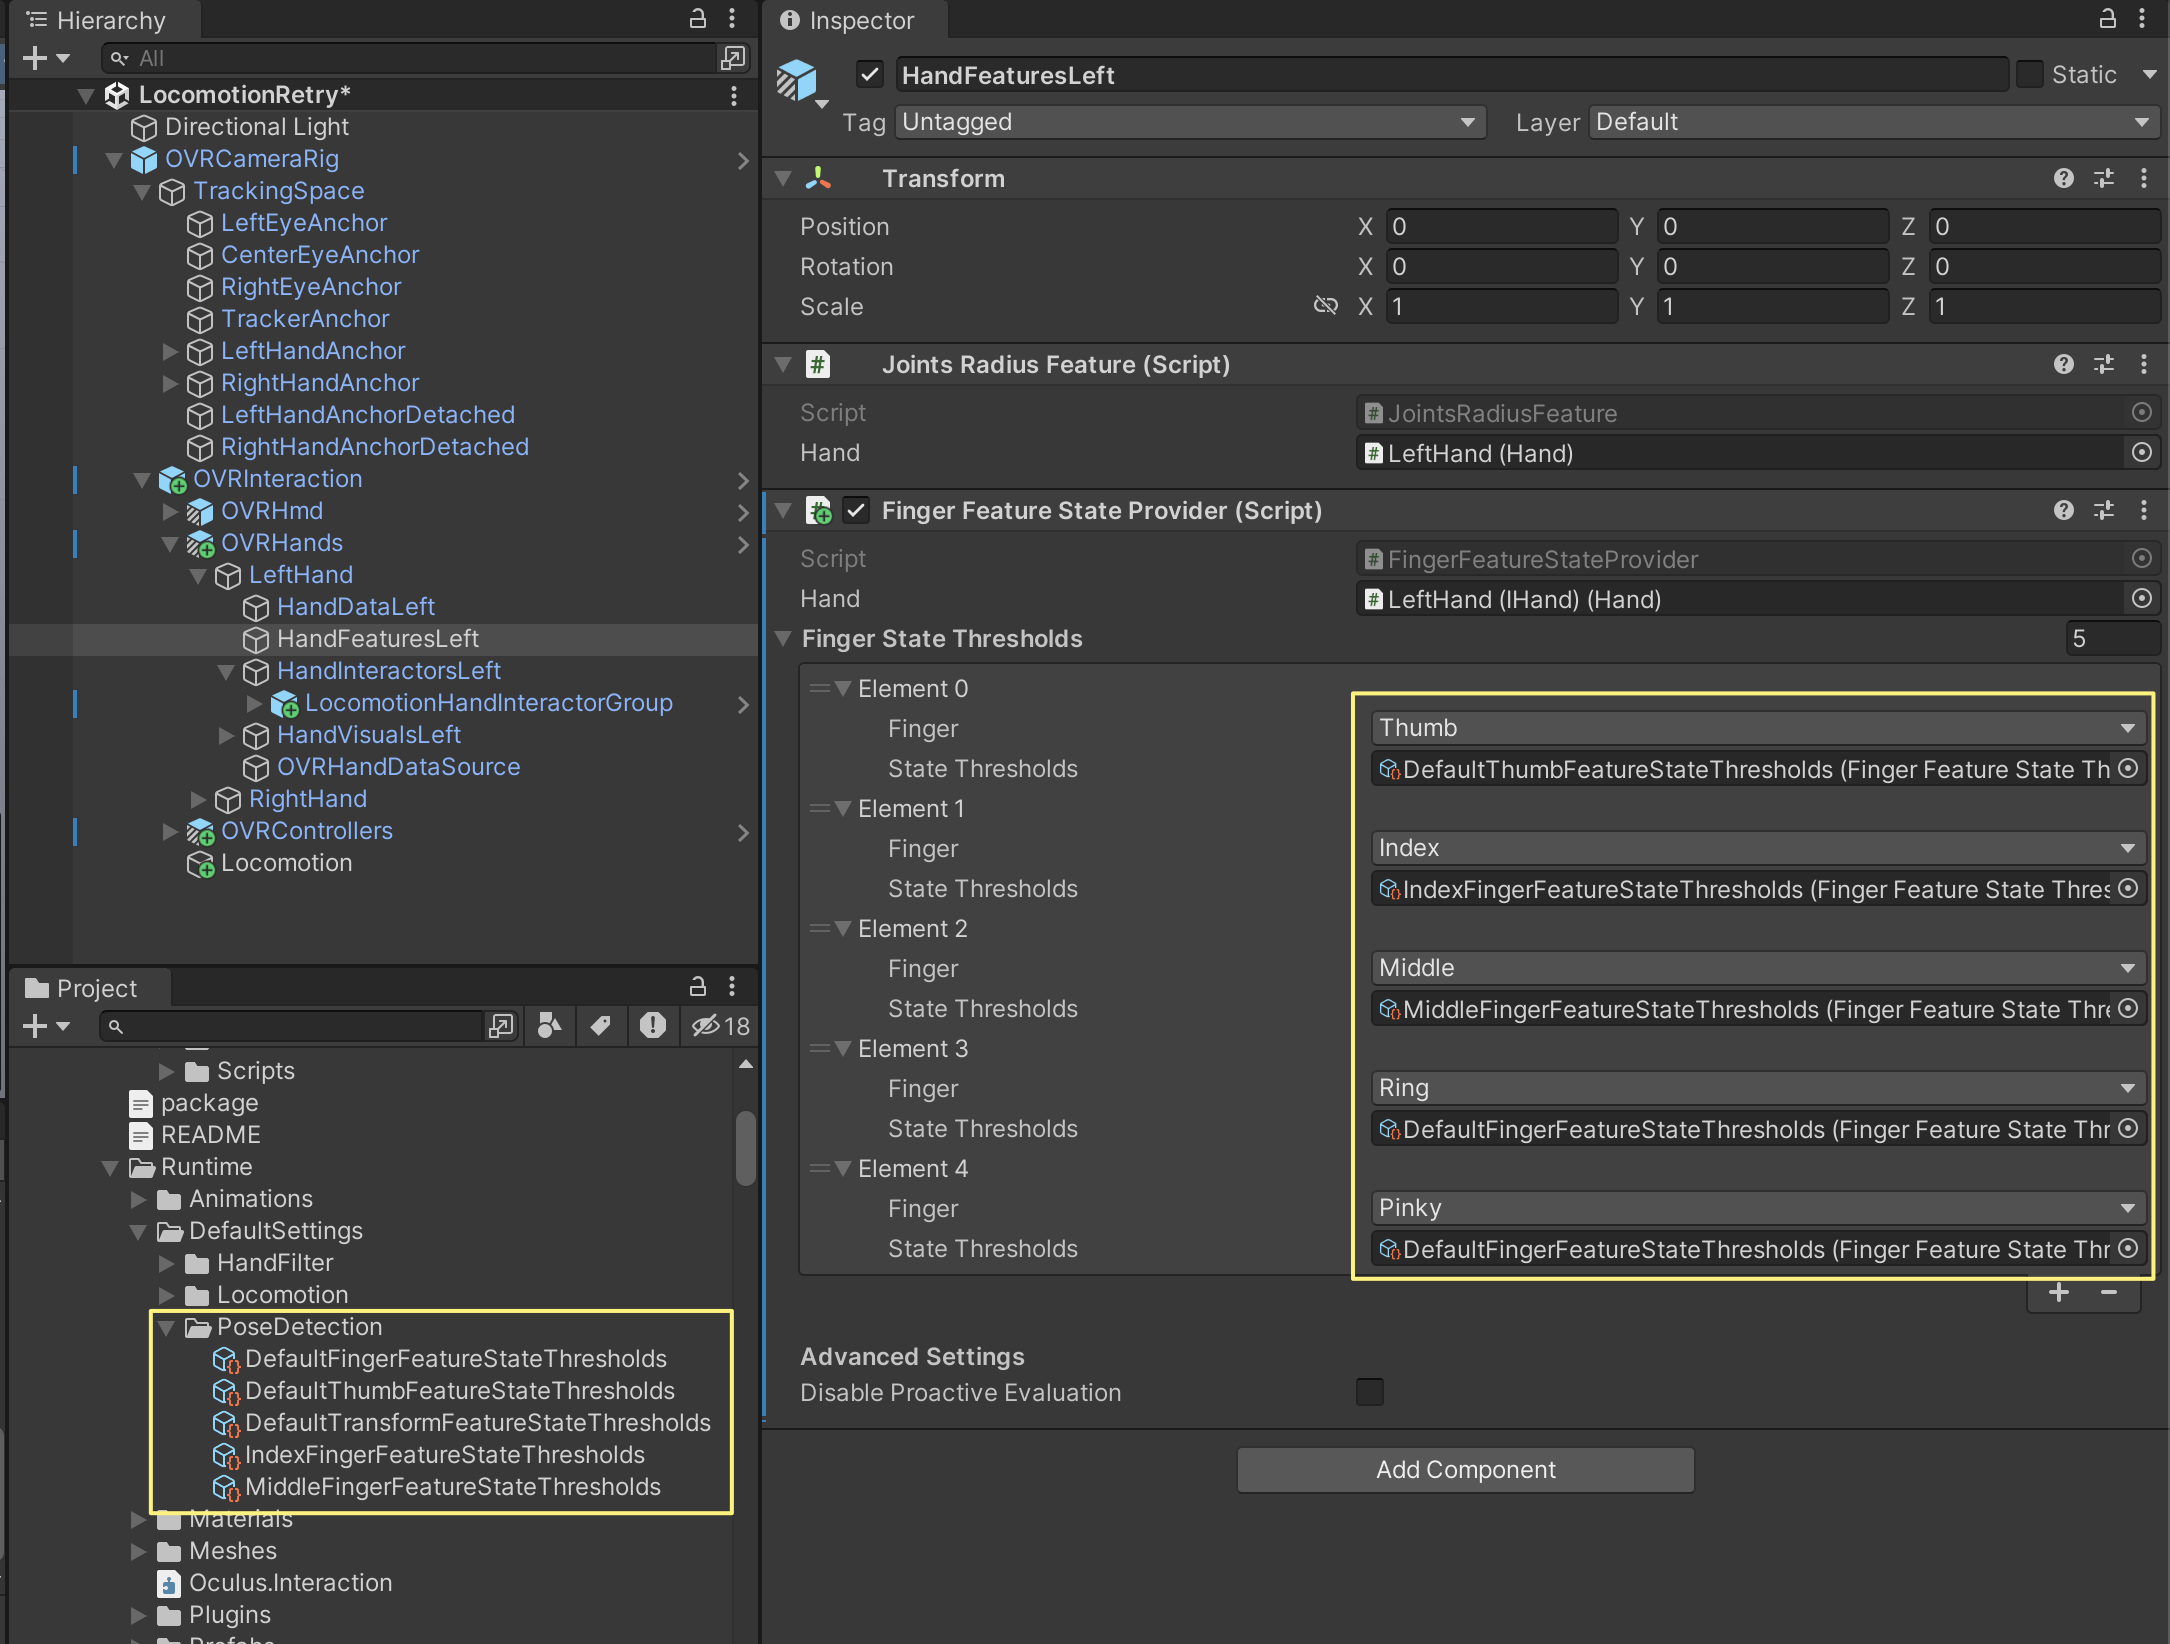
State Threshoulds에 DefaultThumbFeatureStateThresholds, IndexFingerFeatureStateThresholds, MiddleFingerFeatureStateThresholds, DefaultFingerFeatureStateThresholds, DefaultFingerFeatureStateThresholds를 차례대로 넣어준다
(Oculus/Interaction/Runtime/DefaultSettings/PoseDetection 에 있다 )
14. 이제 LocomotionHandInteractorGroup를 다시 선택 하고 Finger Feature State Provider Ref 컴포넌트의 Finger Feature State Provider 필드에 LeftHand/HandFeaturesLeft를 넣어준다
15.LocomotionHandInteractorGroup를 선택 하고 Locomotion Events Connection 컴포넌트의 Handler에 위에서 만든 (8번) Locomotion을 넣어준다
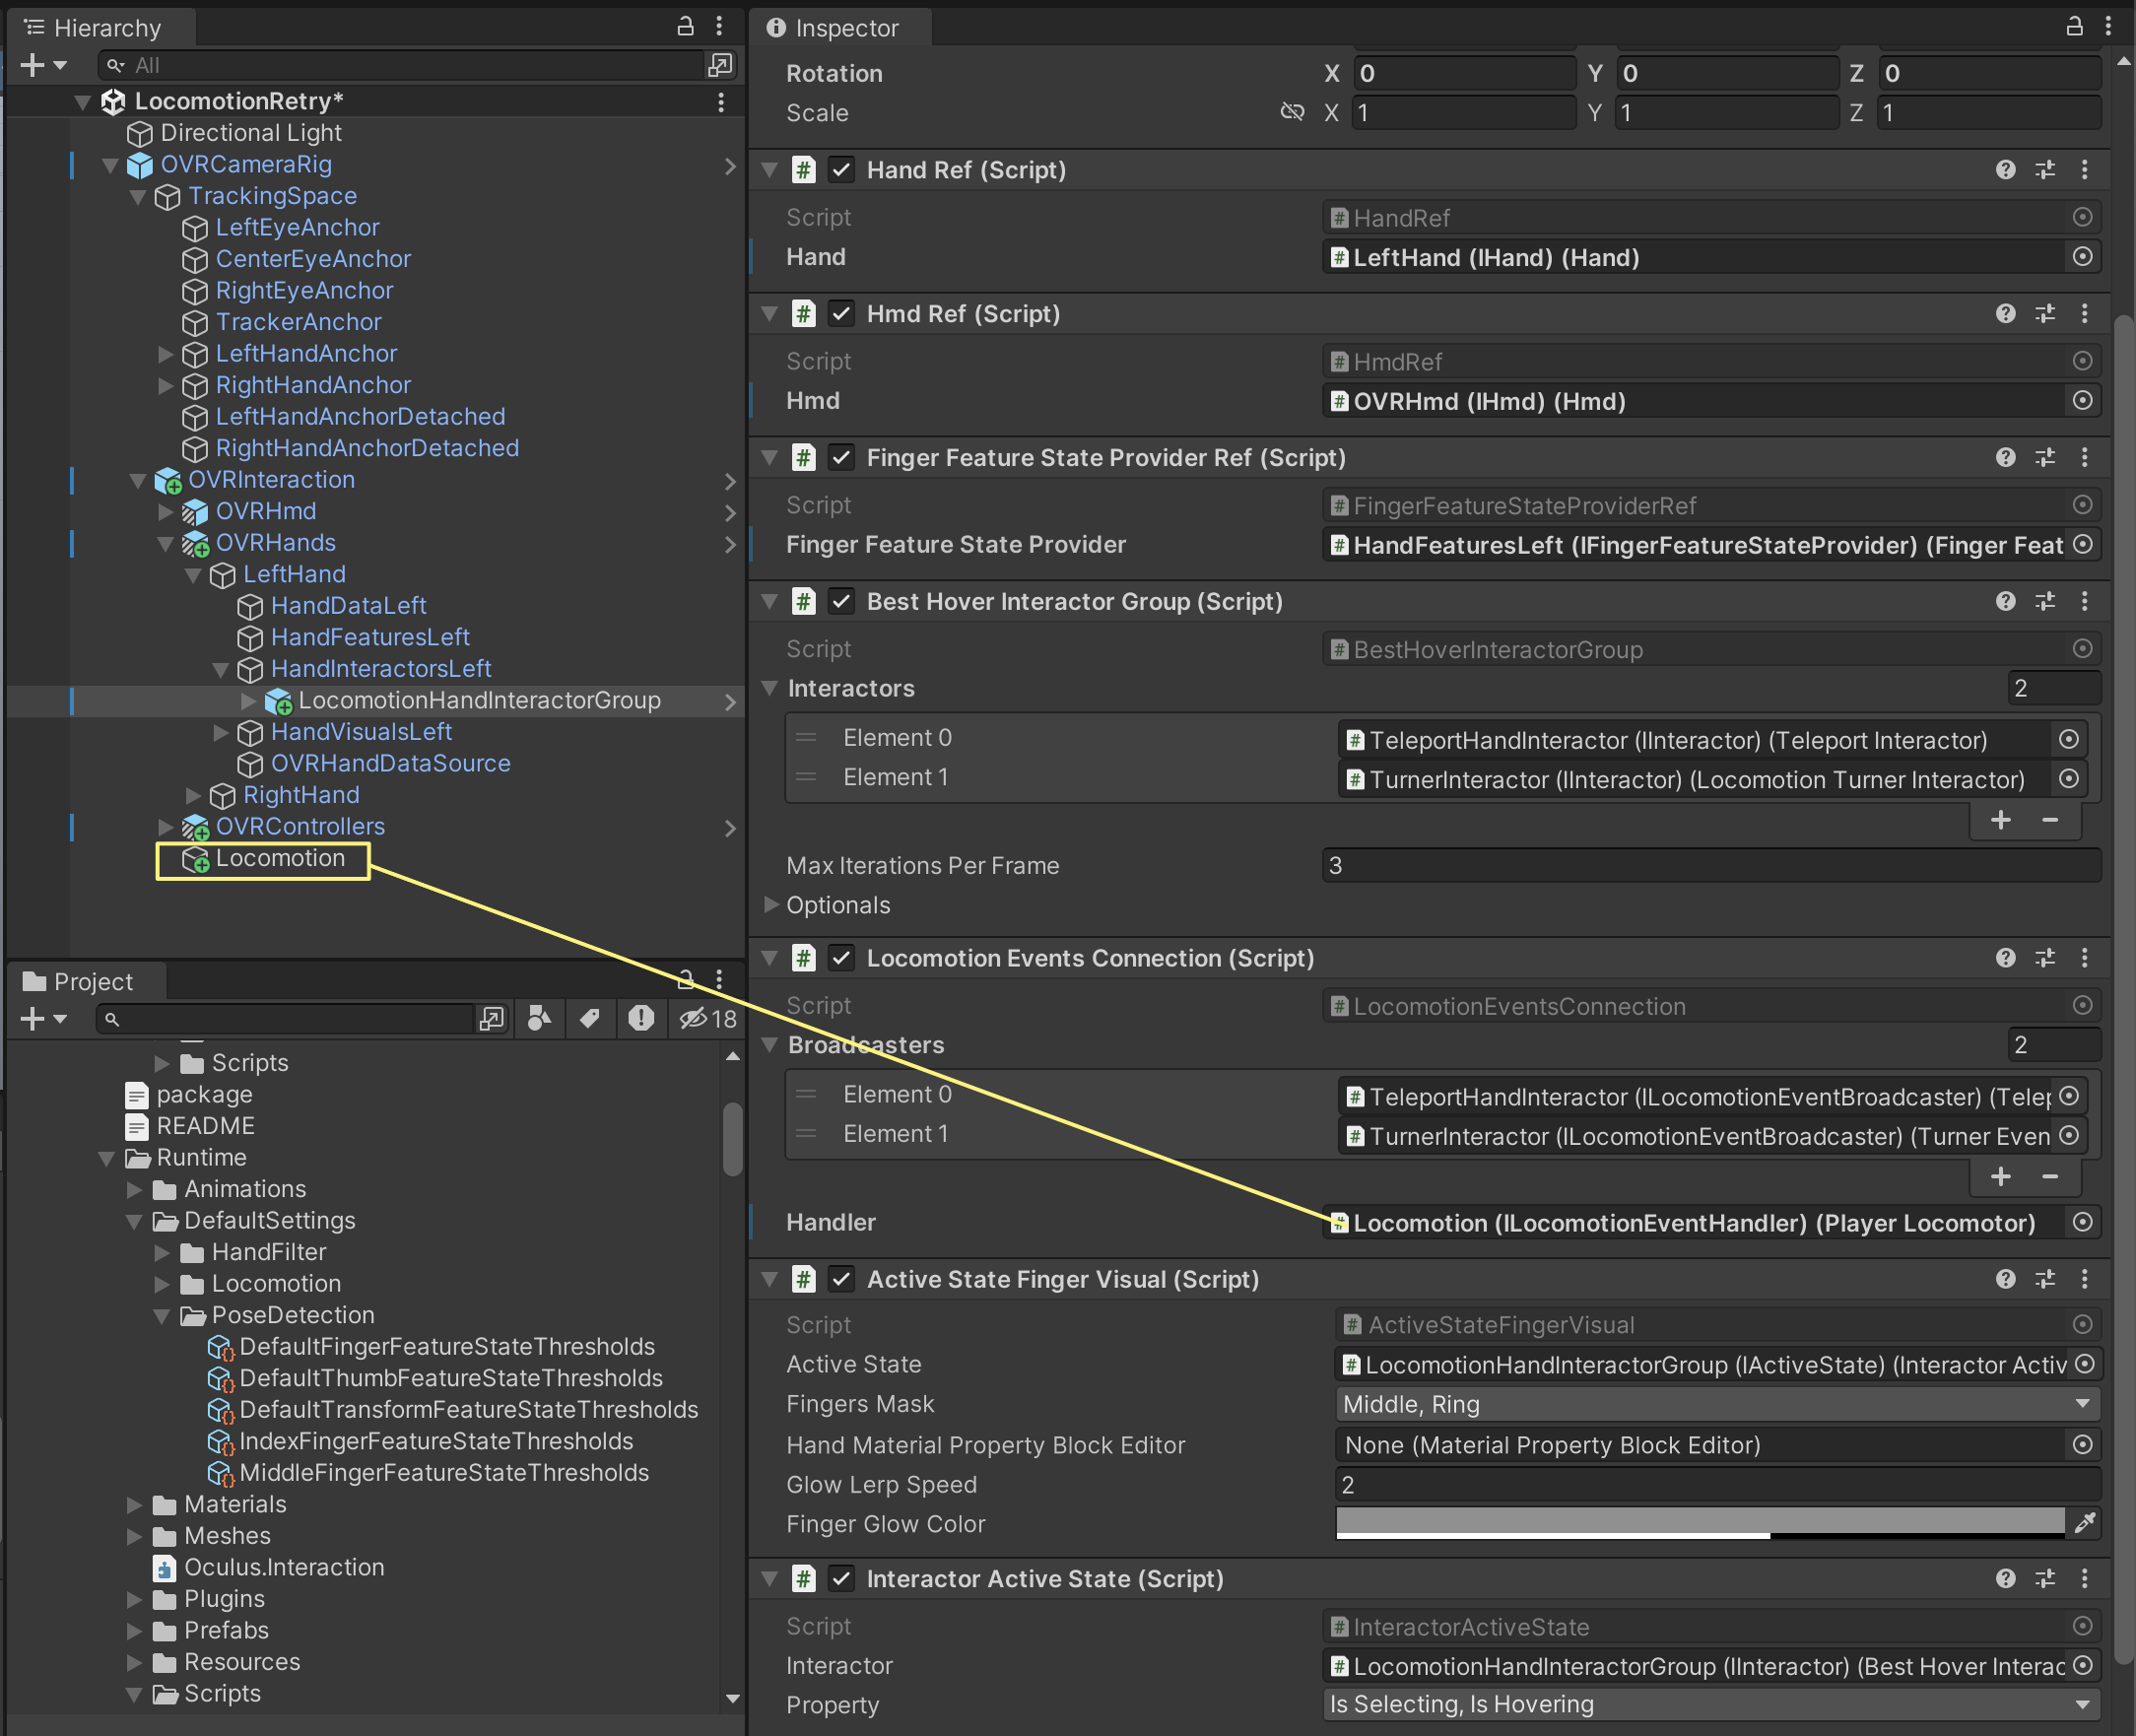
- 16. l_handMeshNode를 Active State Finger Visual 컴포넌트의 Han Material Property Block Editor에 넣어준다
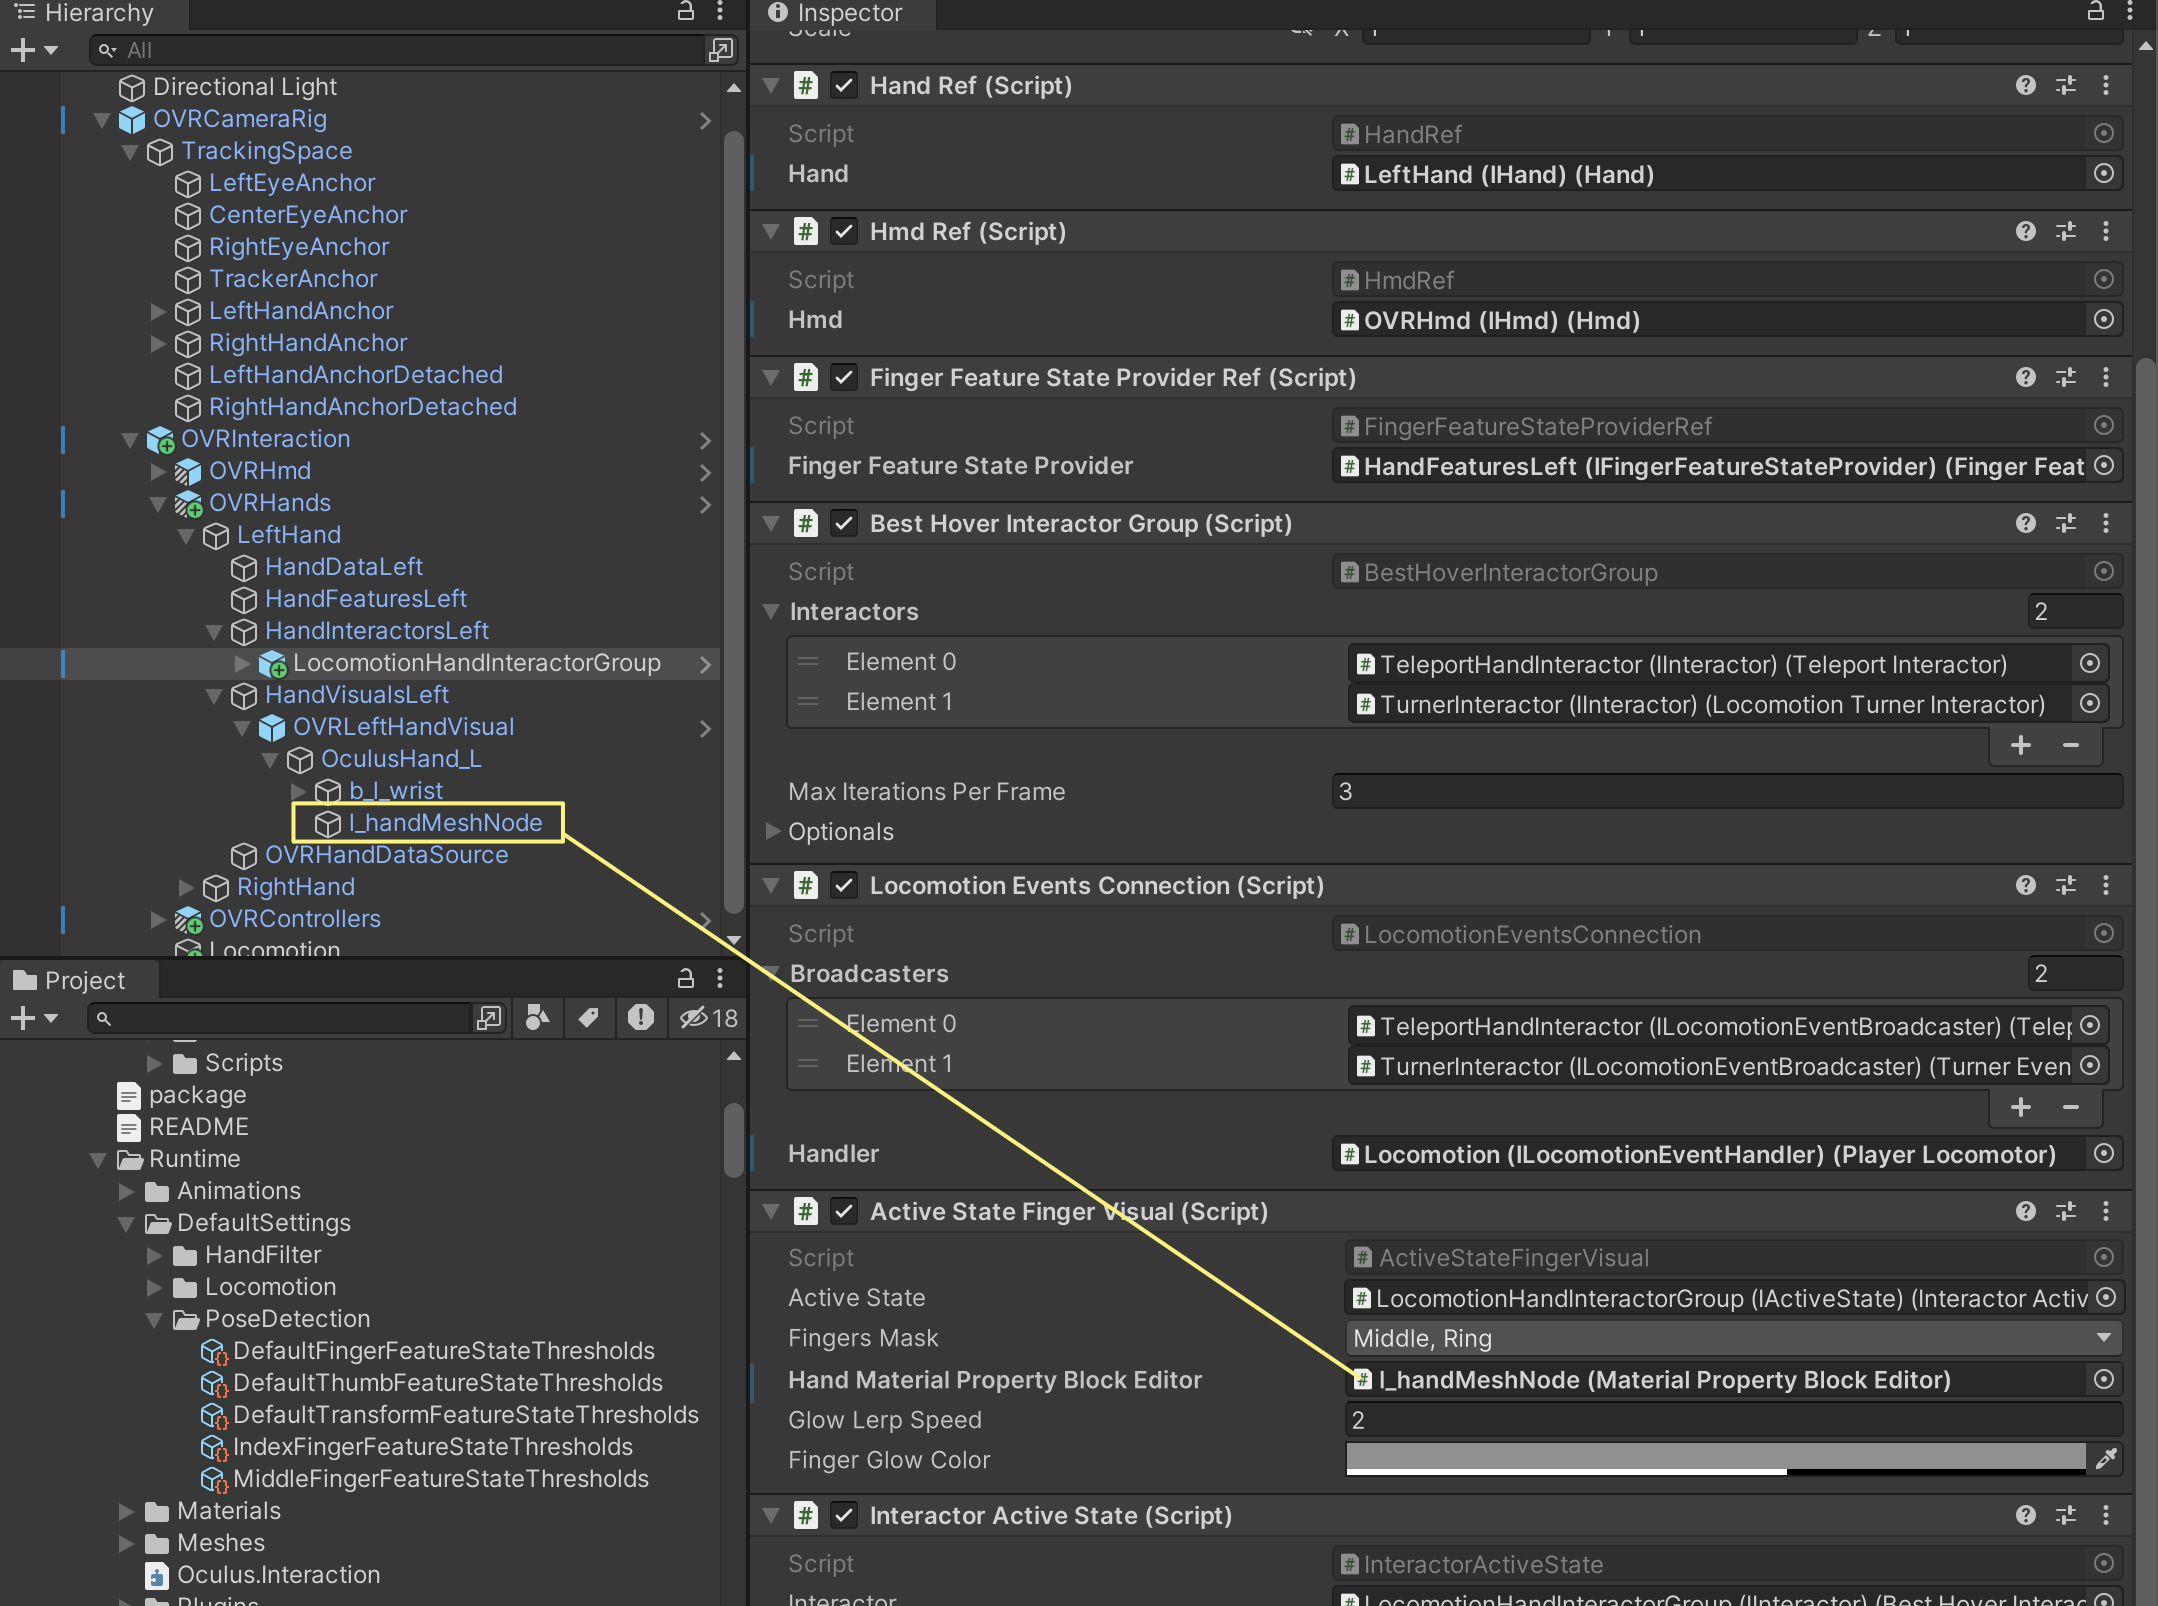
- 다음 필드가 모두 채워져 있는지 확인 한다
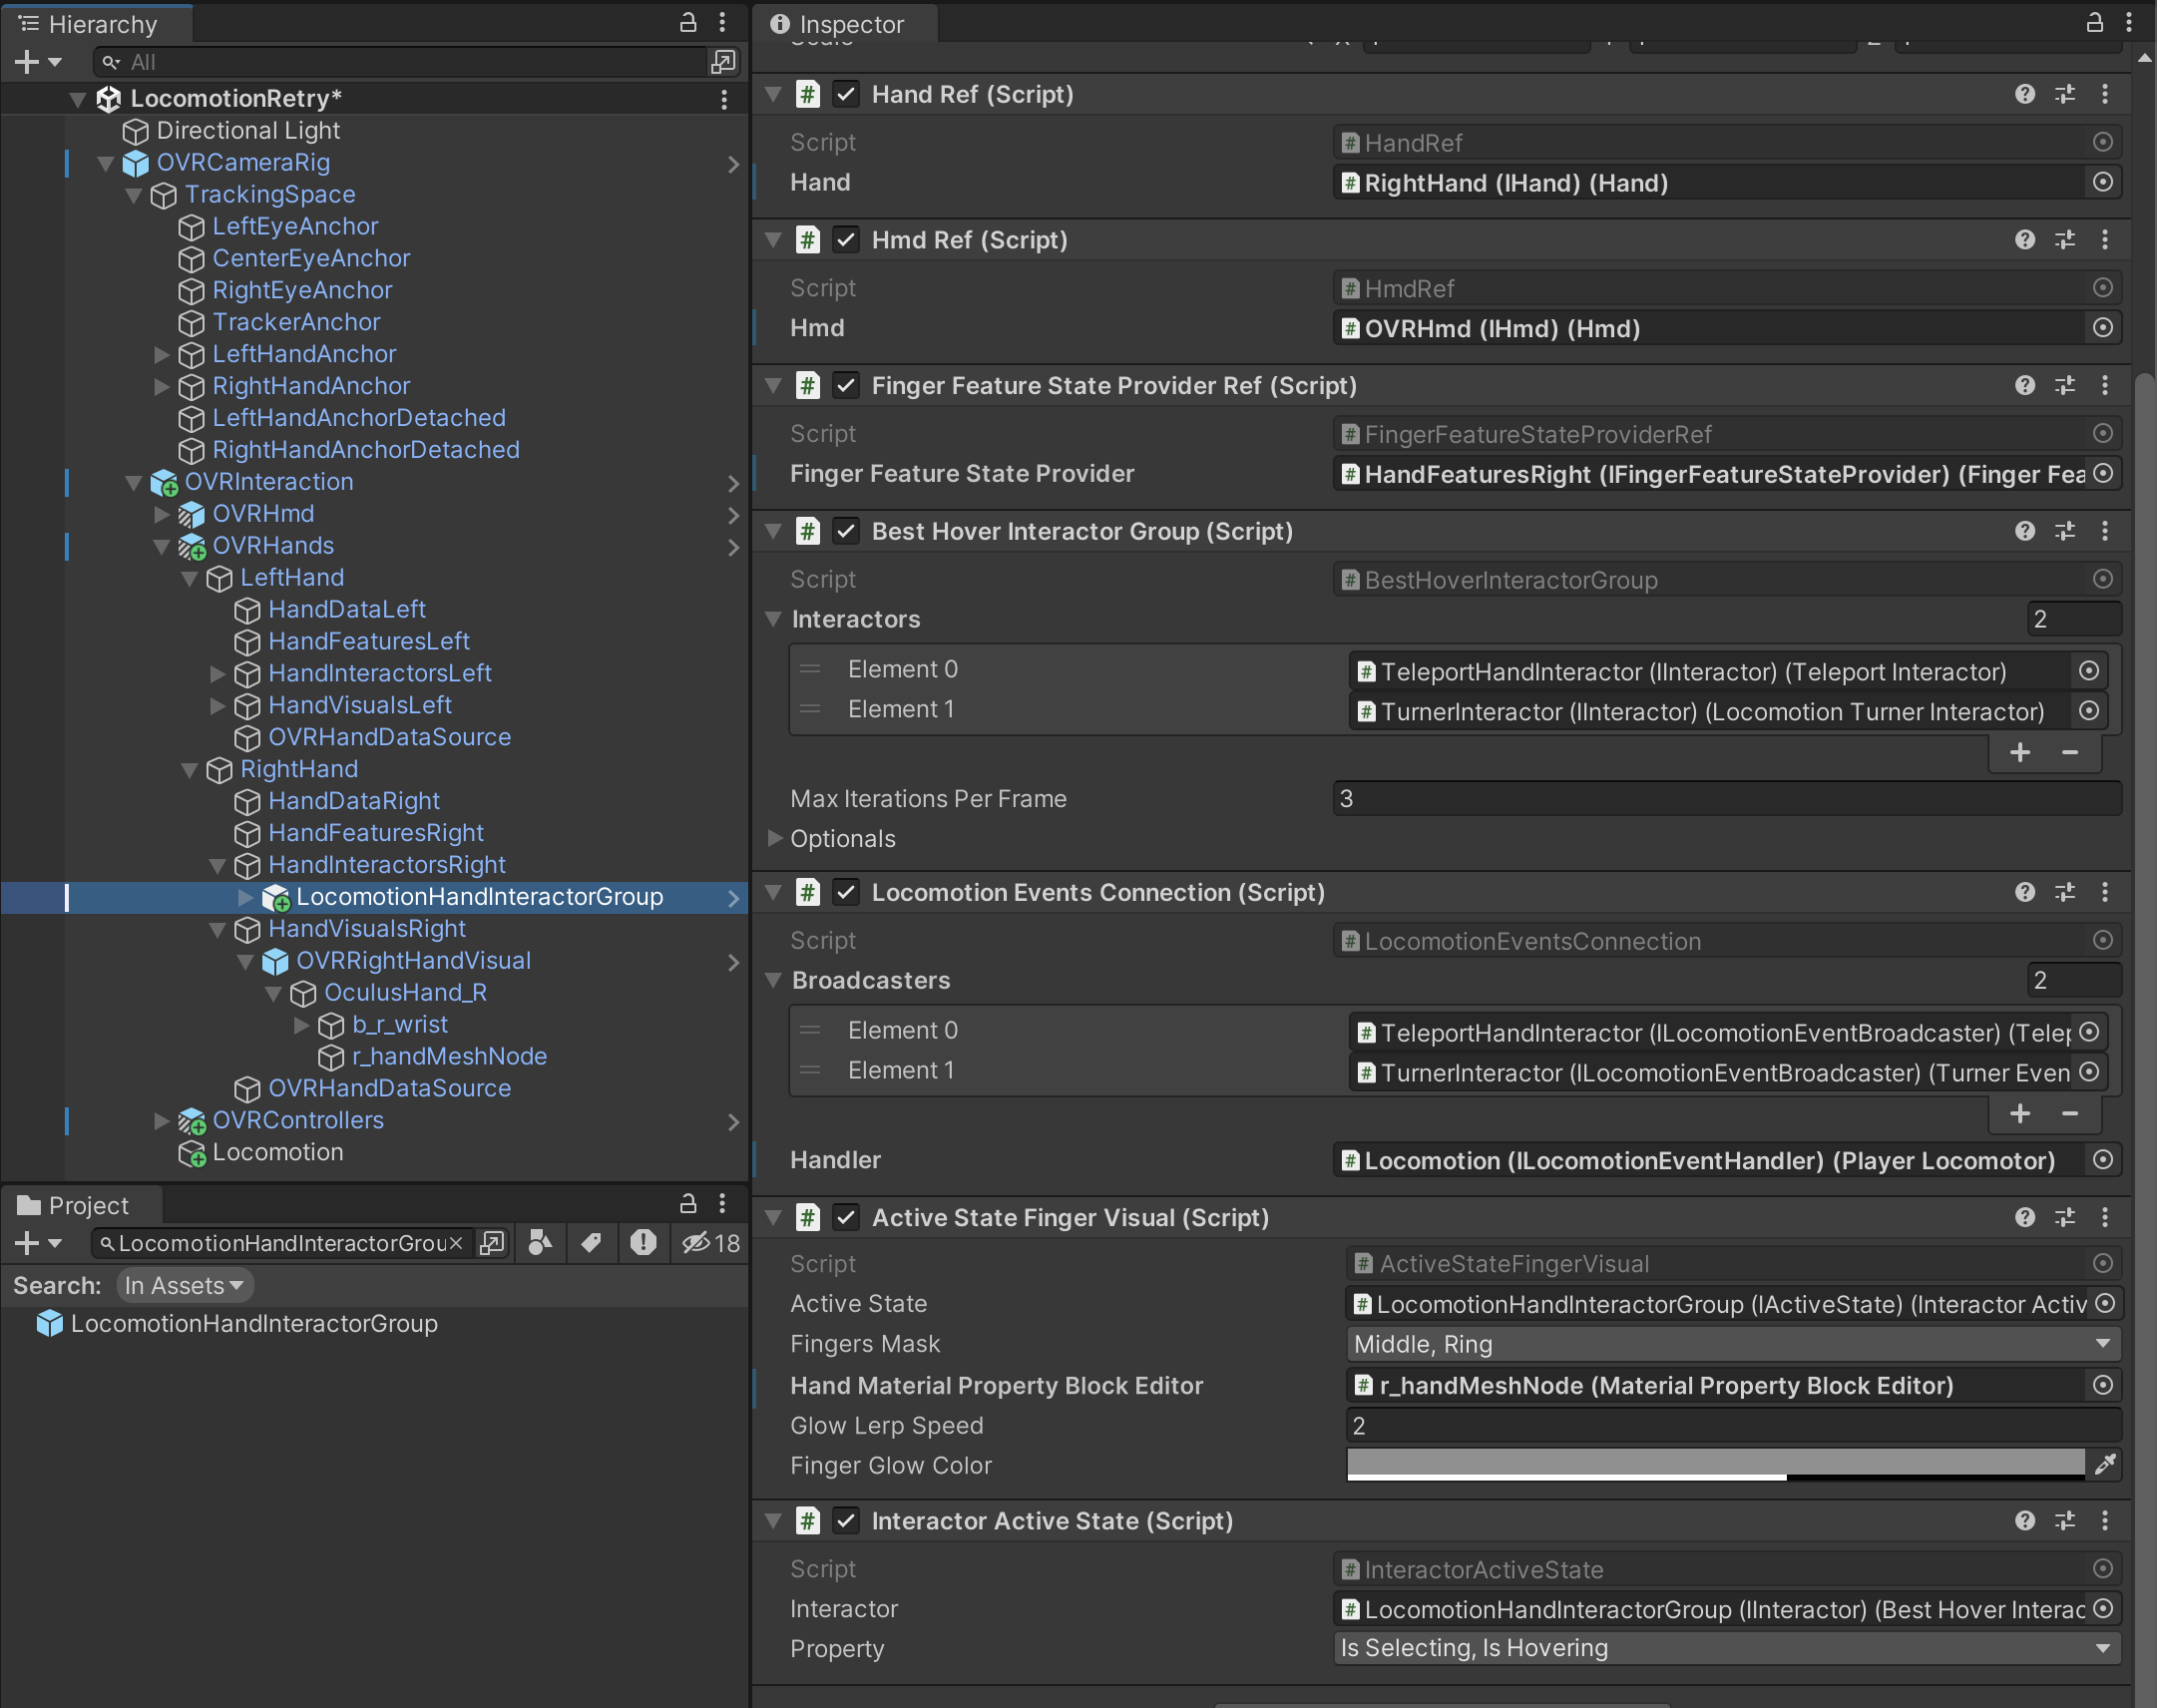
같은 방법으로 오른쪽도 해준다
- 여기까지 하고 빌드 하면 핸드 제스쳐 ( L자 )에 의해 텔레포트 가이드 Ray가 생겨난걸 볼수 있다
- 하지만 Turn 가이드 UI가 안나온다
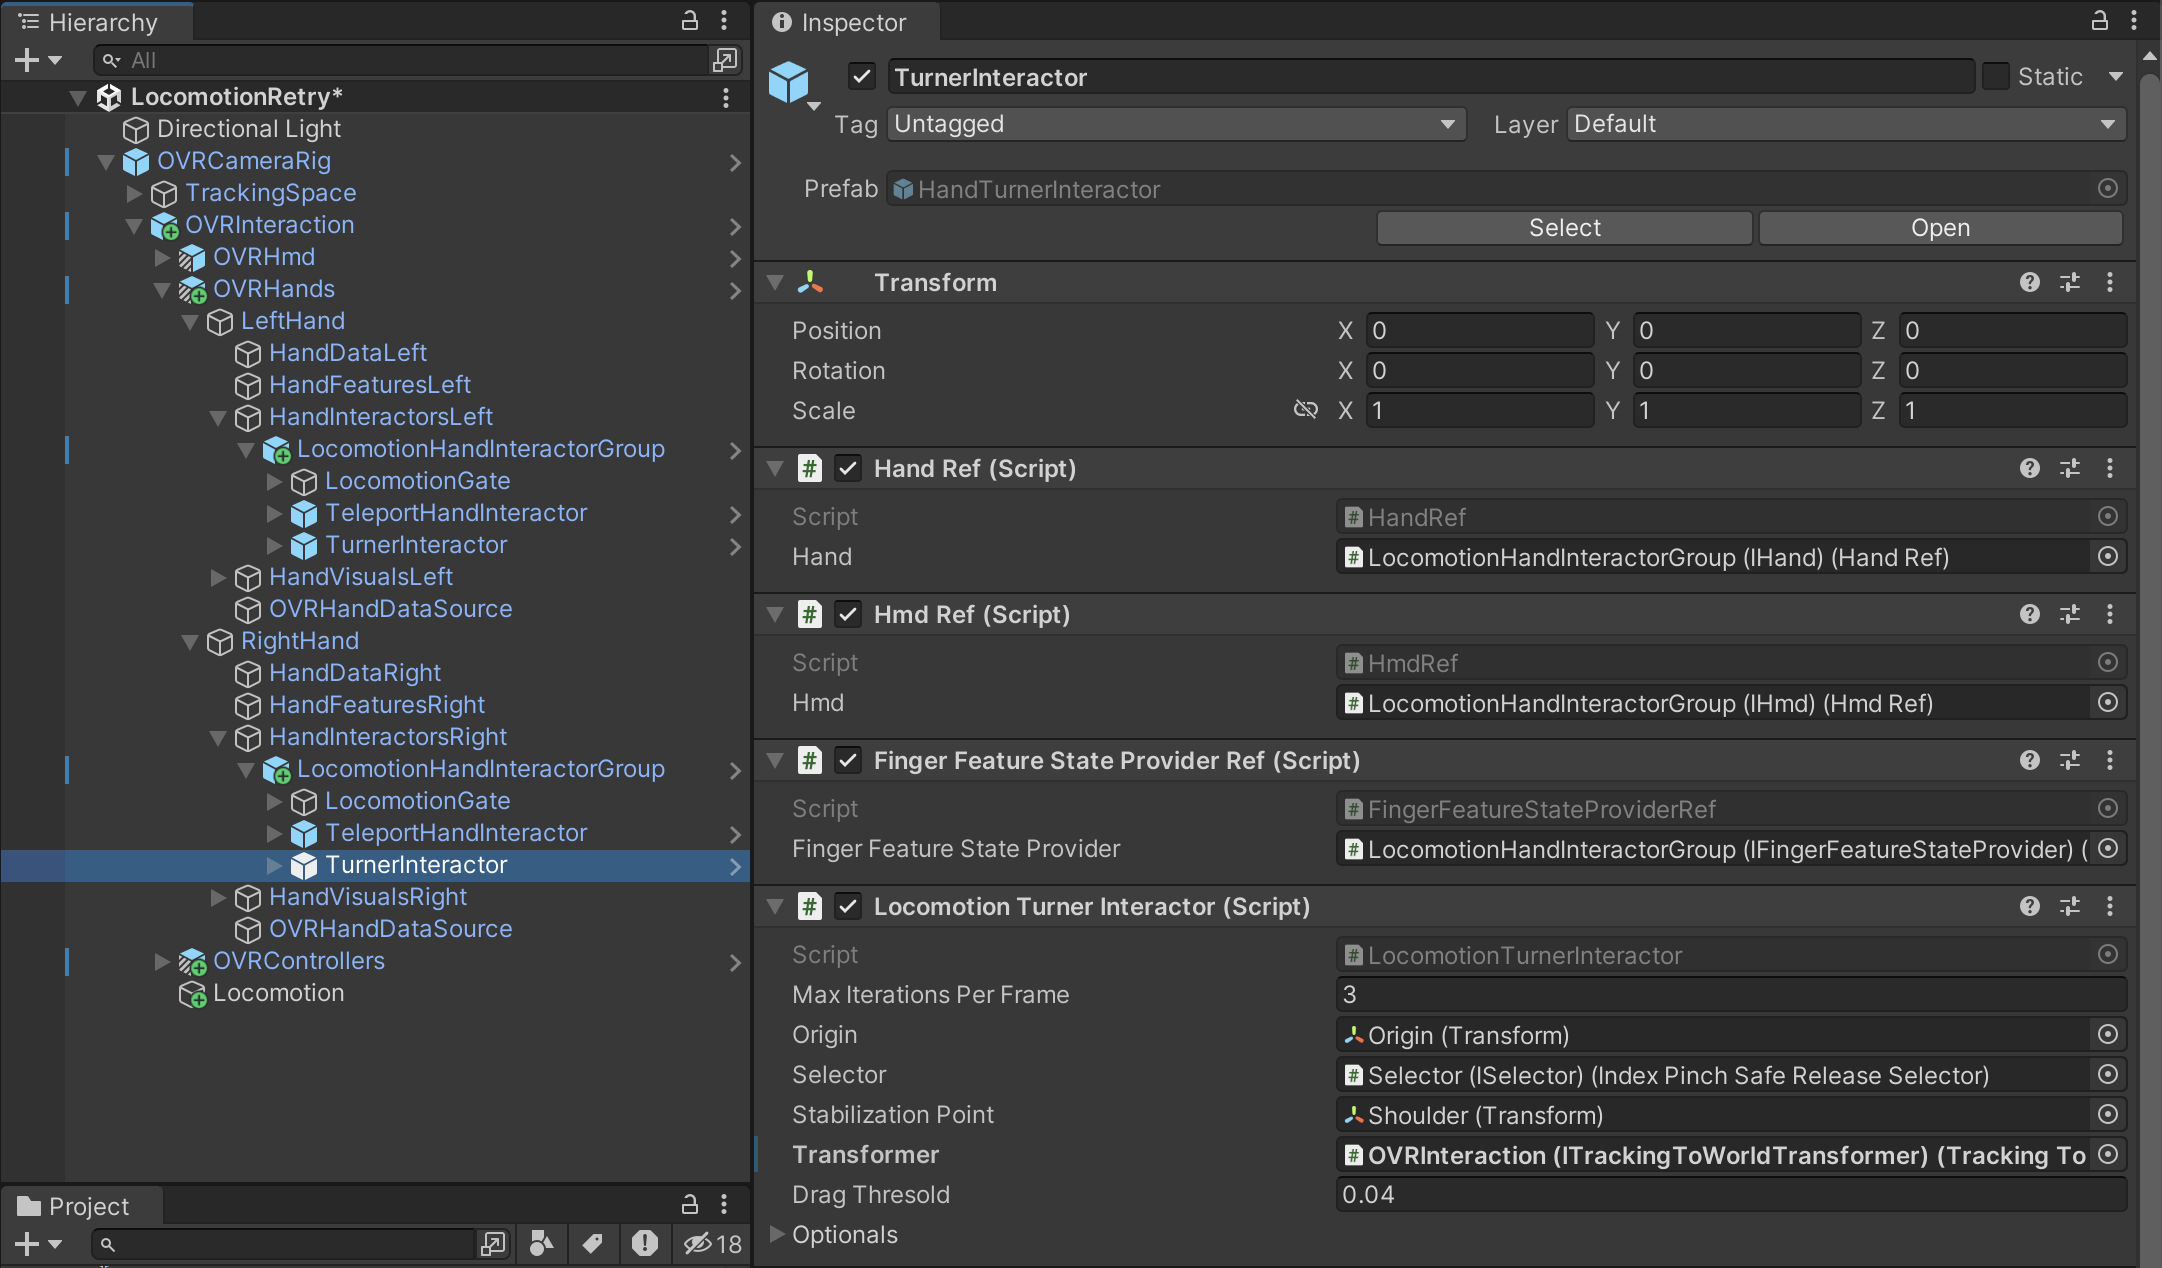
- LocomotionHandInteractorGroup/
TurnerInteractor 를 선택 해보면 Transformer가 빠져 있다
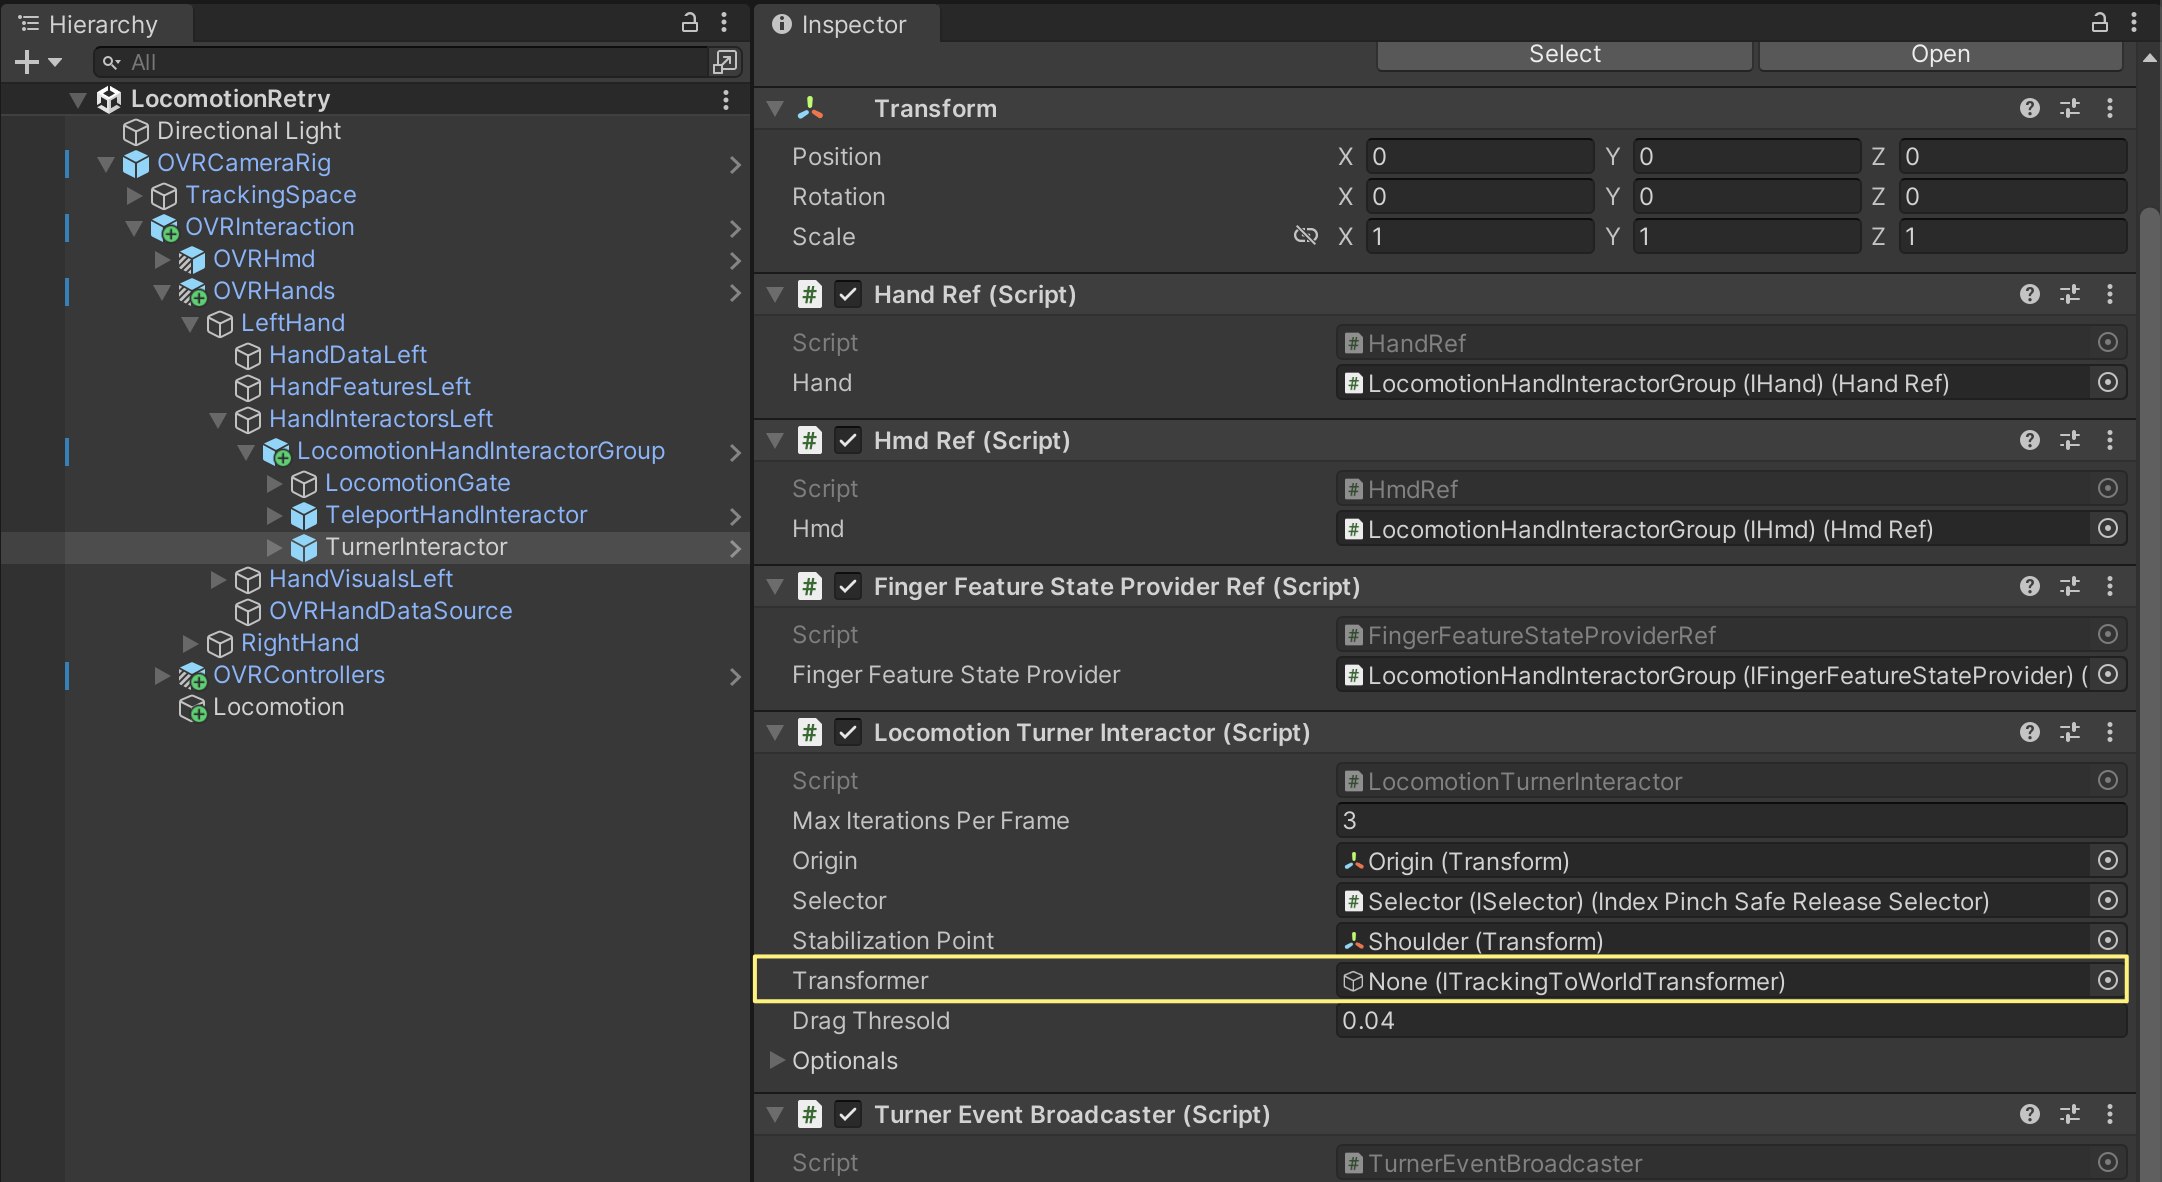
- 이부분에 OVRInteraction를 넣어 주면 된다
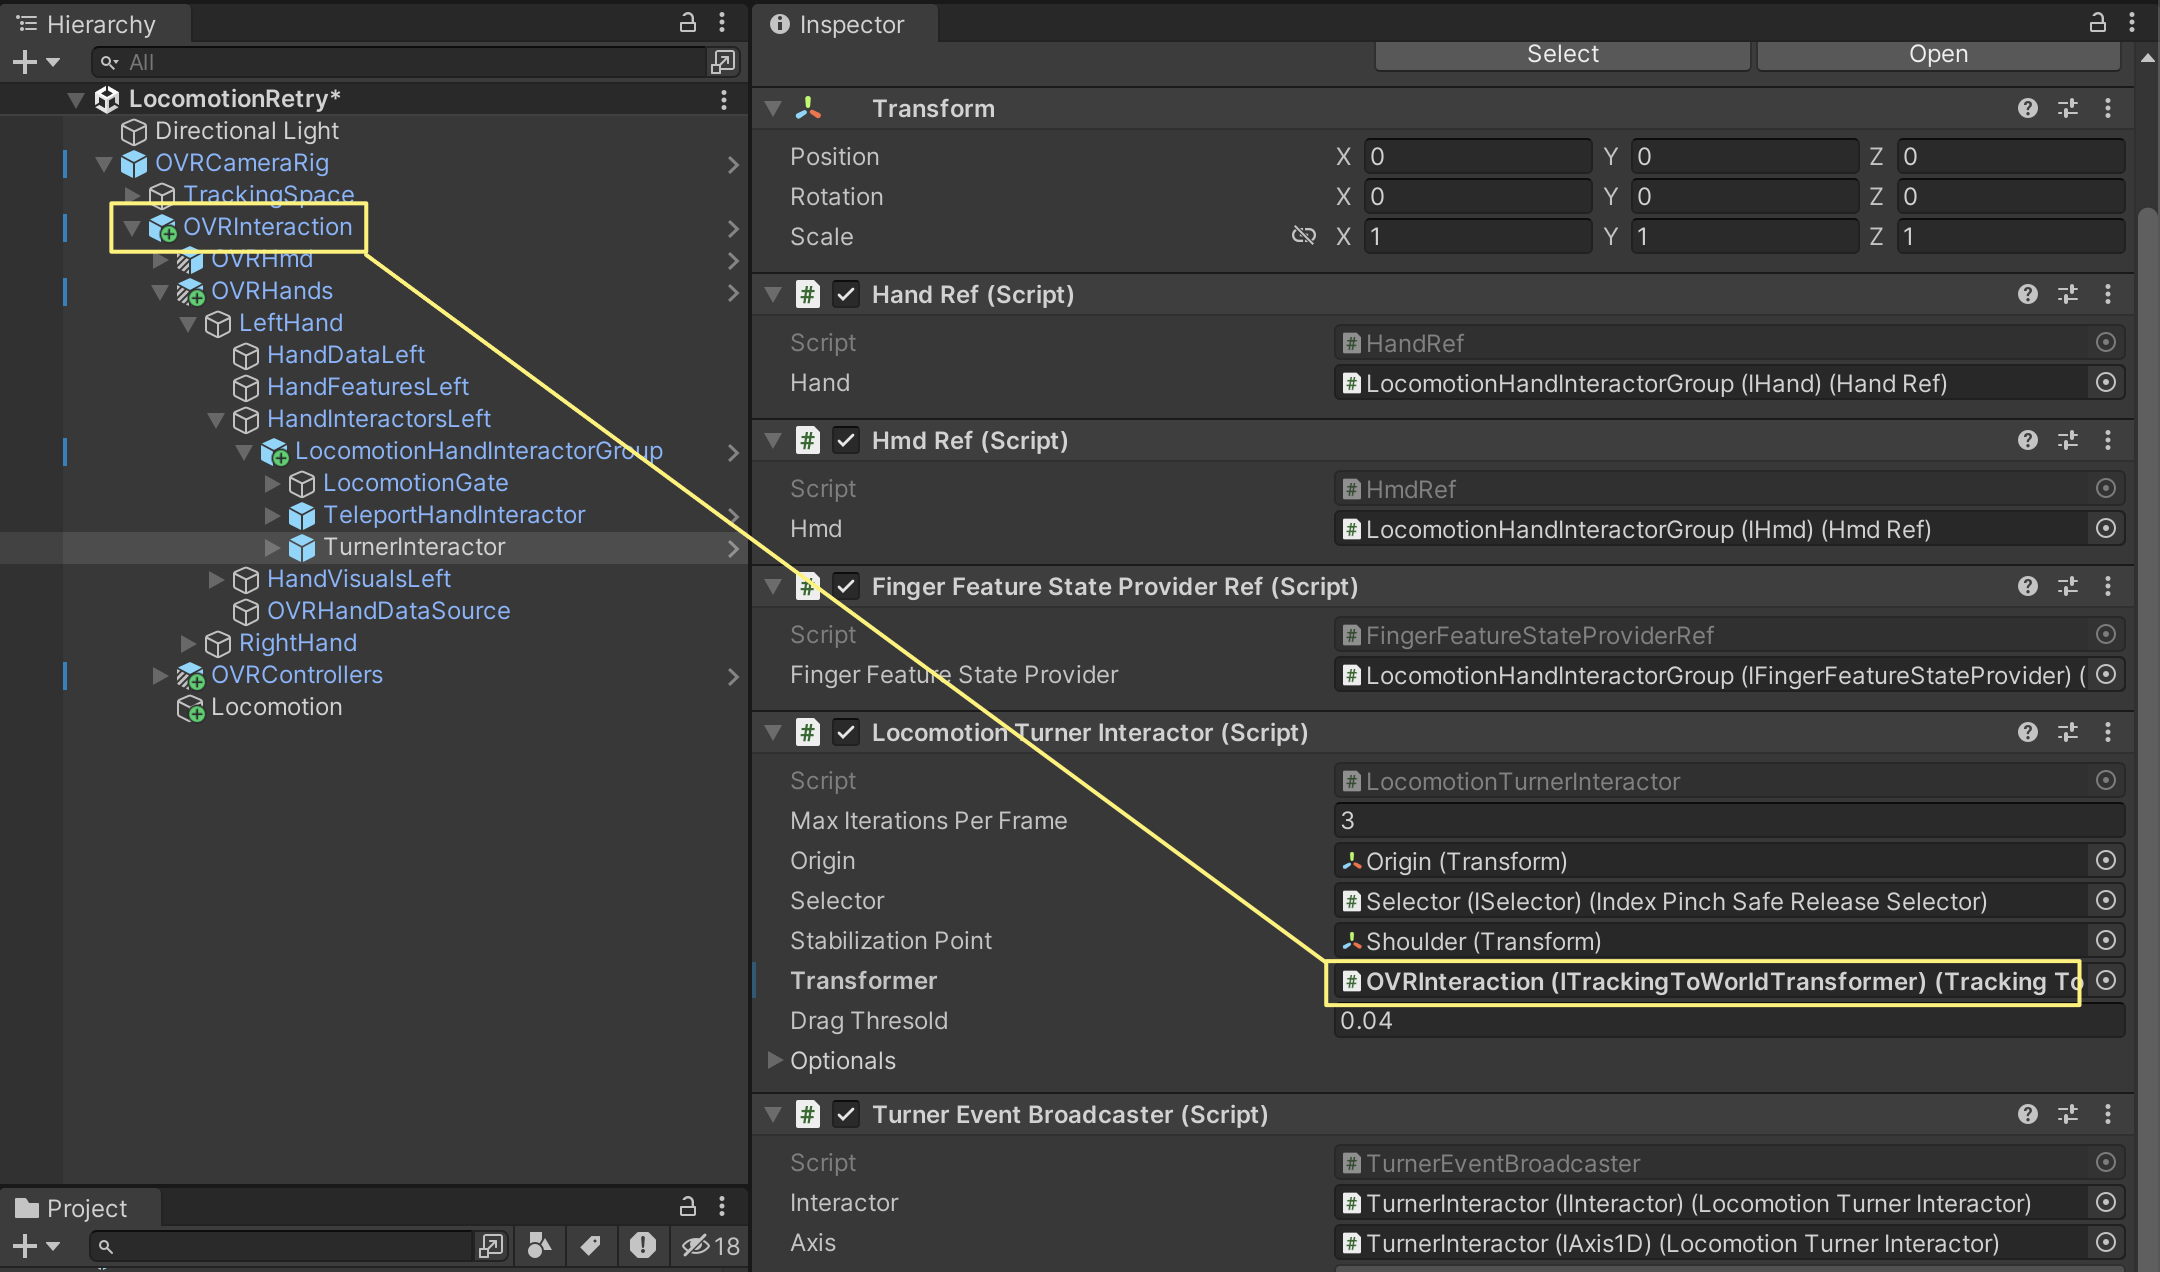
오른쪽도 넣어주자
빌드후 결과를 확인 하자
간단한 환경을 만들고 Turn이 잘 동작 하는지 확인 하자
아직 텔레포트는 안될거다
이제 텔레포트 가능한 스폿을 설치 할 차례다
TeleportHotspot 프리팹을 찾아 하이어라키에 드레그 하고 적당히 위치 시킨다
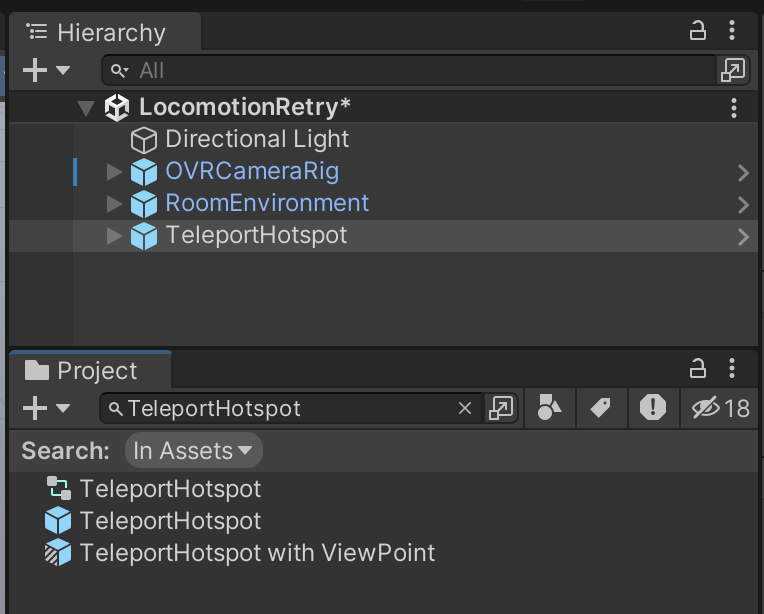

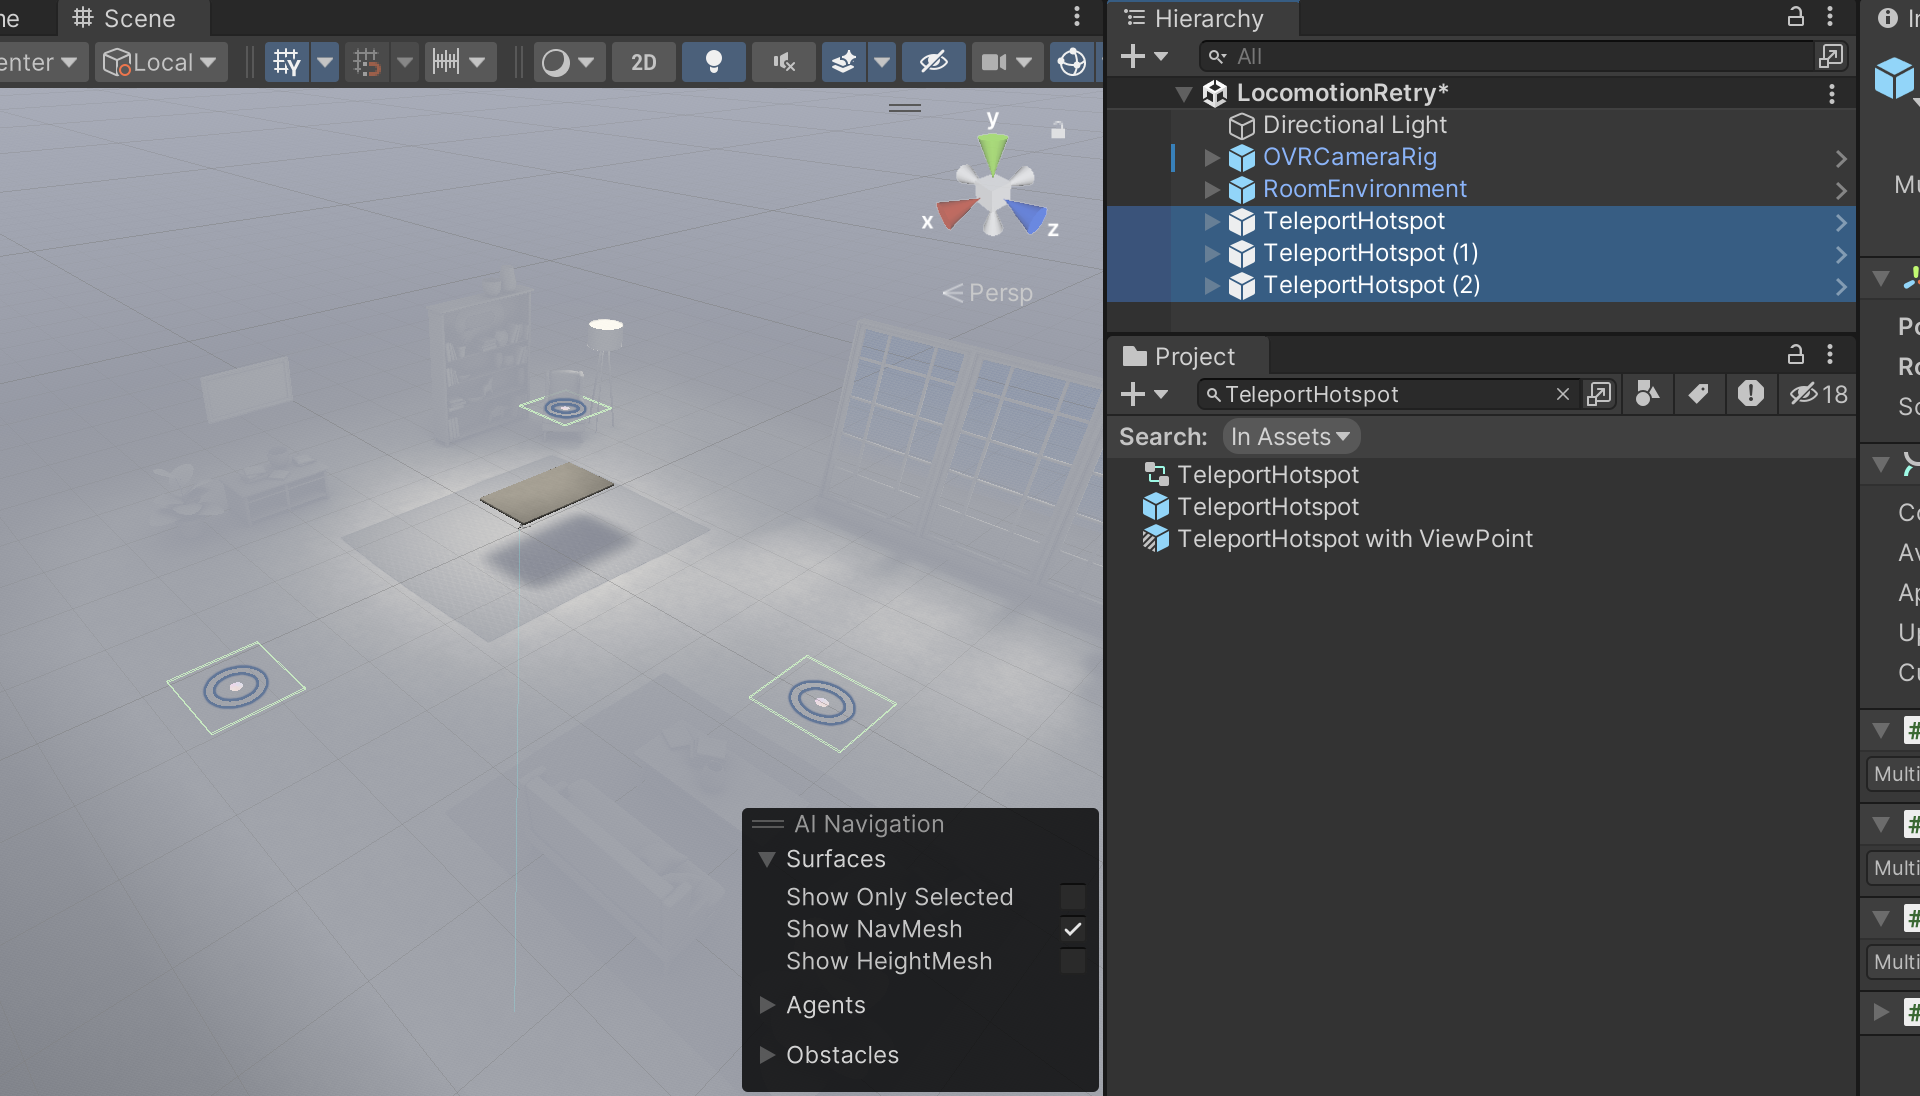
빌드후 결과를 확인 한다
텔레포트 , 스냅 턴이 잘된다
다음은 텔레포트 가능한곳과 불가능한곳을 설정 하는 일이 남았다
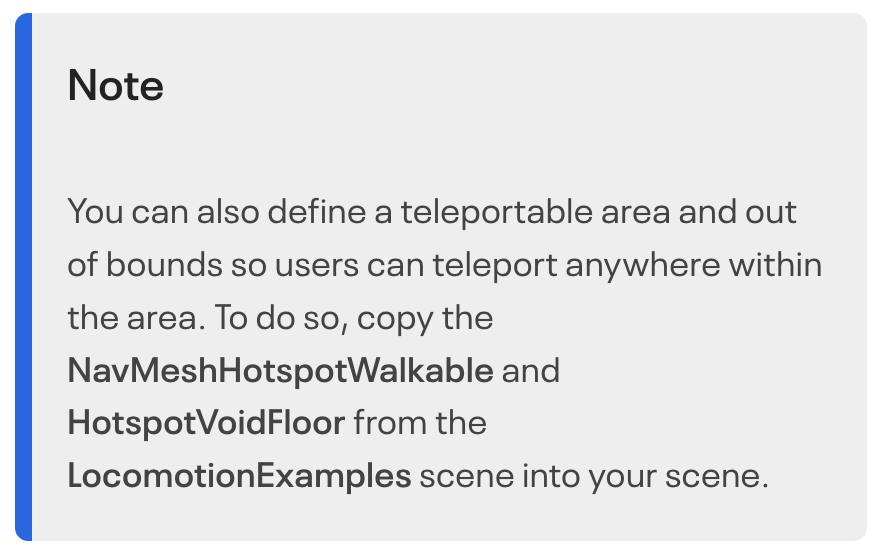
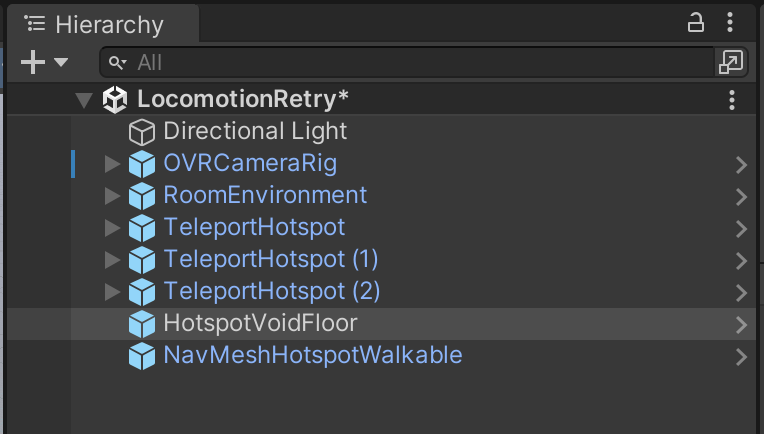
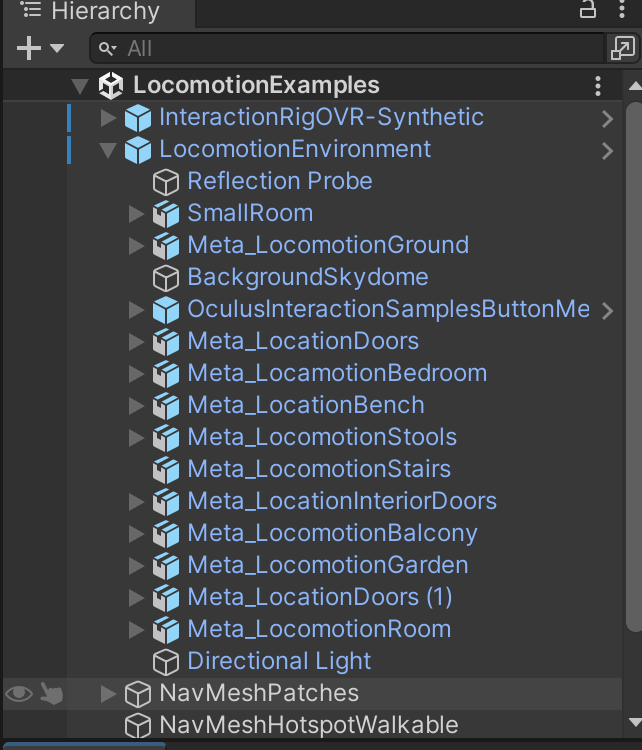
일단 예제 씬에 있는 NavMeshHotspotWalkable과 HotspotVoidFloor 게임 오브젝트를 프리팹으로 만들어 가져온다
작업중인 씬을 열어 하이어라키에 넣는다
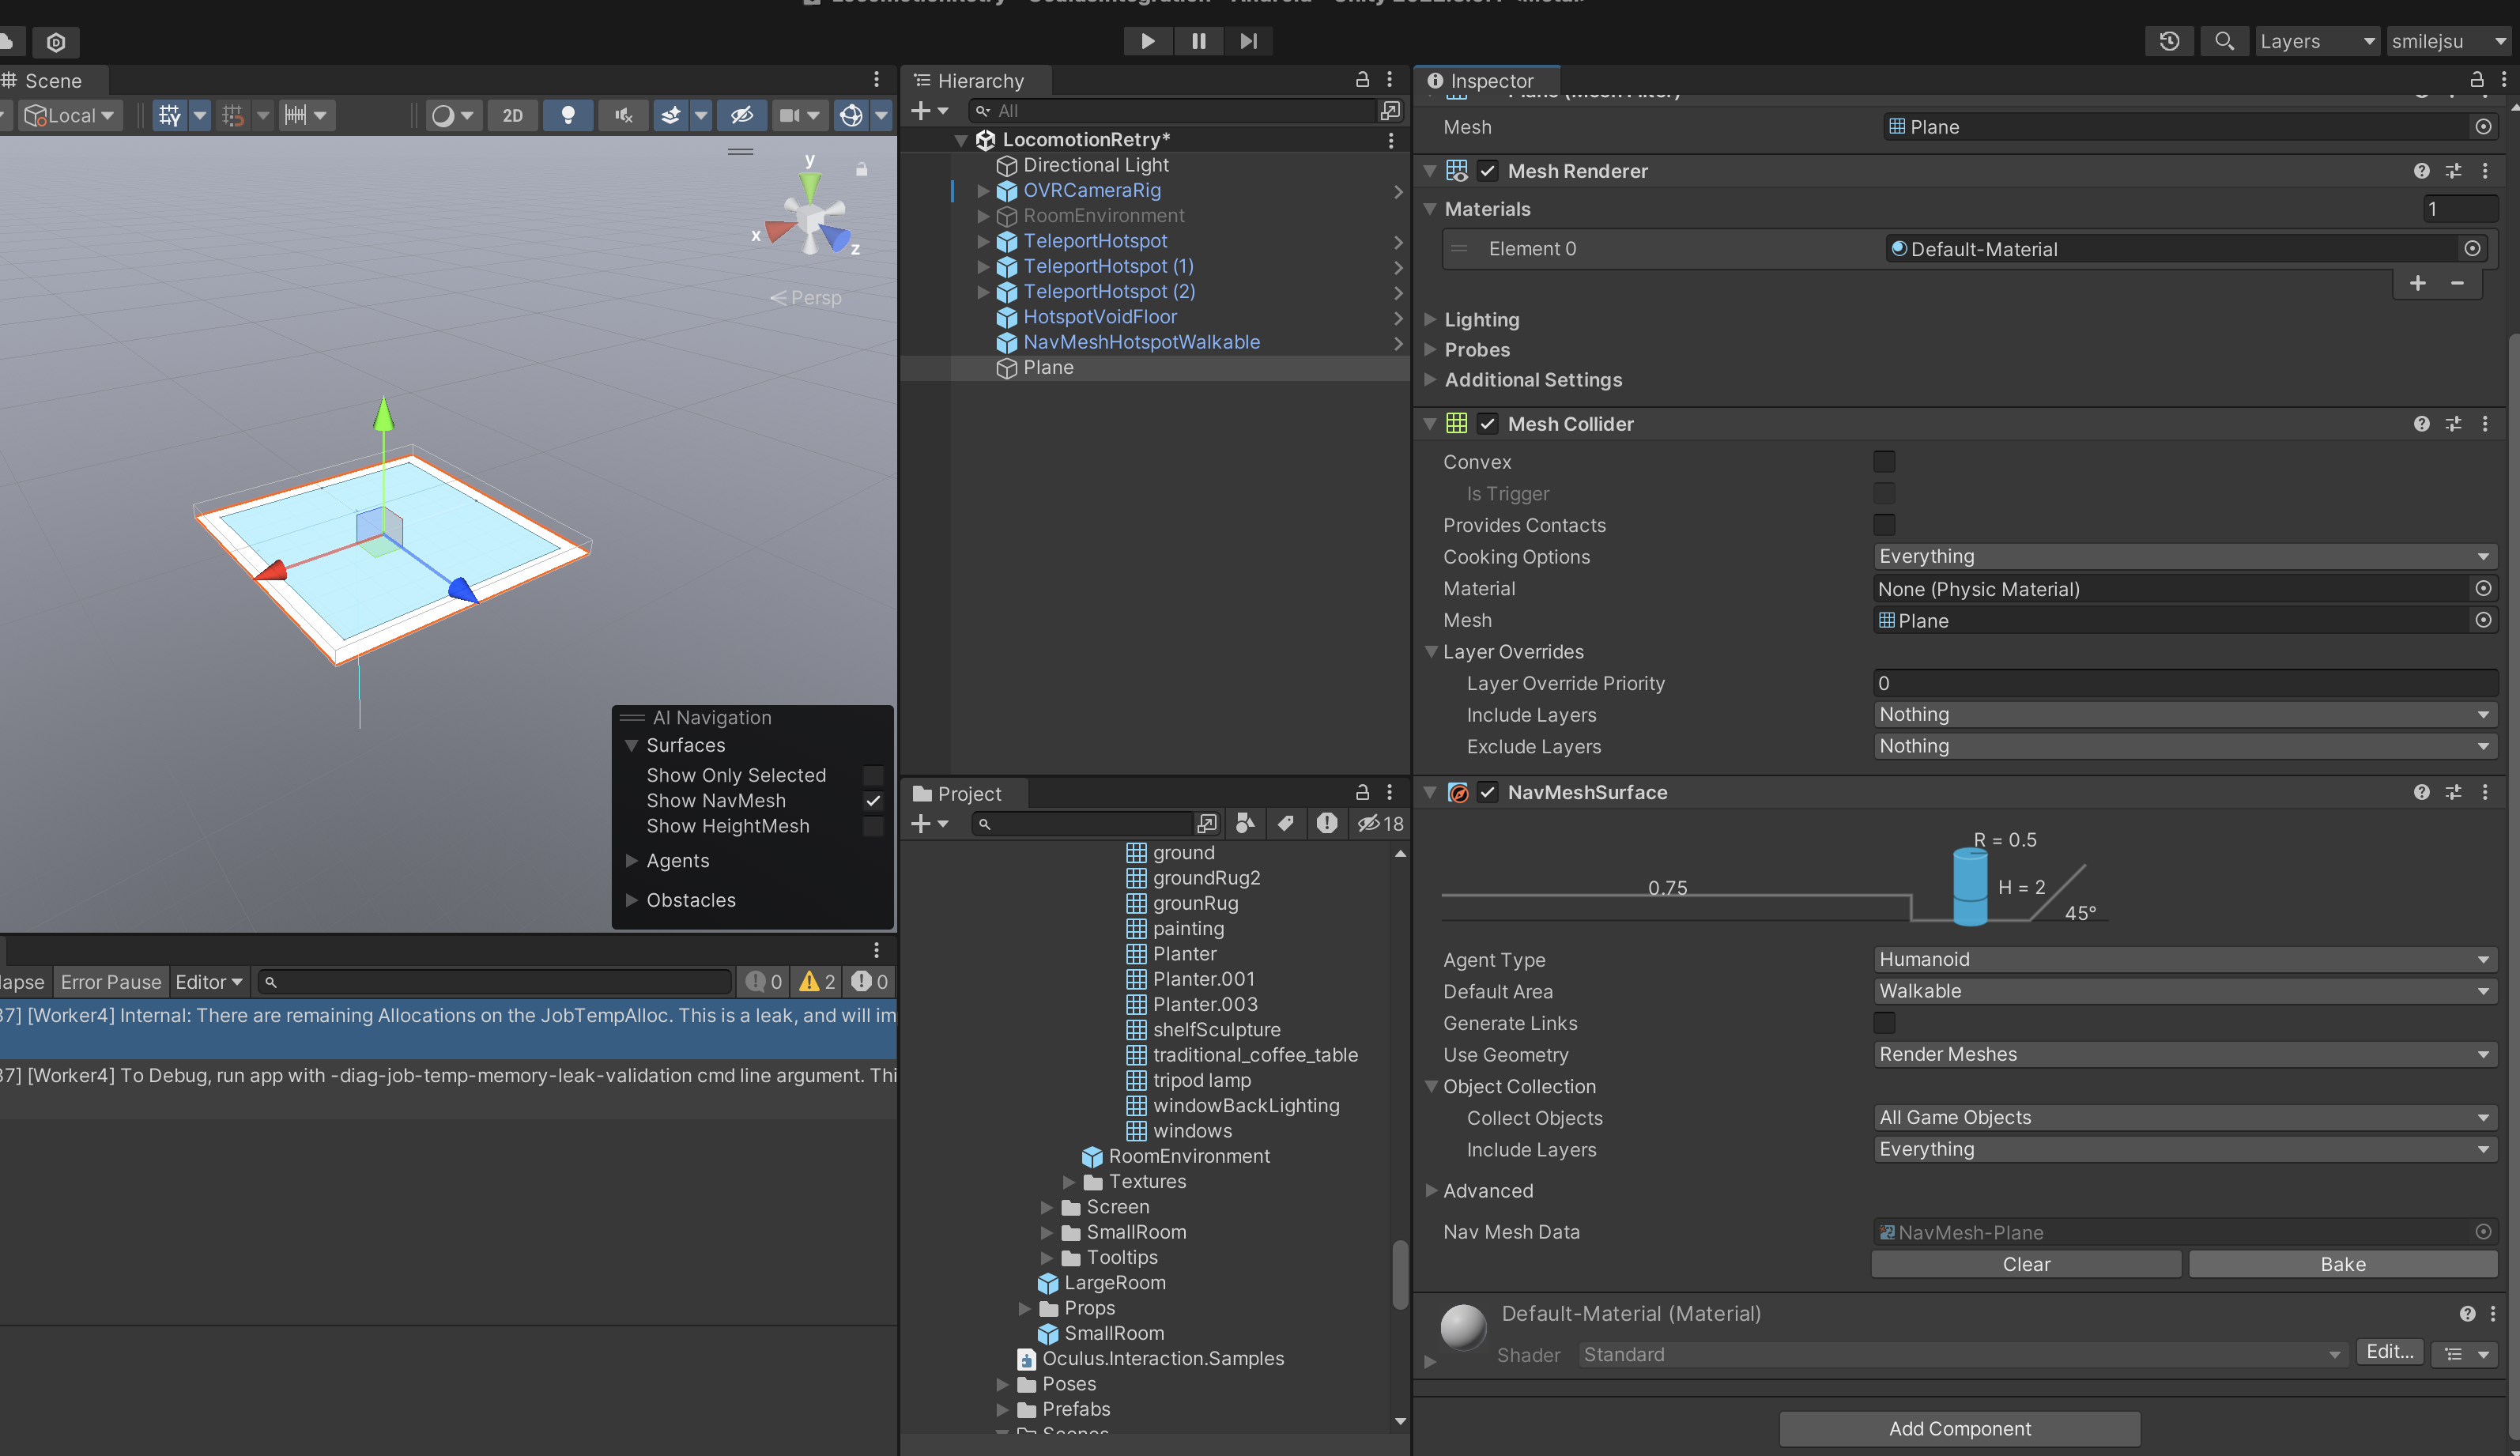
네비메시 설정을 해야 할거 같은데 전혀 문서에는 적혀 있지 않다...
뭔가 텔레포트 Ray에 X 마크가 생겨났다
하지만 지면에 텔레포트 되지는 않았다
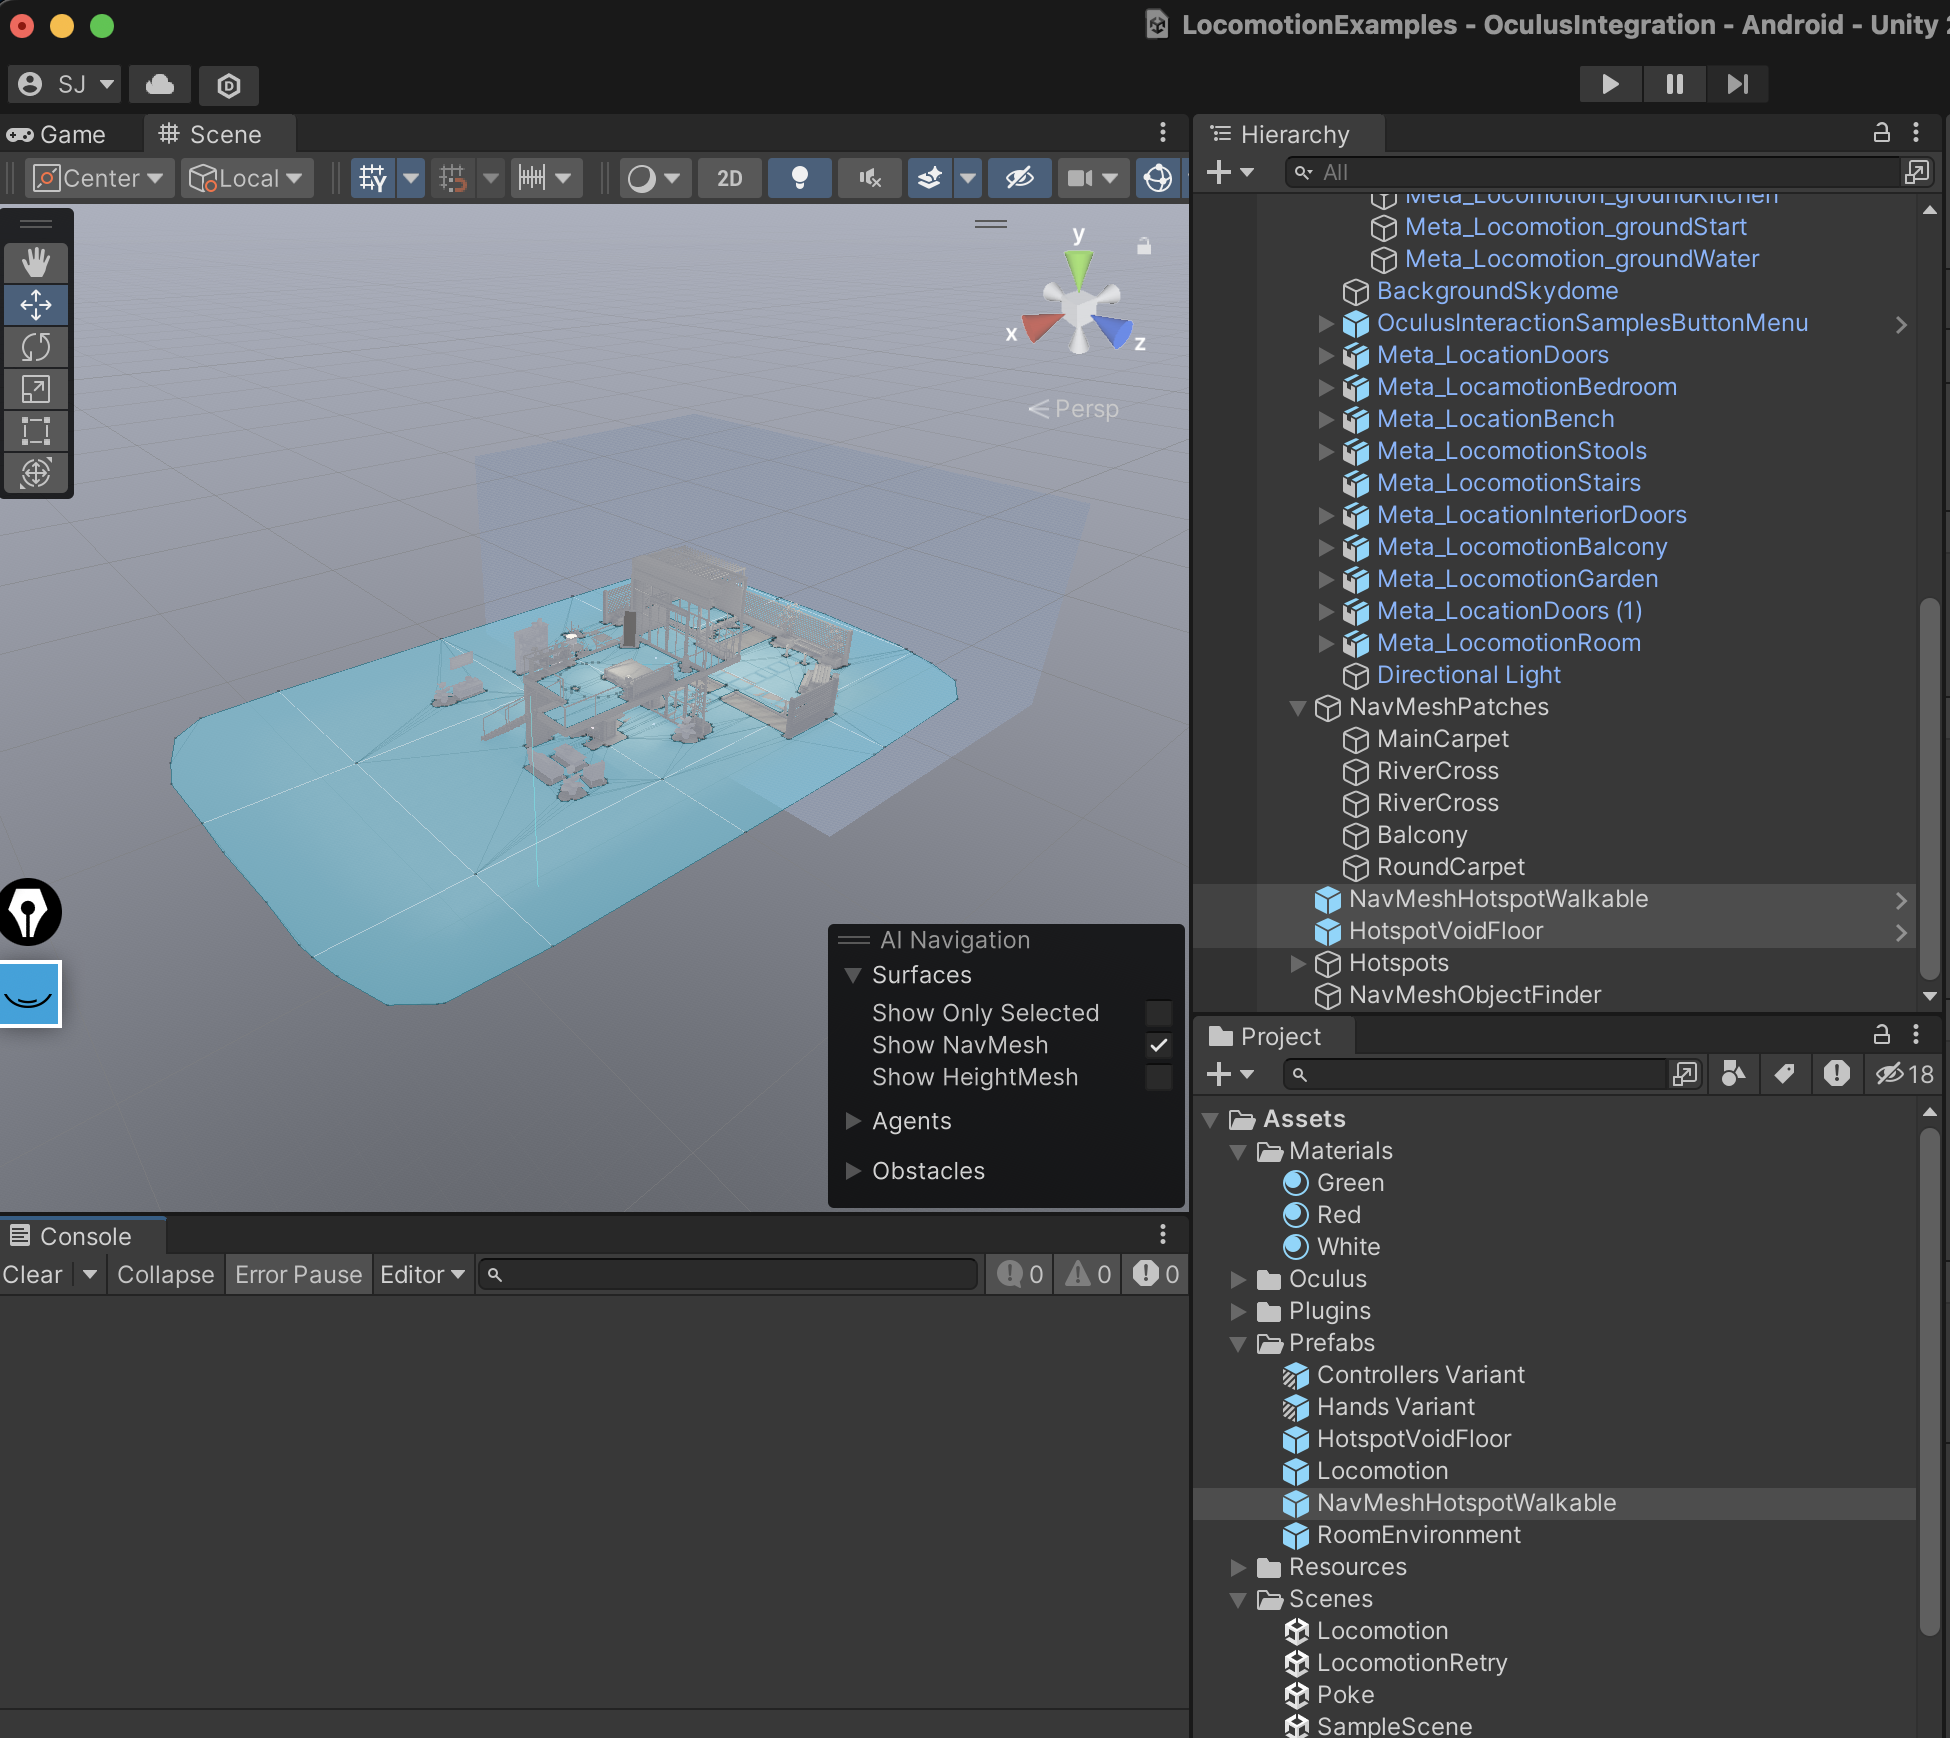
예제 씬에 보며는 네비메시가 깔려 있는걸 확인 할수 있었다
지면 텔레포트시 콜라이더가 아닌 네비 메시가 있어야 하는지 테스트가 필요 했다
https://docs.unity3d.com/Packages/com.unity.ai.navigation@1.1/manual/NavMeshSurface.html
NavMesh Surface | AI Navigation | 1.1.5
NavMesh Surface The NavMesh Surface component represents the walkable area for a specific NavMesh Agent type, and defines a part of the Scene where a NavMesh should be built. To use the NavMesh Surface component, navigate to GameObject > AI > NavMesh Surfa
docs.unity3d.com
Plane을 만들어 테스트 해보았다
환경 게임 오브젝트의 Ground만 가져와서 테스트 해보기로 했다

베이크가 안되었다
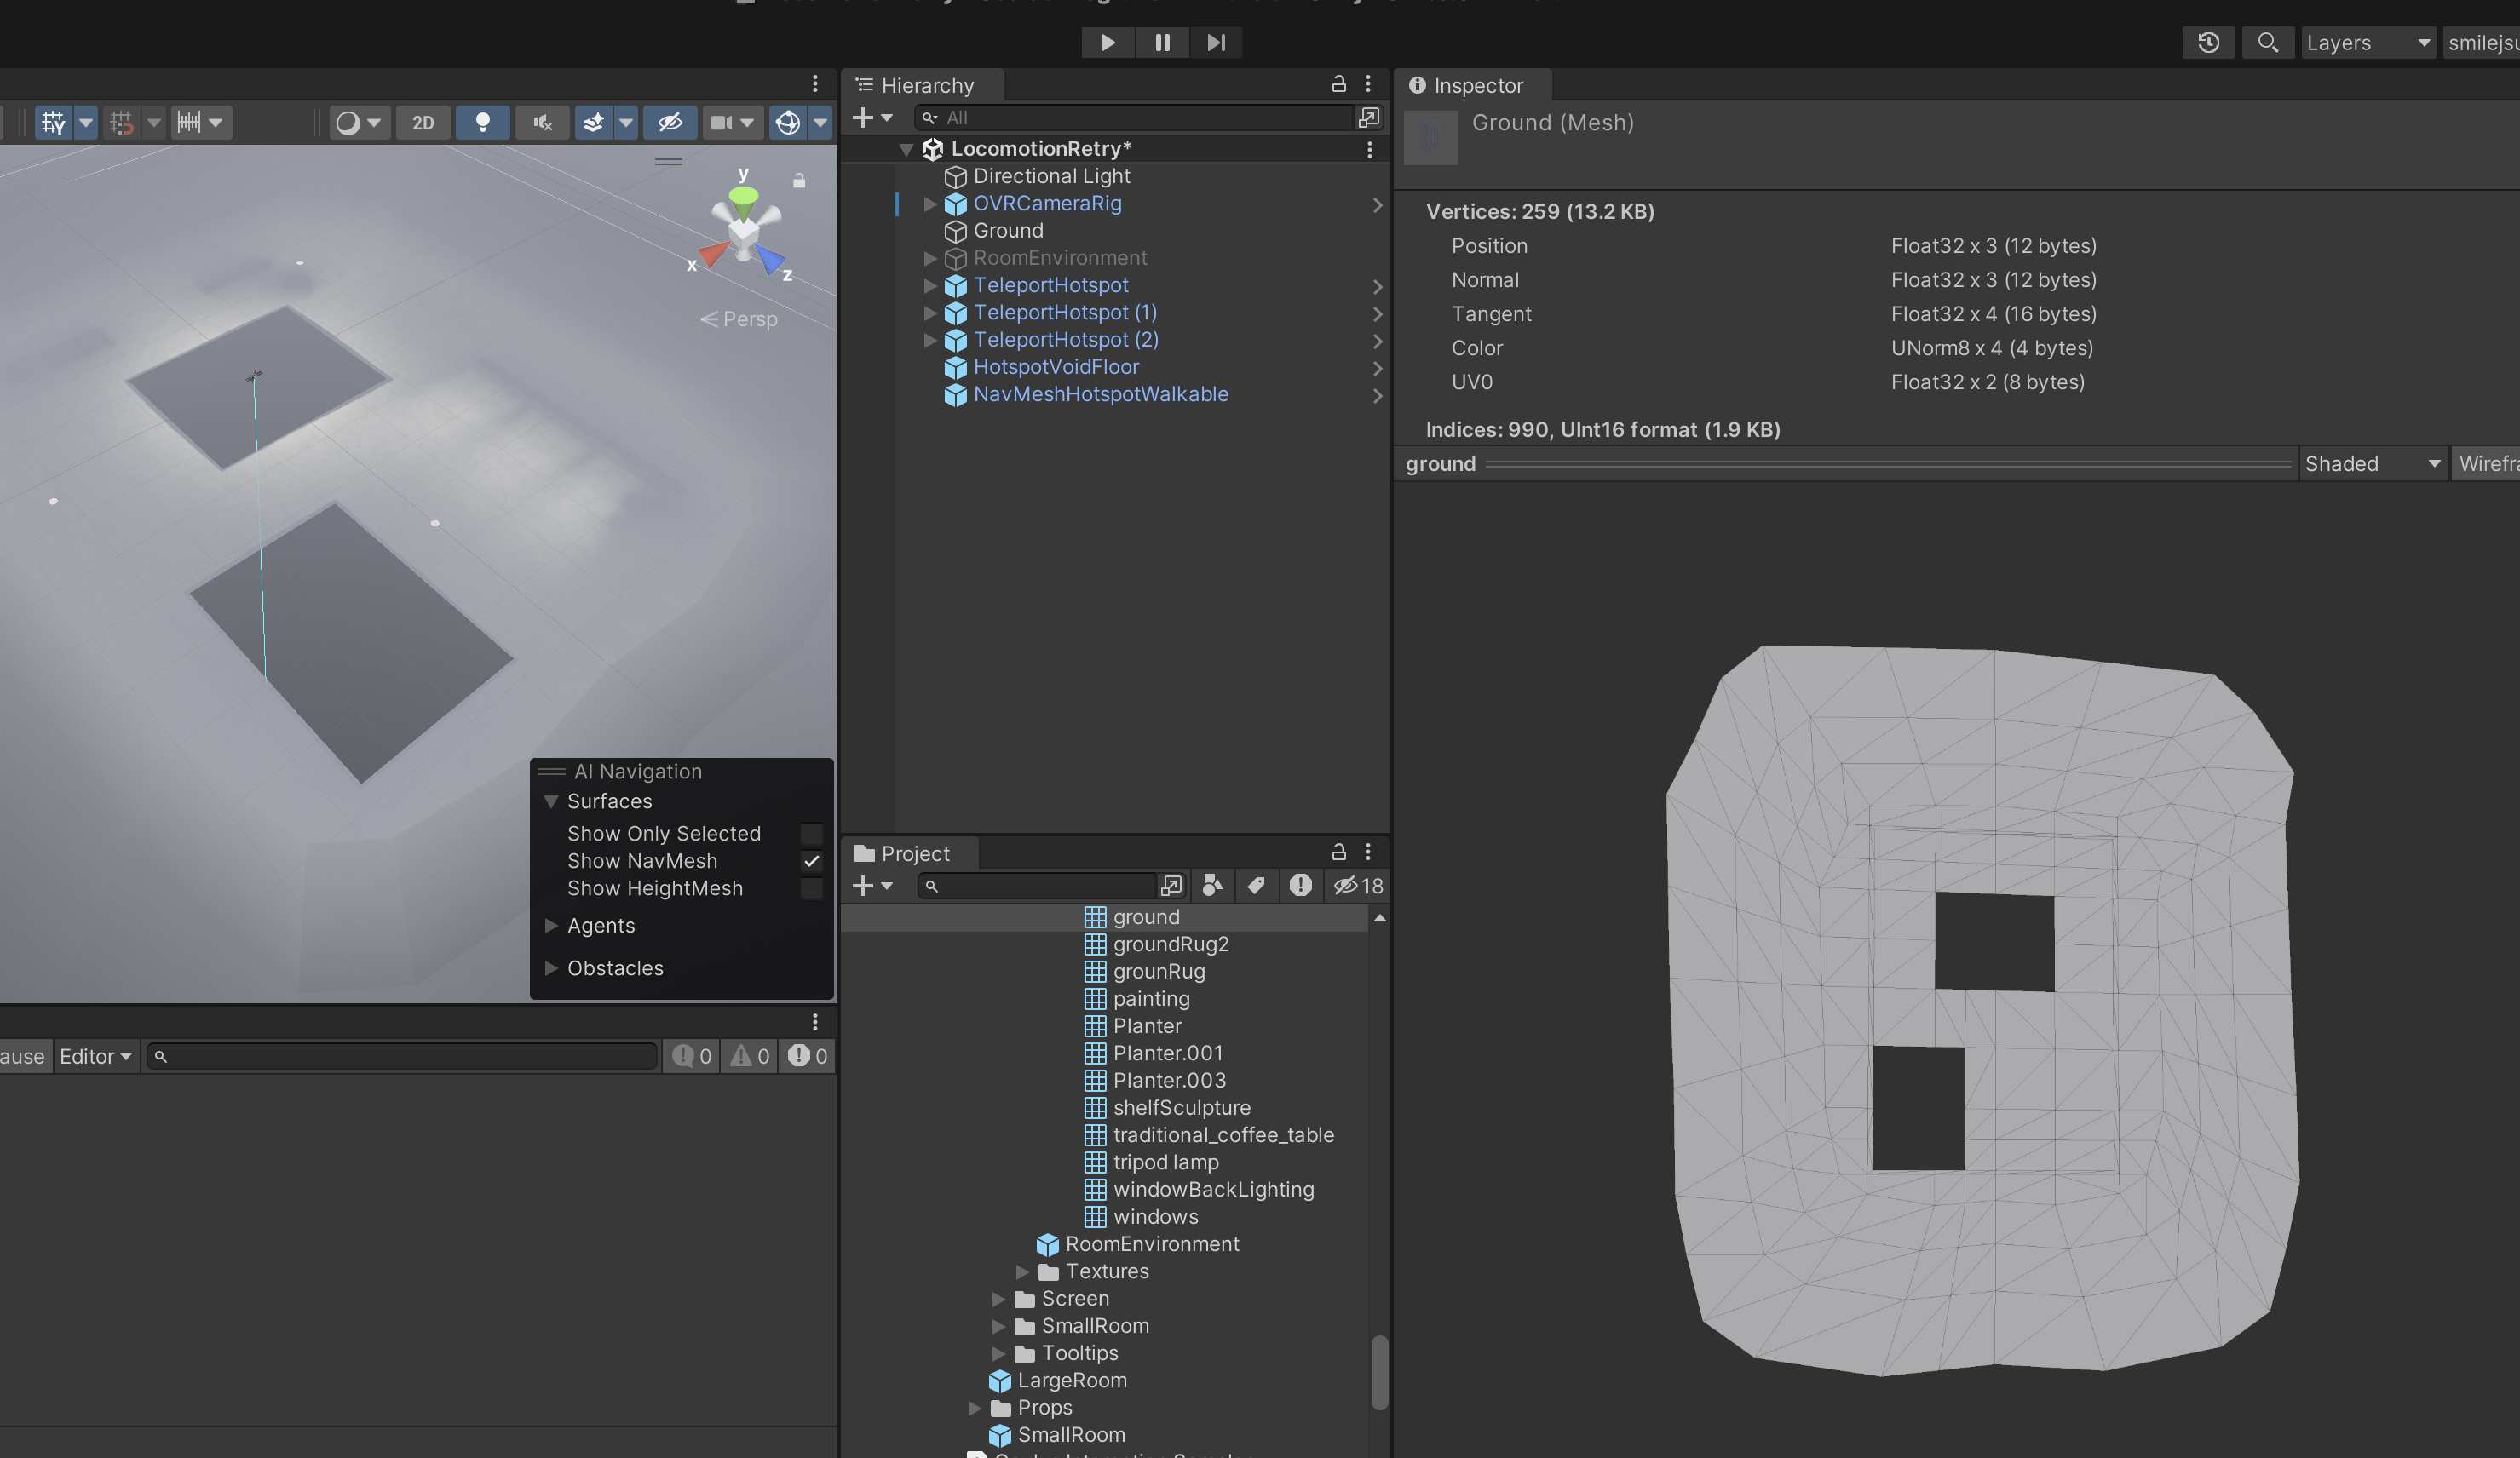
예제에 있는 메시랑 같은건지 확인 했다
왜 다르지..
로코모션용으로 따로 만든거구나..
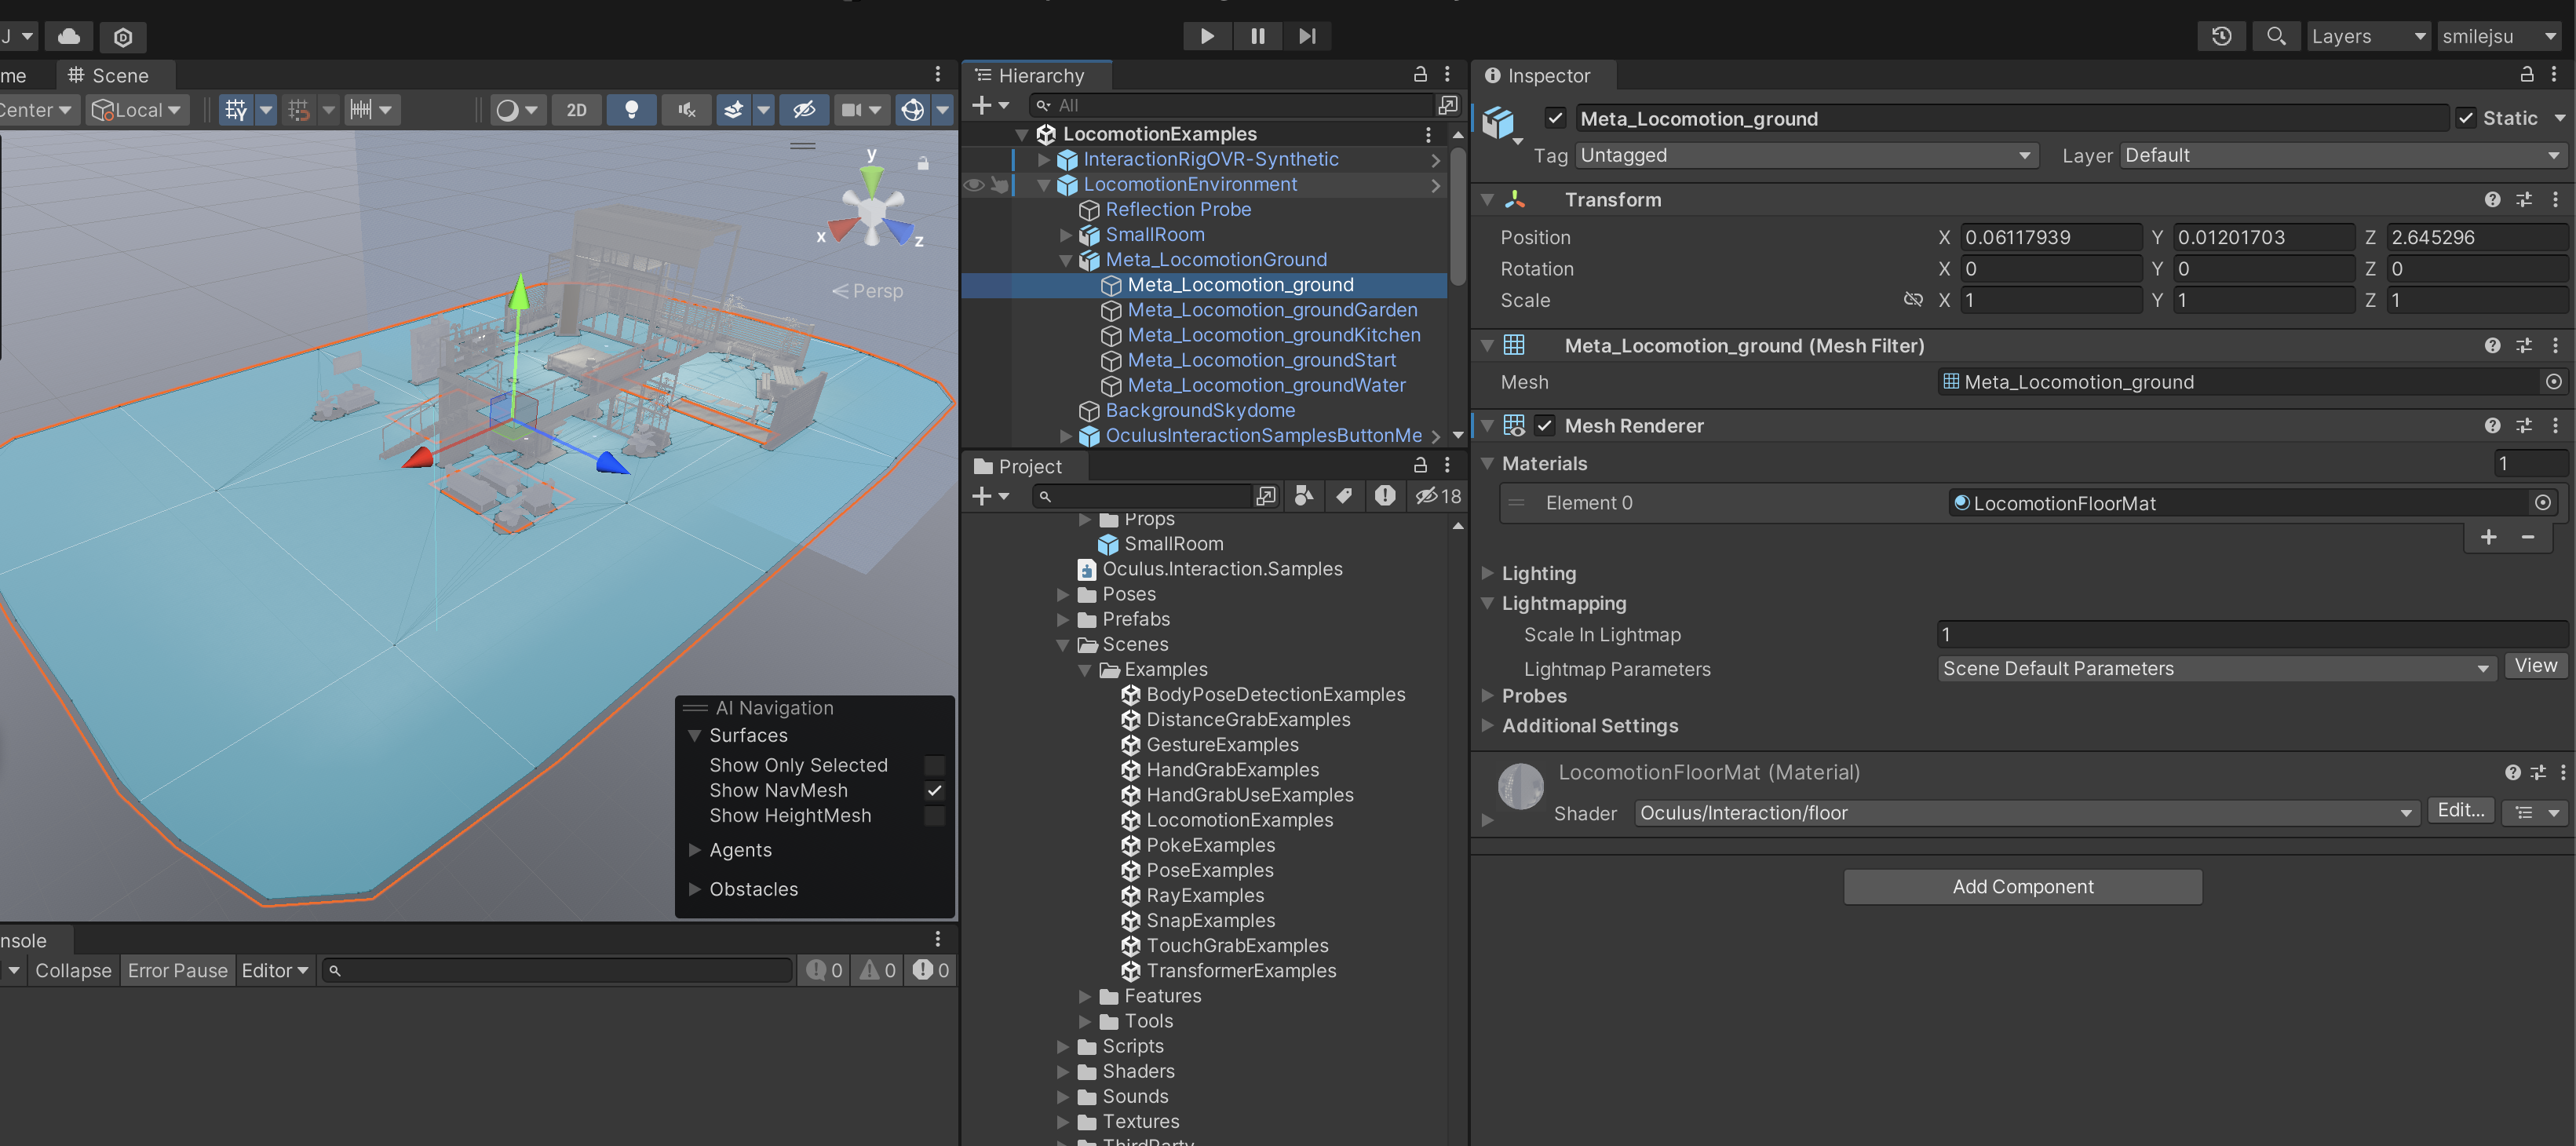
일단 프리팹으로 만들어 가져온다

잘 구워졌다
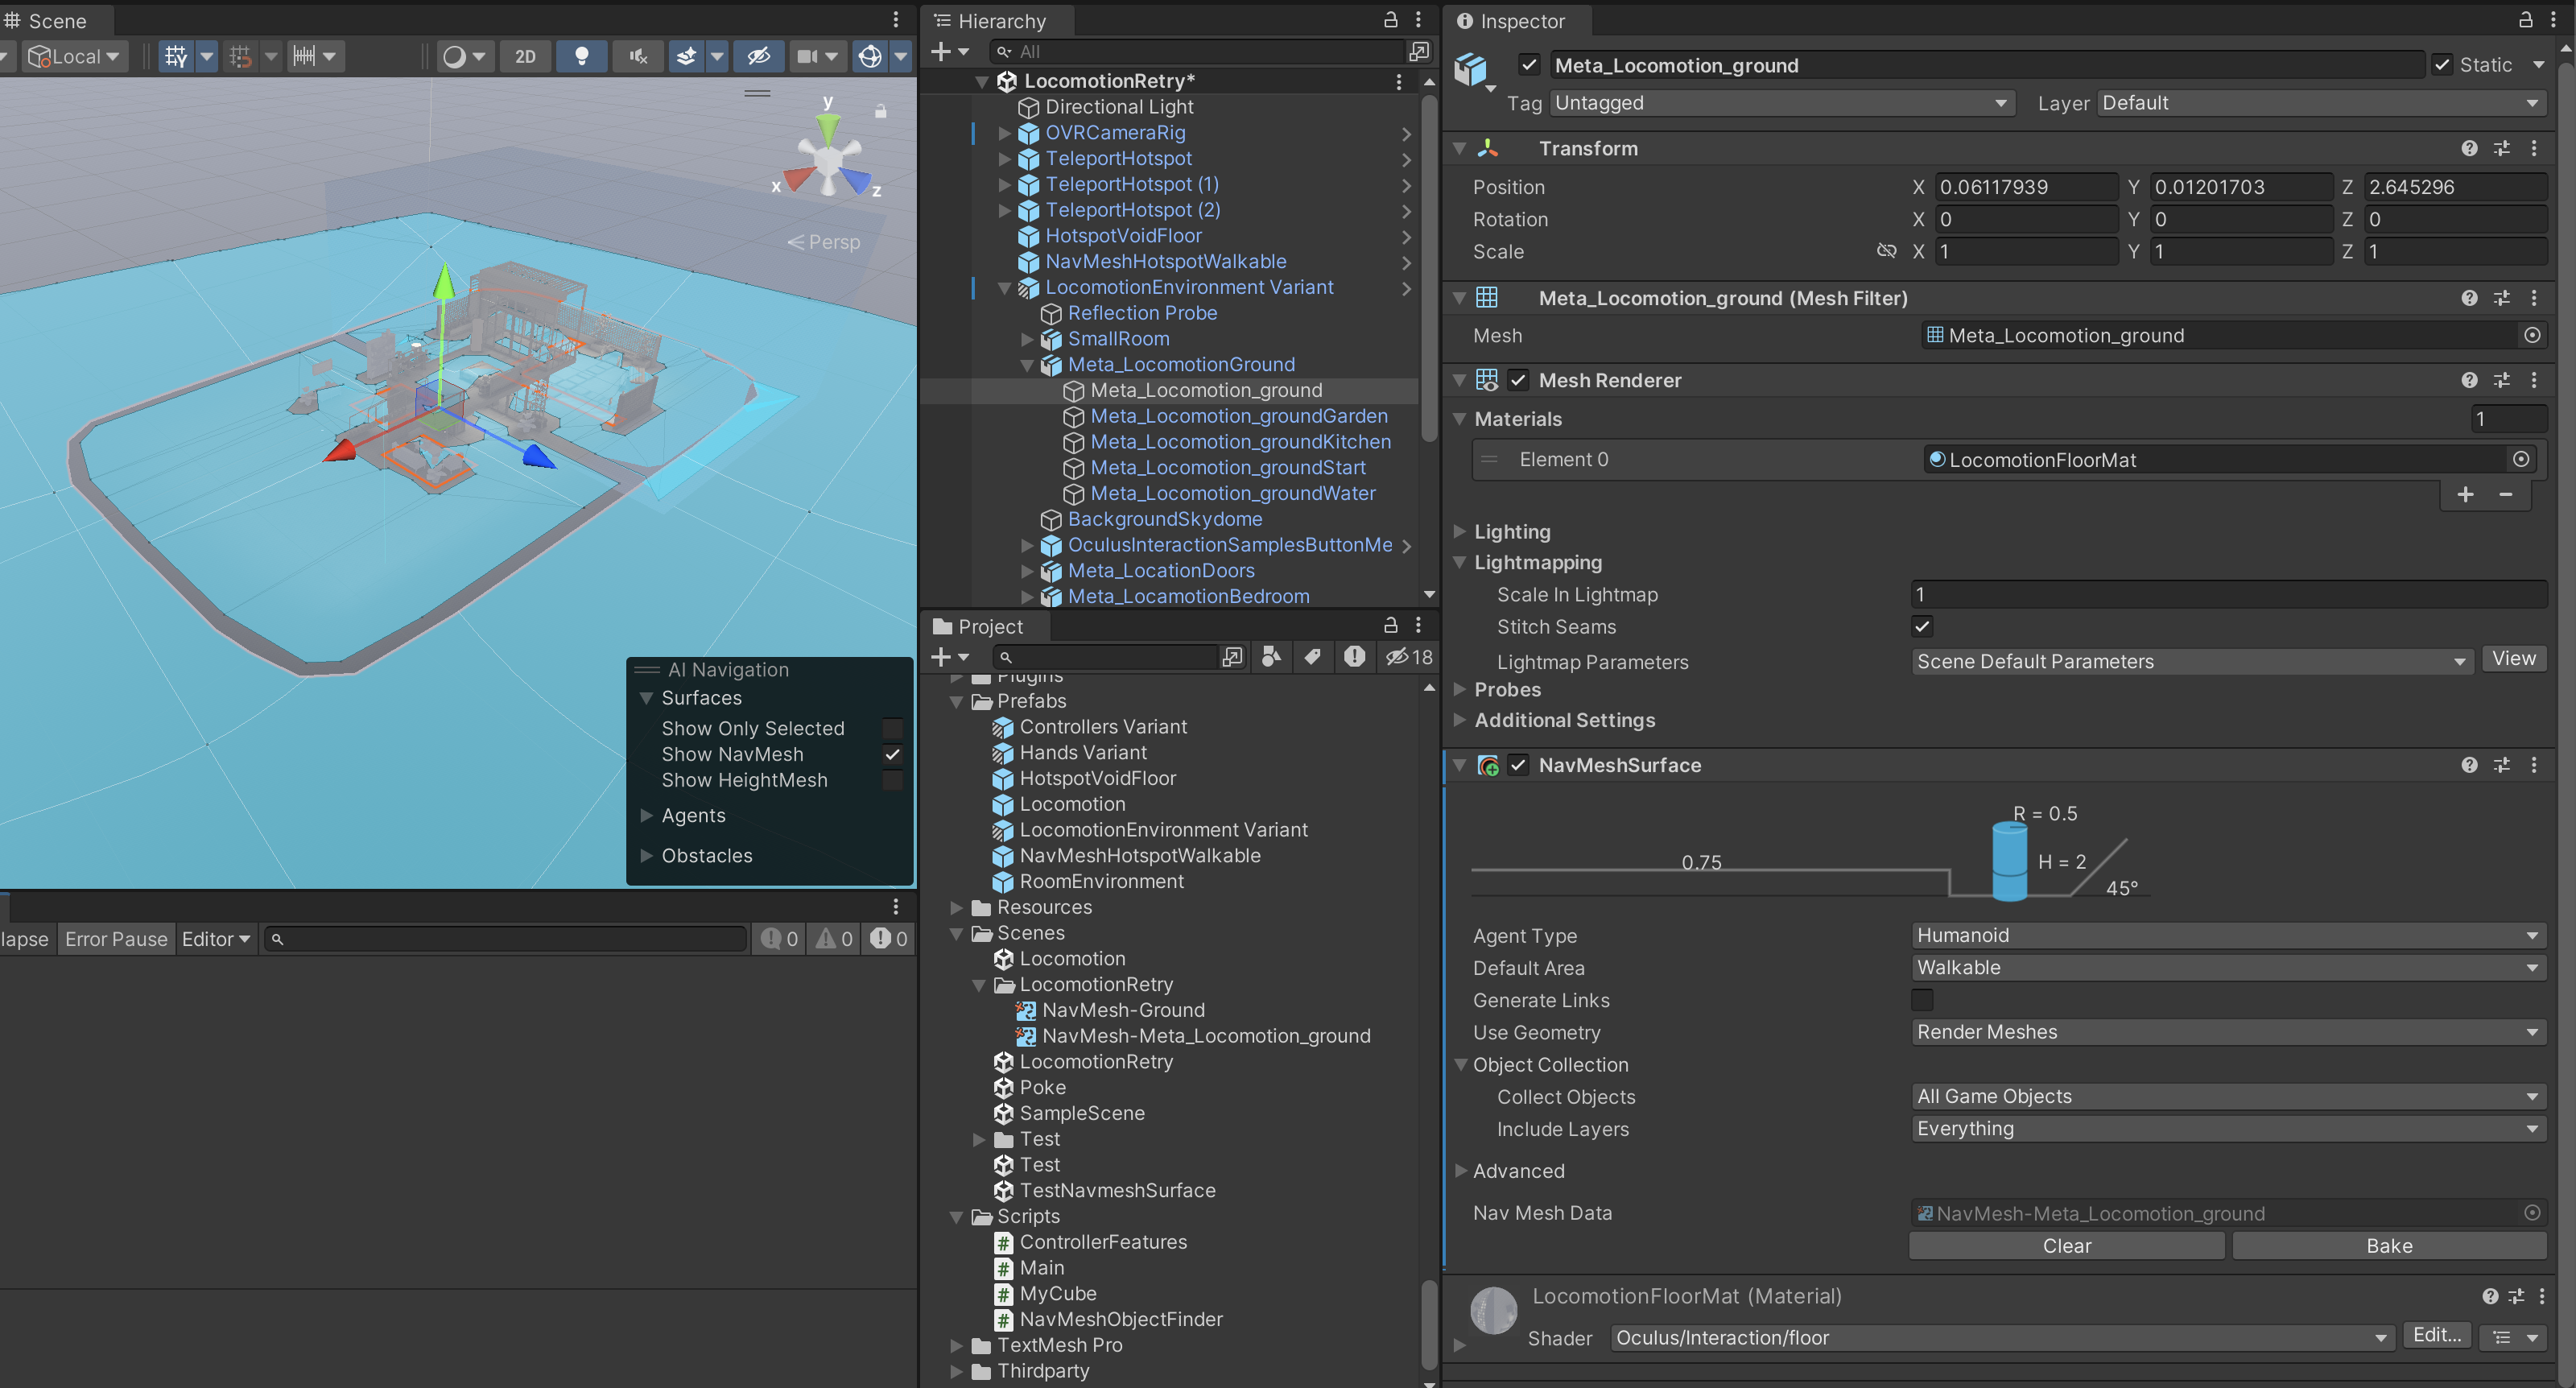
빌드후 실행 결과를 확인 하자
네비메시를 구워 사용자가 해당 지역 내 어디든 순간 이동할 수 있도록 순간 이동 가능한 영역과 범위 밖을 정의할 수 있었다
현재 장면이 로드되면 손으로 L자 모양을 만들거나 컨트롤러의 조이스틱을 앞으로 누릅니다.
손이나 컨트롤러에서 흰색 광선이 방출됩니다.
TeleportHotspot 또는 순간 이동 가능한 영역 위로 마우스를 가져간 후 엄지와 검지를 집거나(손을 사용하는 경우) 조이스틱을 놓으면(컨트롤러를 사용하는 경우) 해당 위치로 순간 이동합니다.
아직 컨트롤러쪽은 설정 안해서 핸드로만 된다
컨트롤러 적용하기
LocomotionControllerInteractorGroup 프리팹을 찾아 OVRControllers/LeftController/ControllerInteractors에 넣어준다
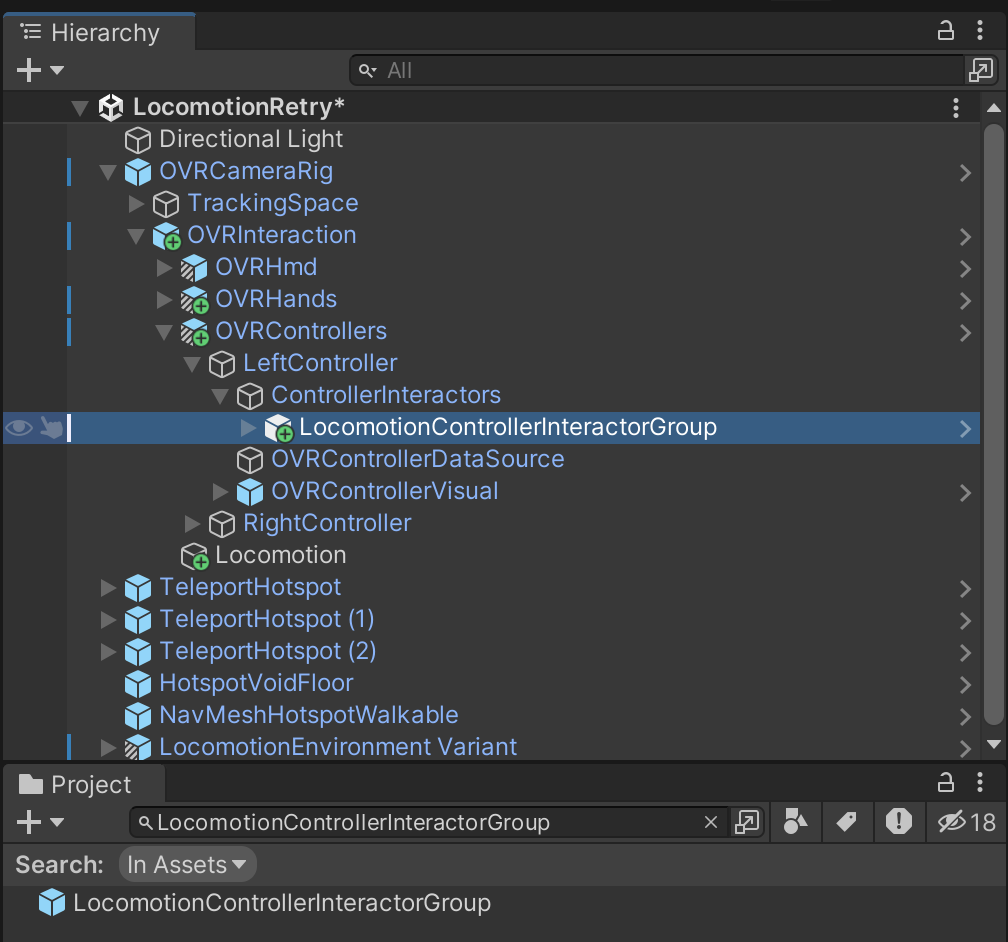
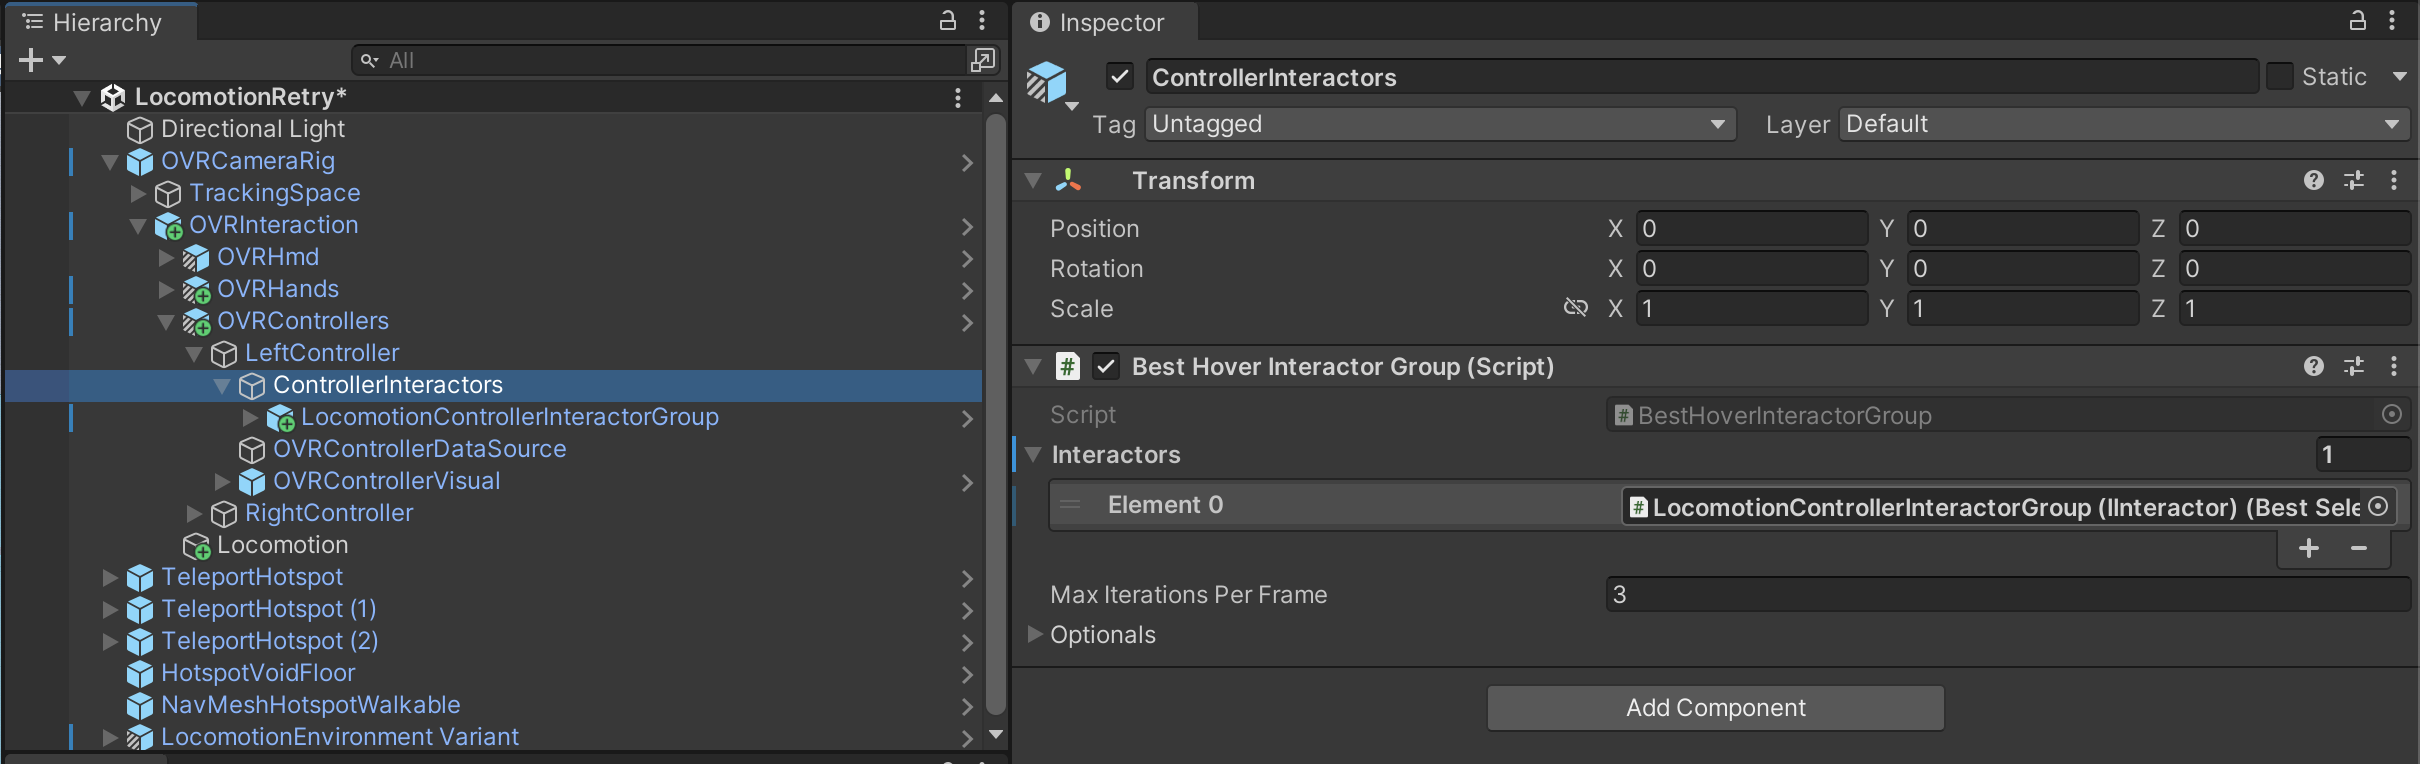
ControllerInteractors를 선택해 + 버튼을 눌러 필드를 만들고 LocomotionControllerInteractorGroup을 할당 한다
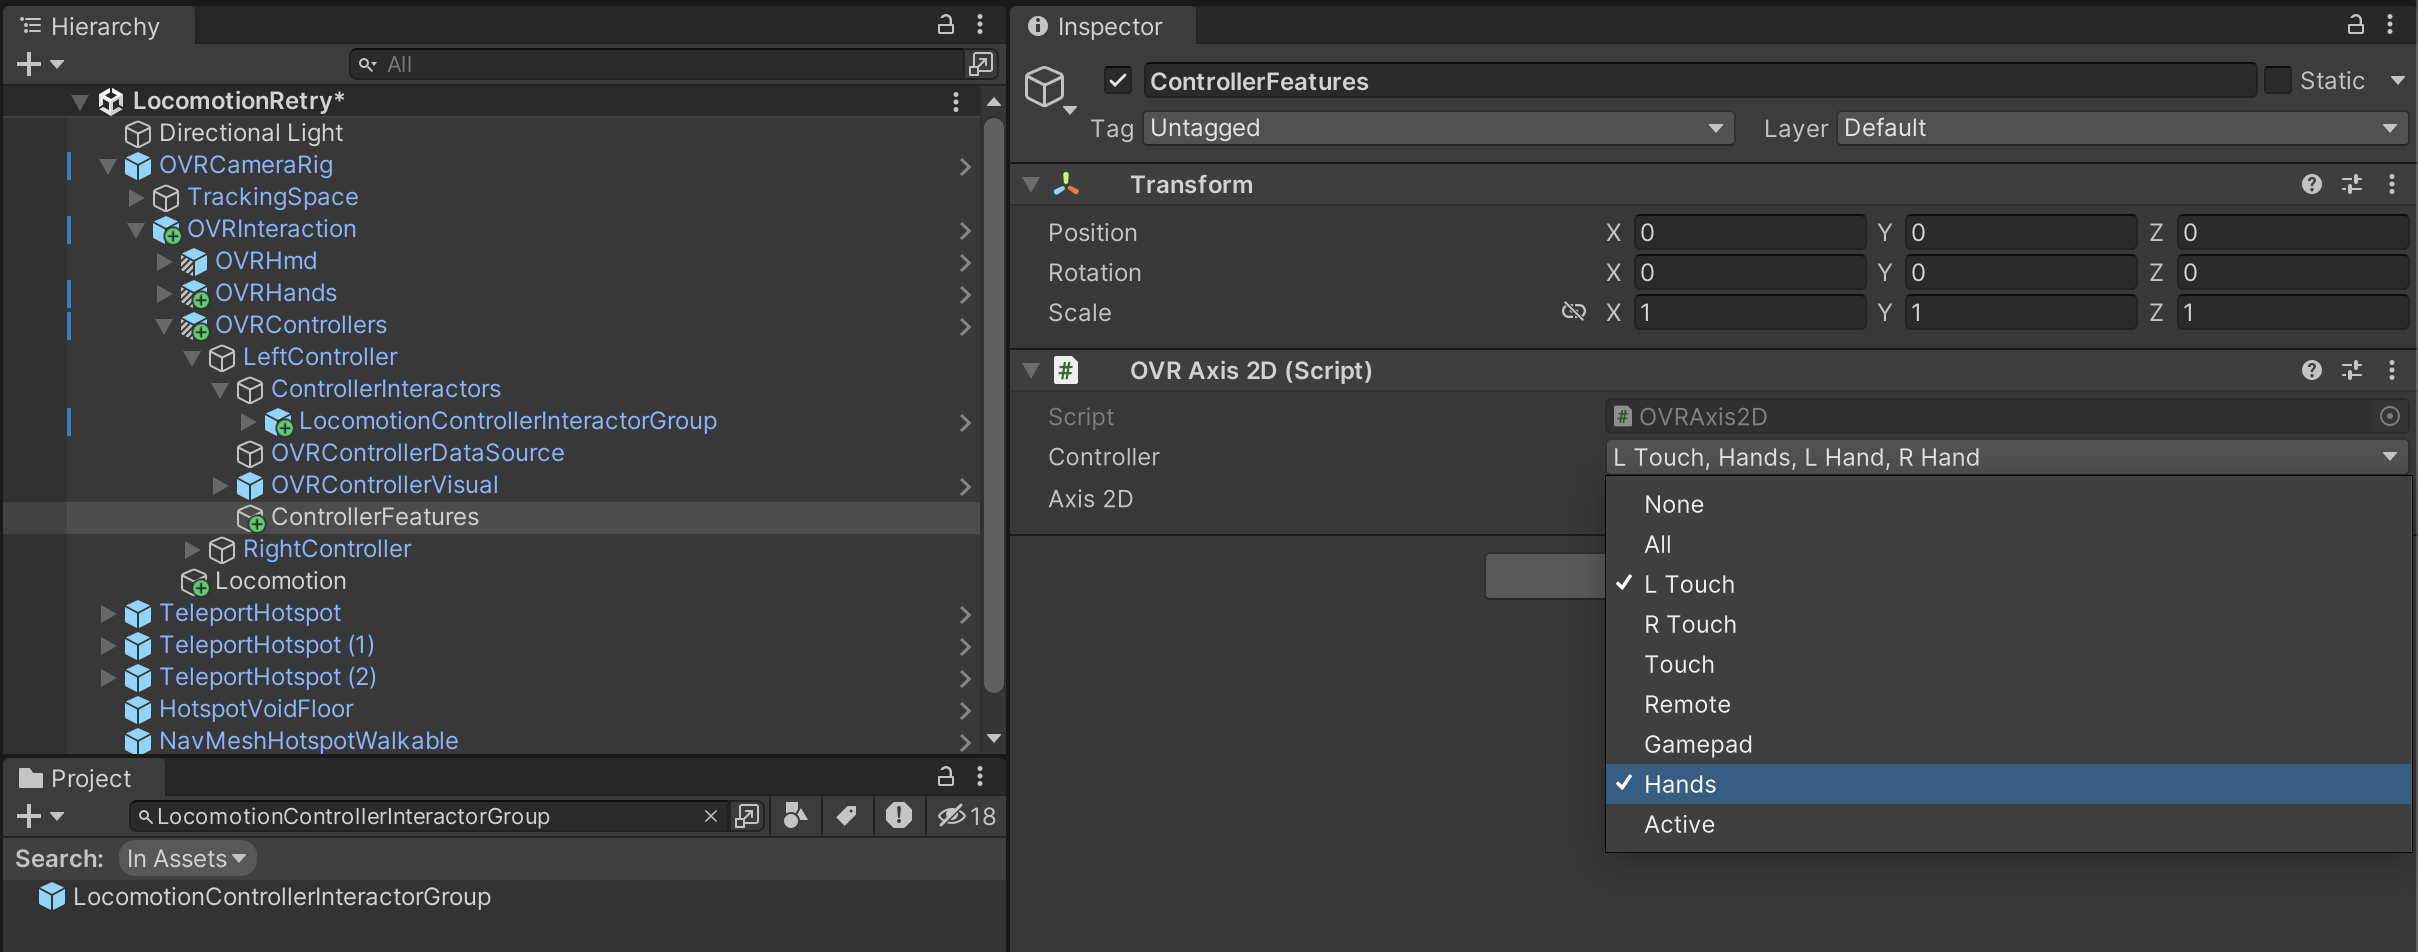
OVRControllers/LeftController 자식으로 빈오브젝트 (ControllerFeatures) 를 만든다
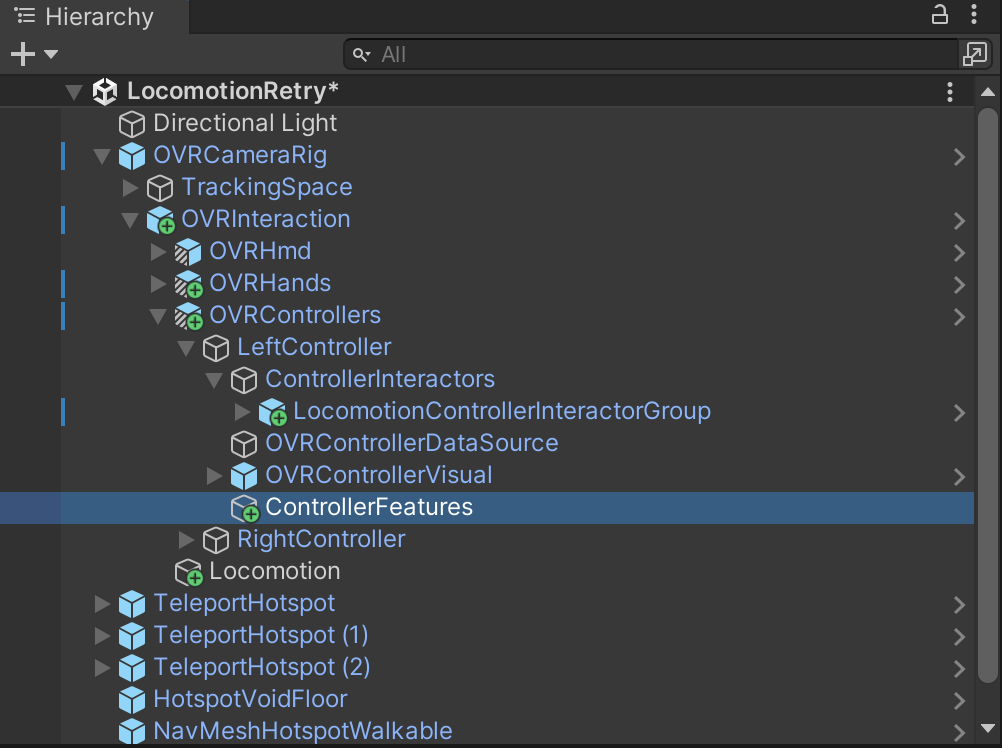
OVRAxis2D컴포넌트를 추가 하고 Controller 에는 LTouch, L Hand를 설정 한다
이때 Hands를 선택해 LHand, RHand가 모두 추가 되었다고 해도 잘 동작 한다 (이부분 의문)
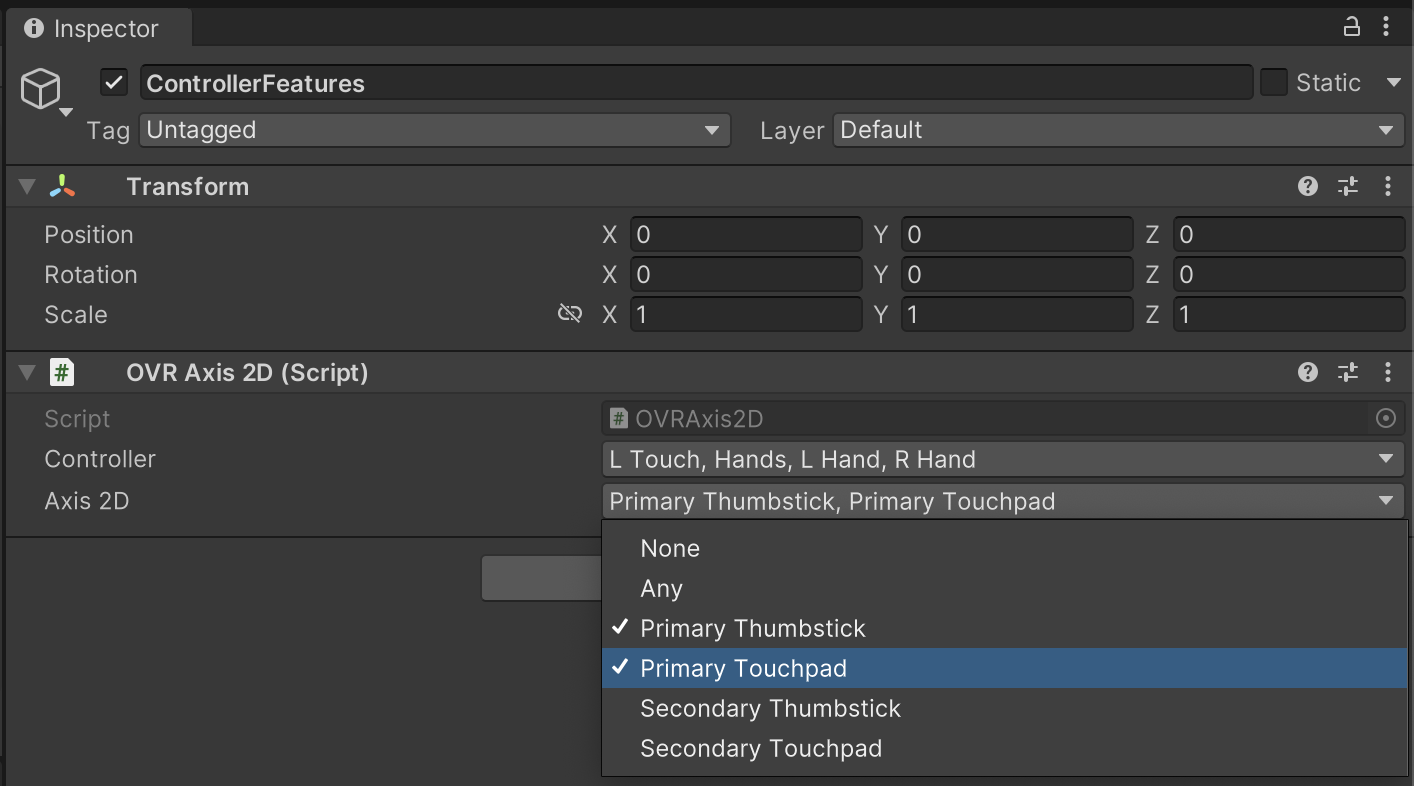
Axis2D에는 Primary Thumbstick, Primary Touchpad를 설정 한다
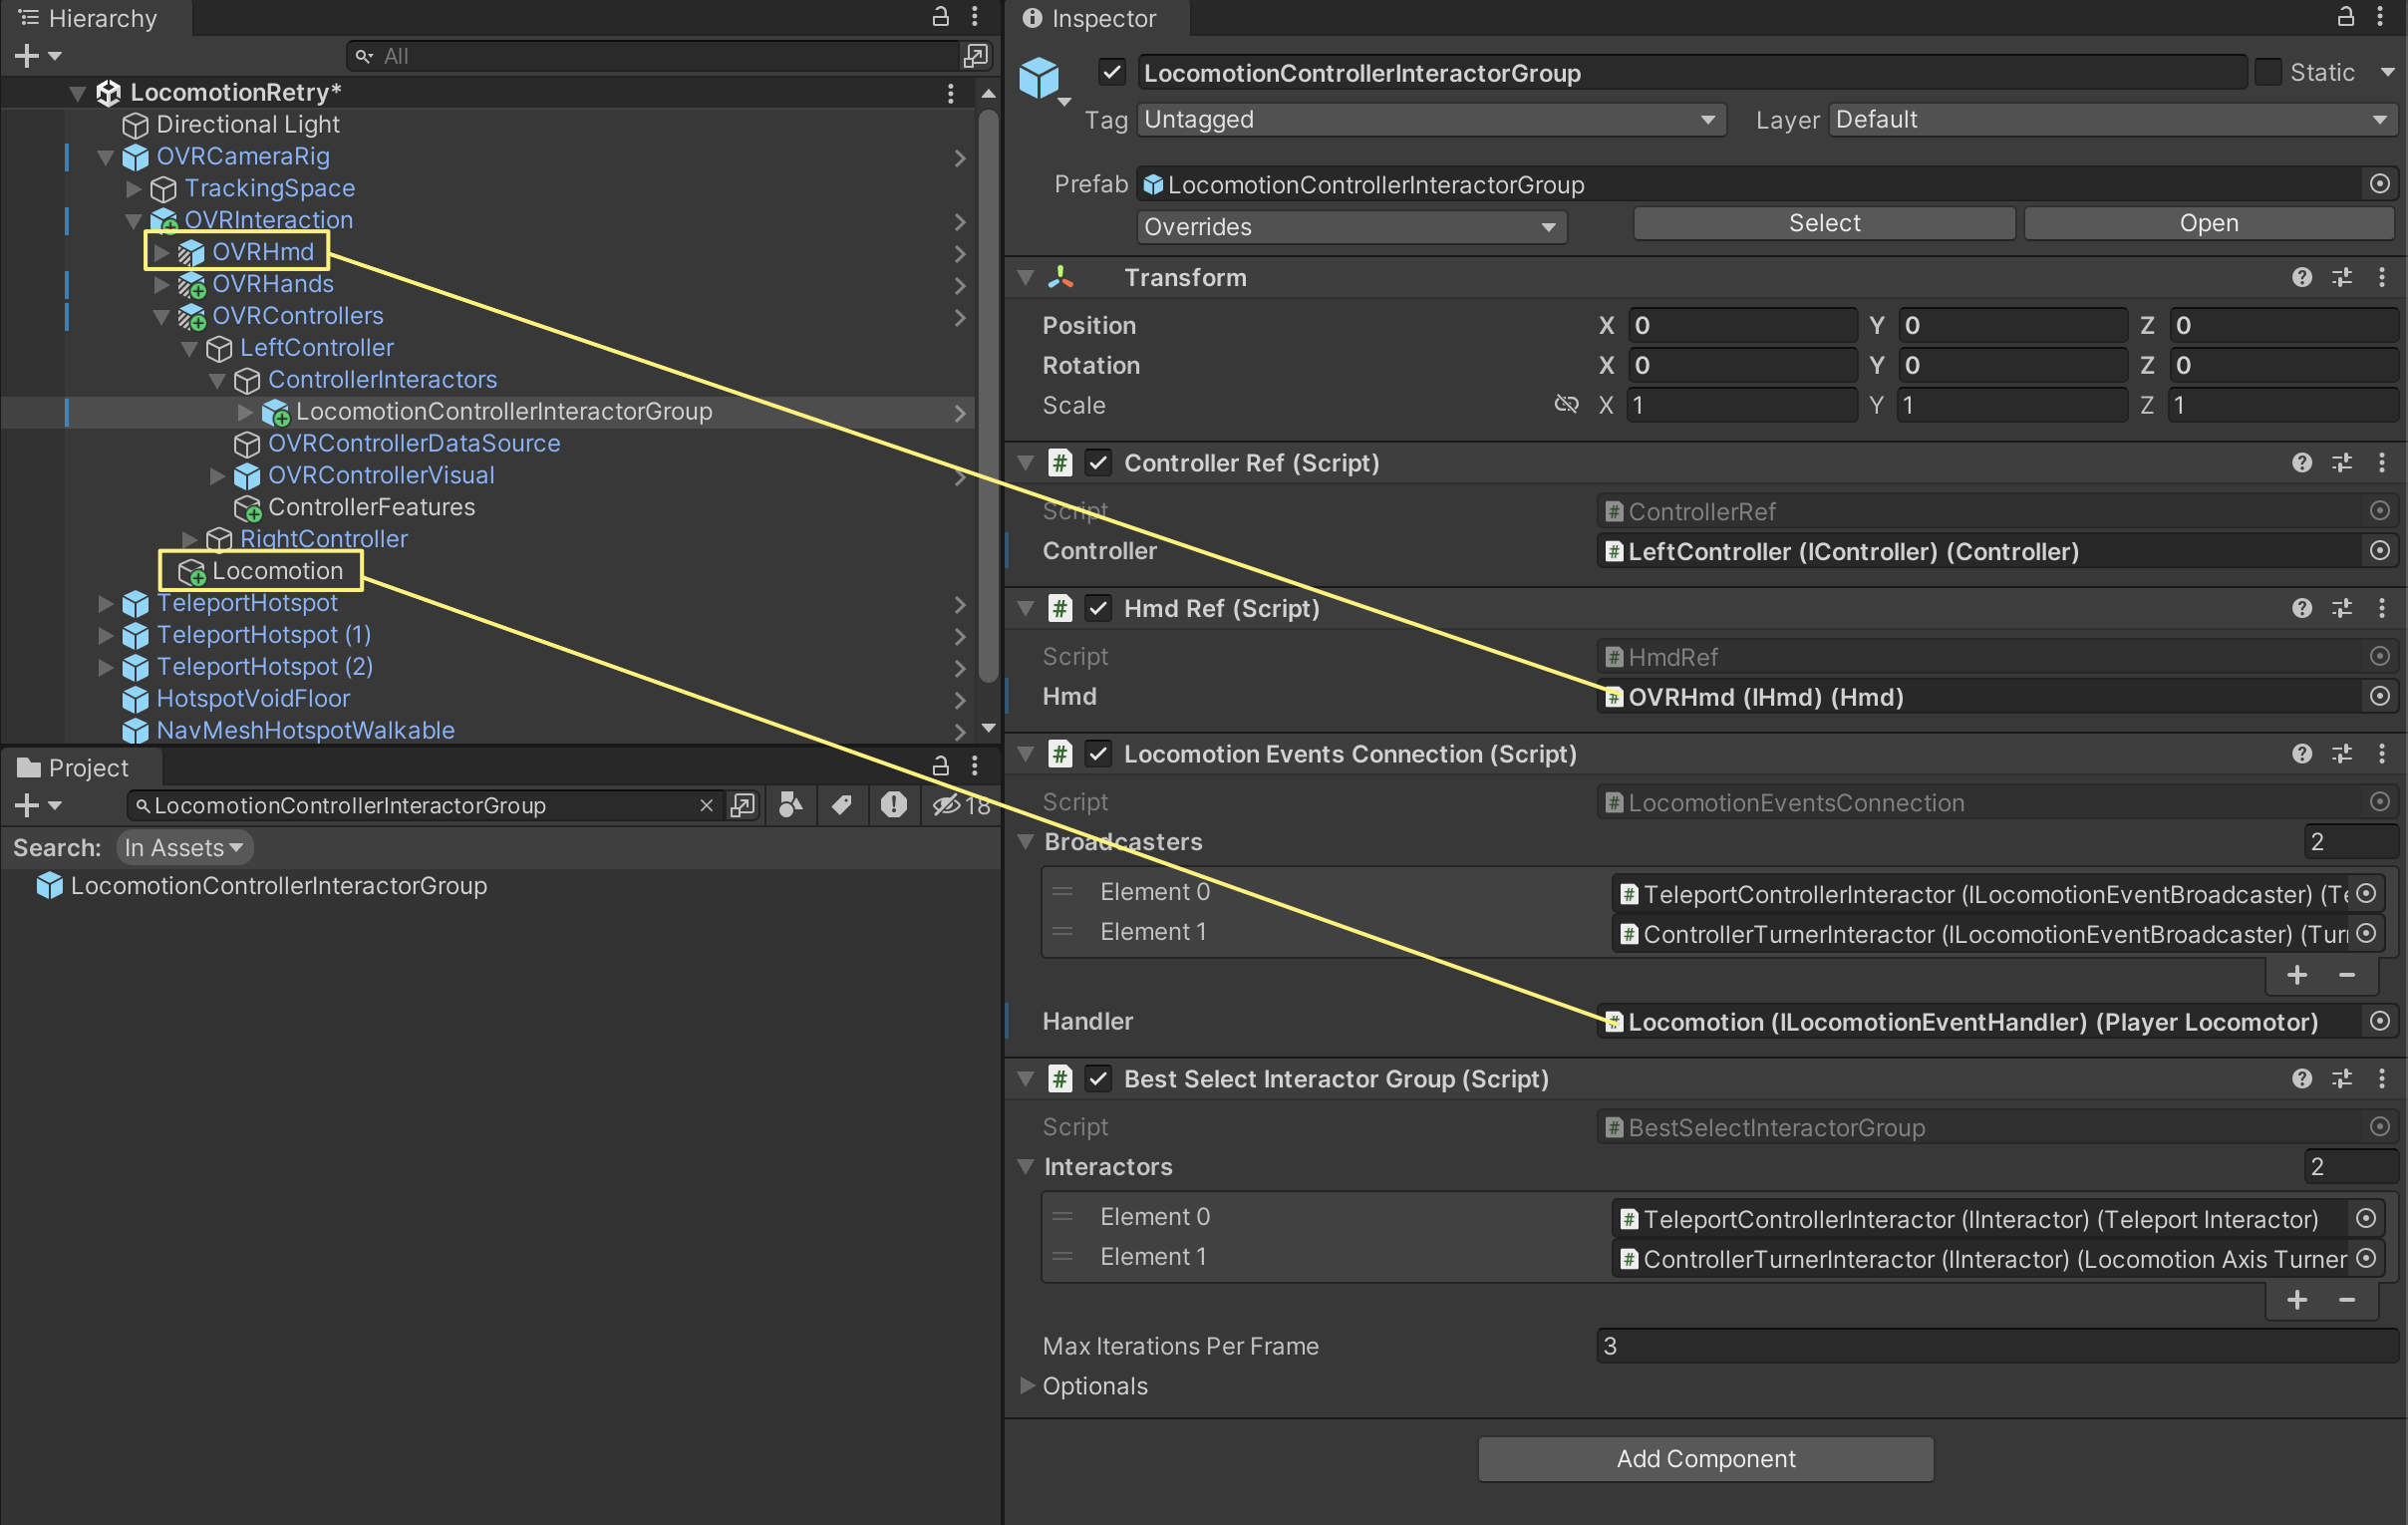
LocomotionControllerInteractorGroup를 선택후 Hmd와 Handler에 OVRHmd, Locomotion을 각각 할당 한다
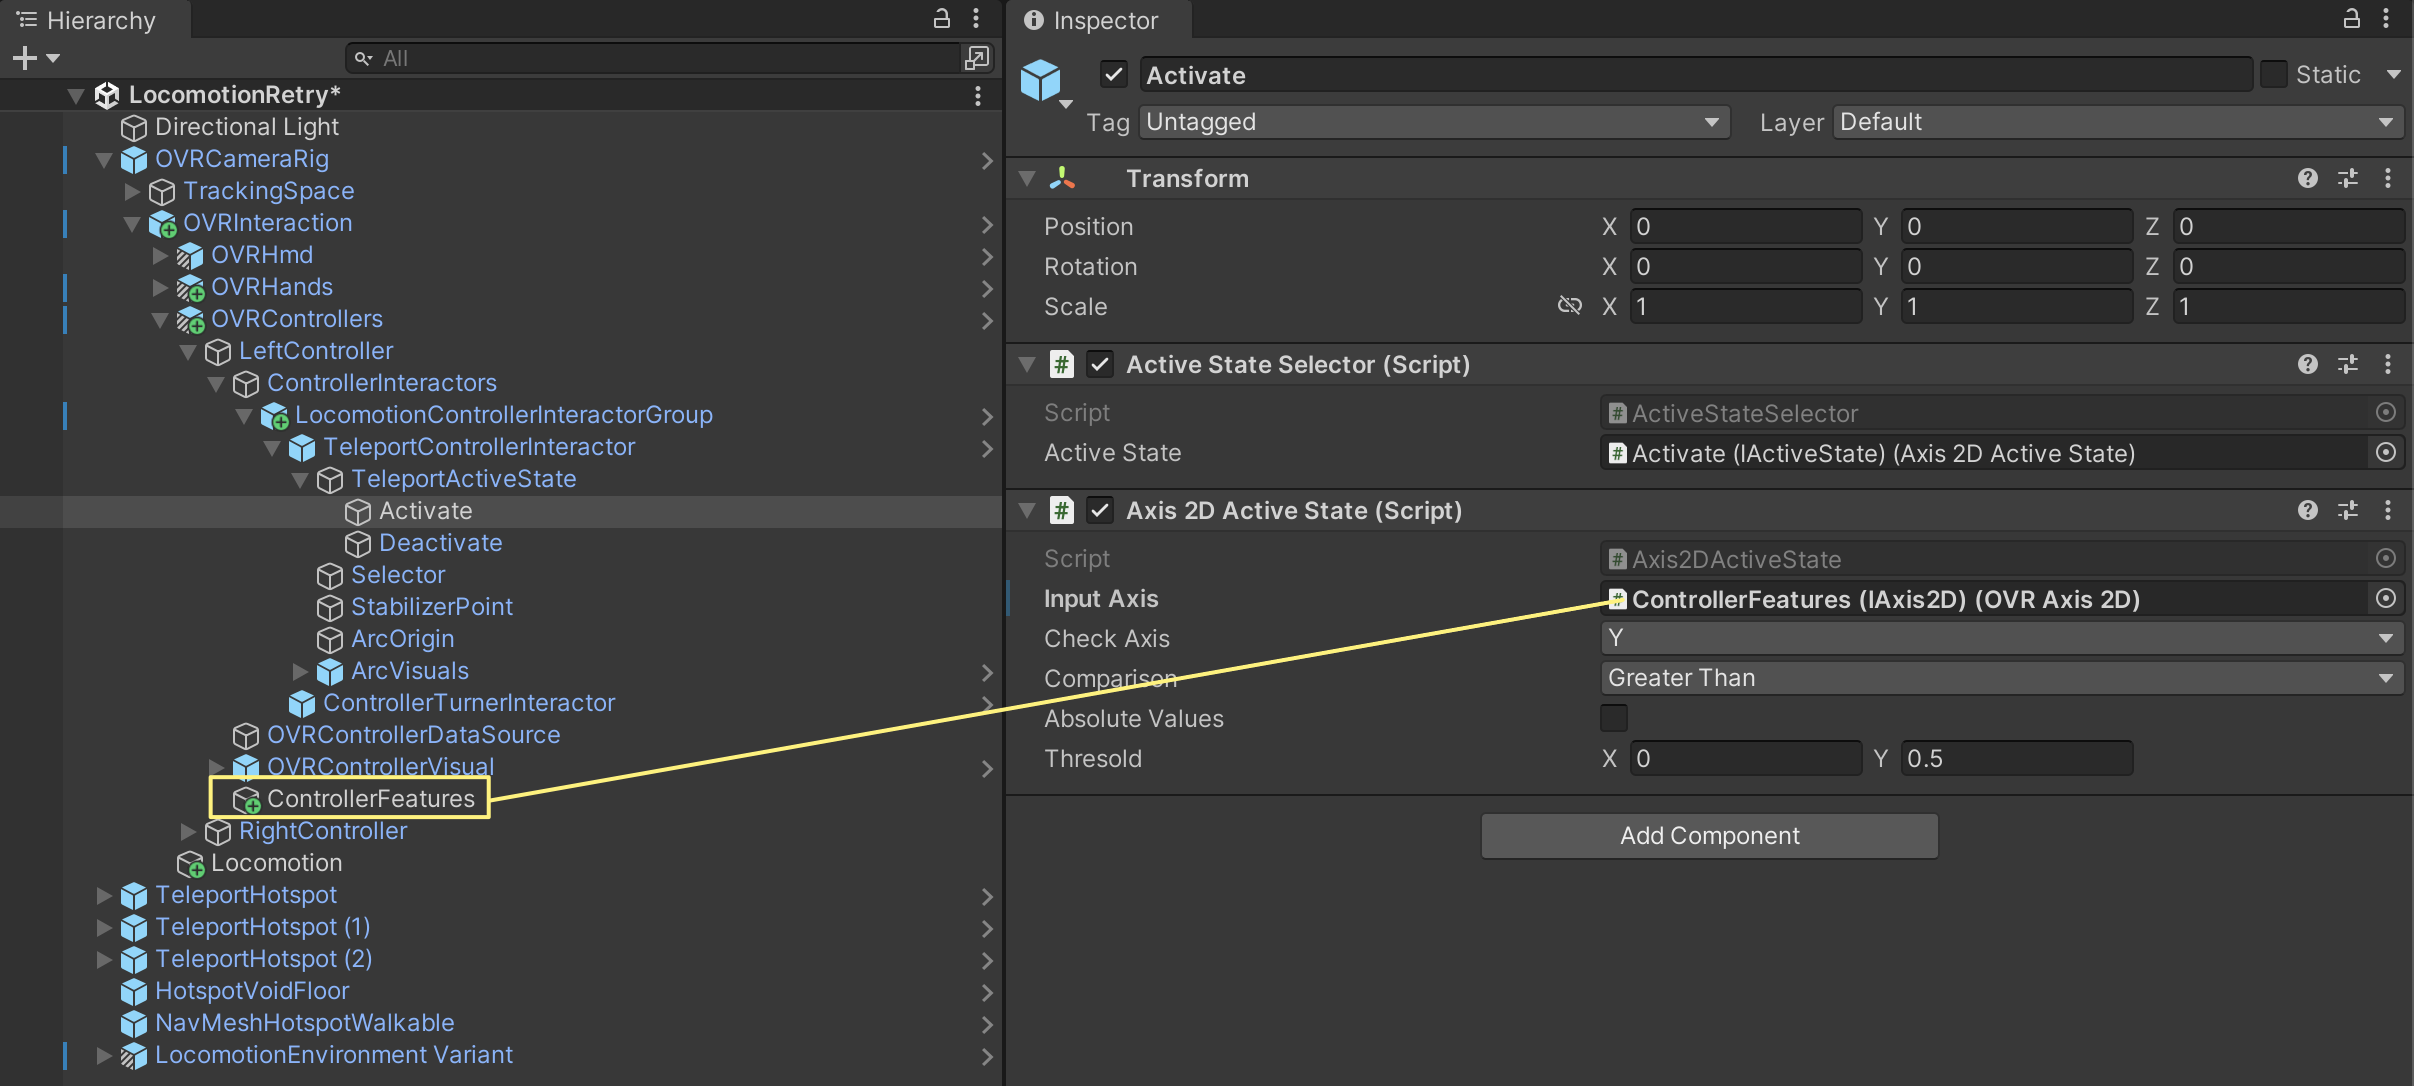
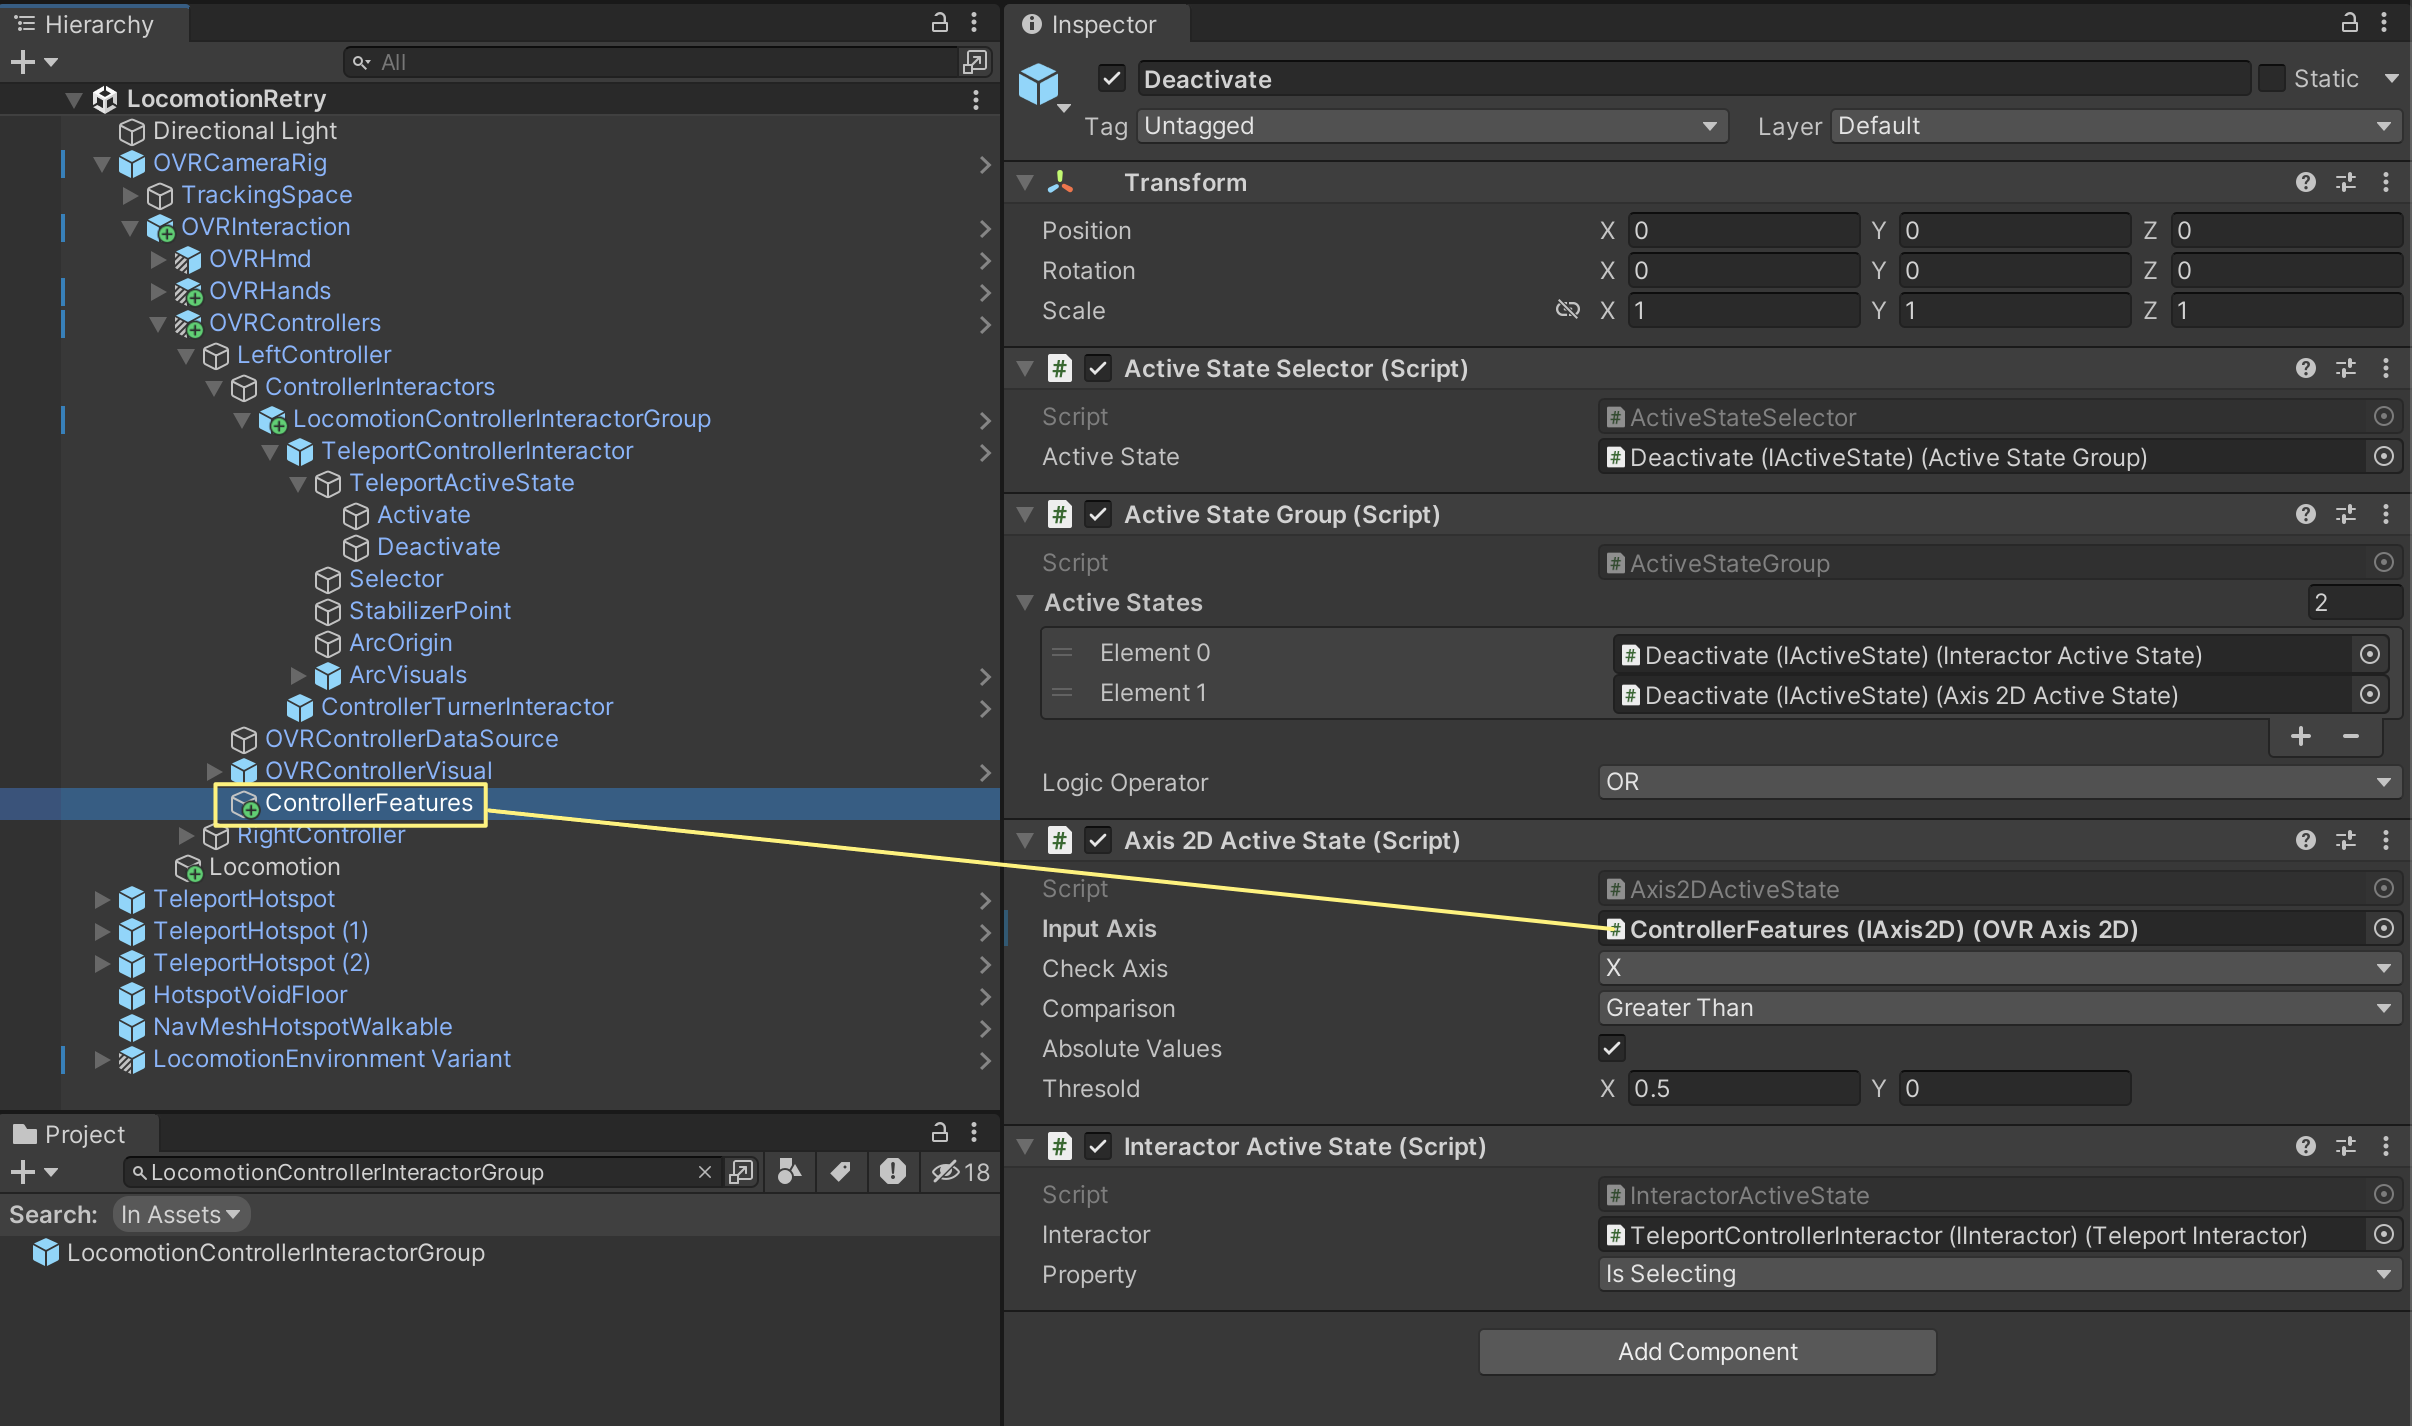
LocomotionControllerInteractorGroup/TeleportControllerInteractor/TeleportActiveState의 을 열어
Active를 선택 하고 Input Axis에 ControllerFeatures를 할당 한다
Deactivate를 선택 하고 Input Axis에 ControllerFeatures를 할당 한다
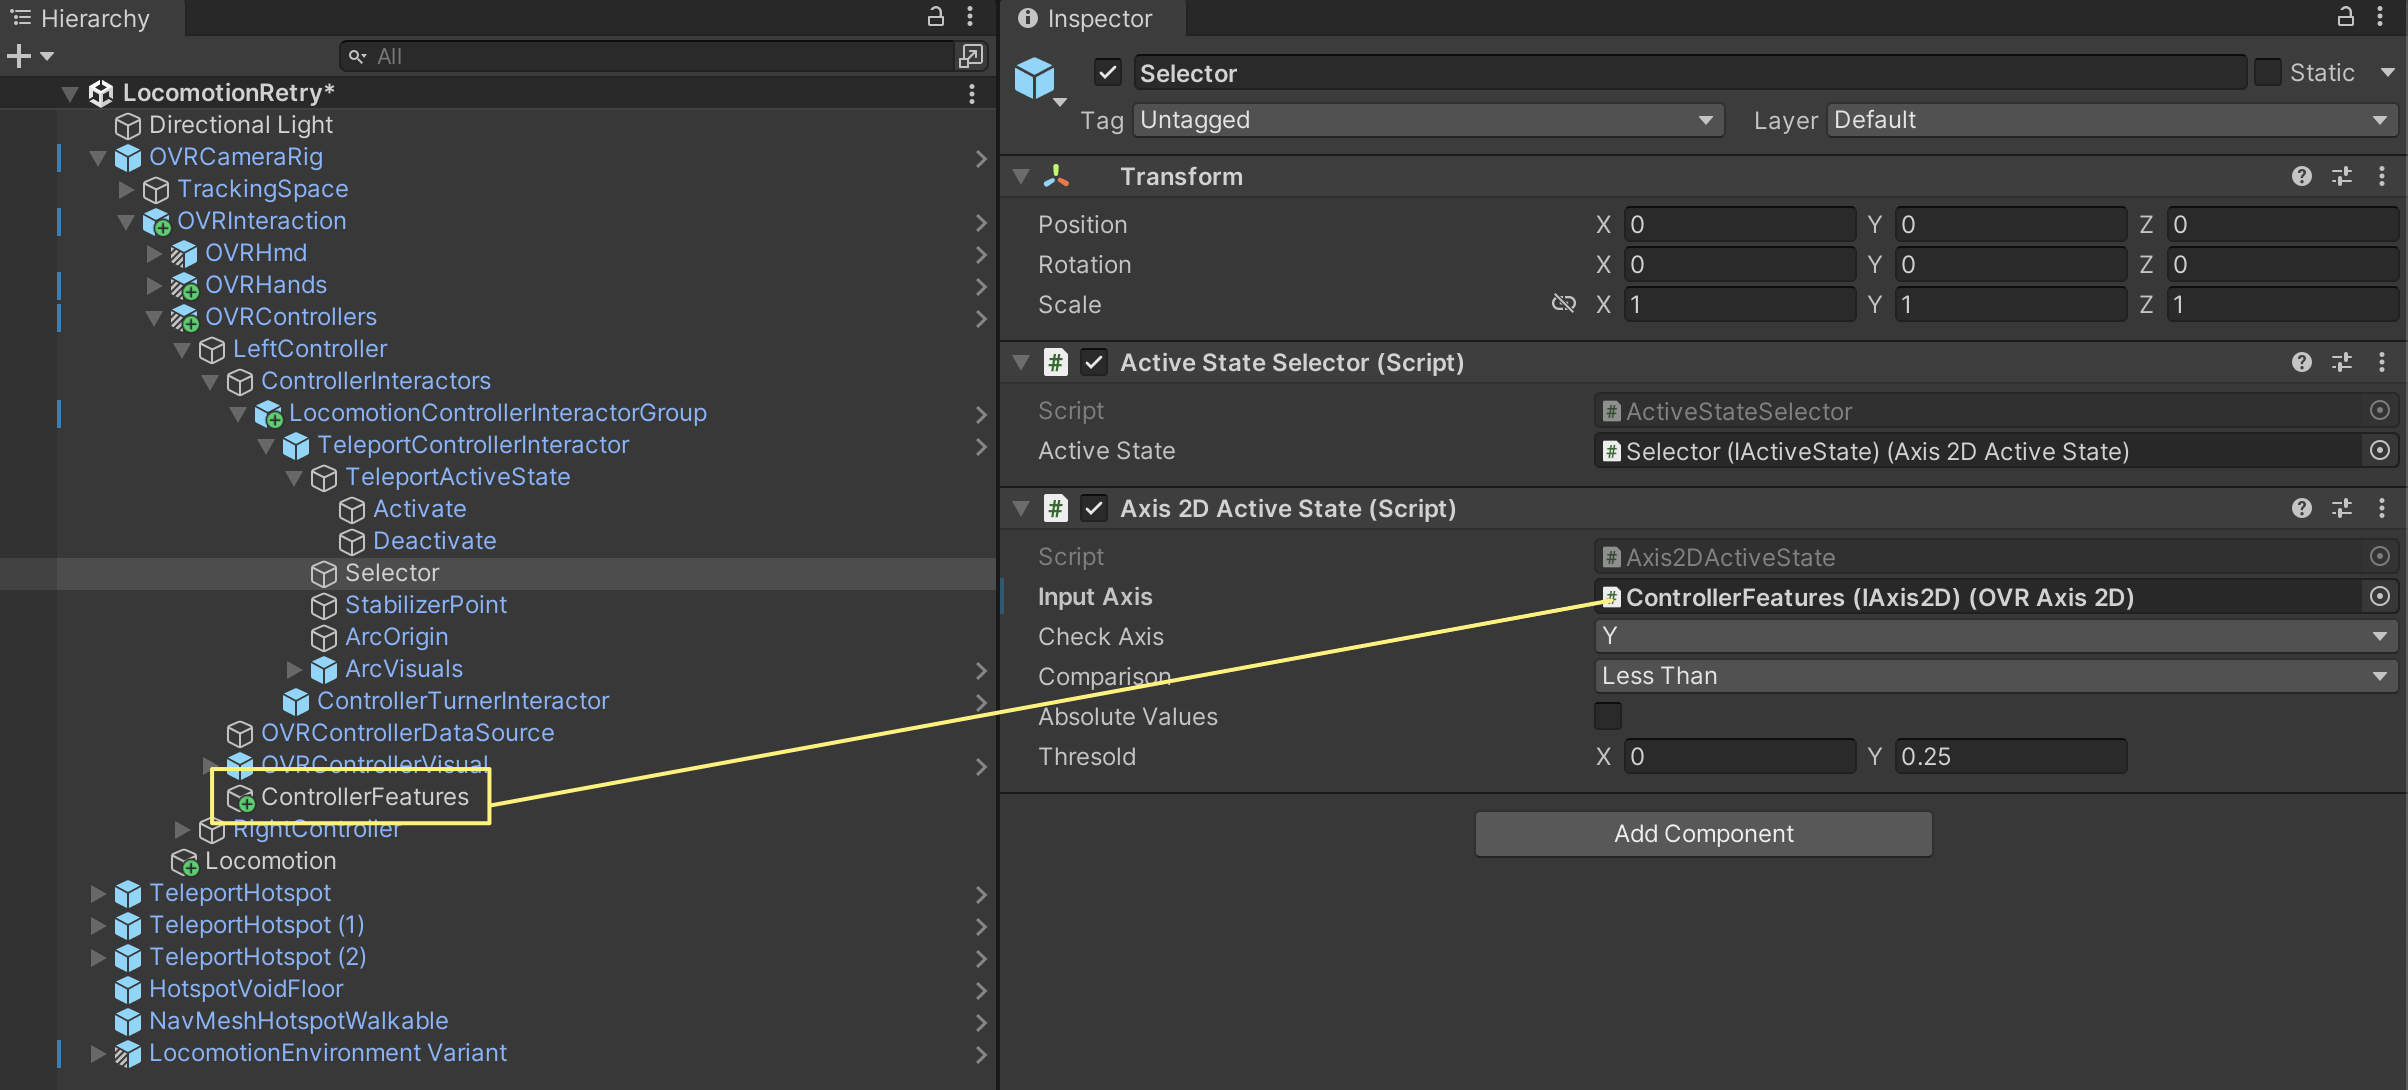
Selector를 선택 하고 Input Axis에 ControllerFeatures를 할당 한다
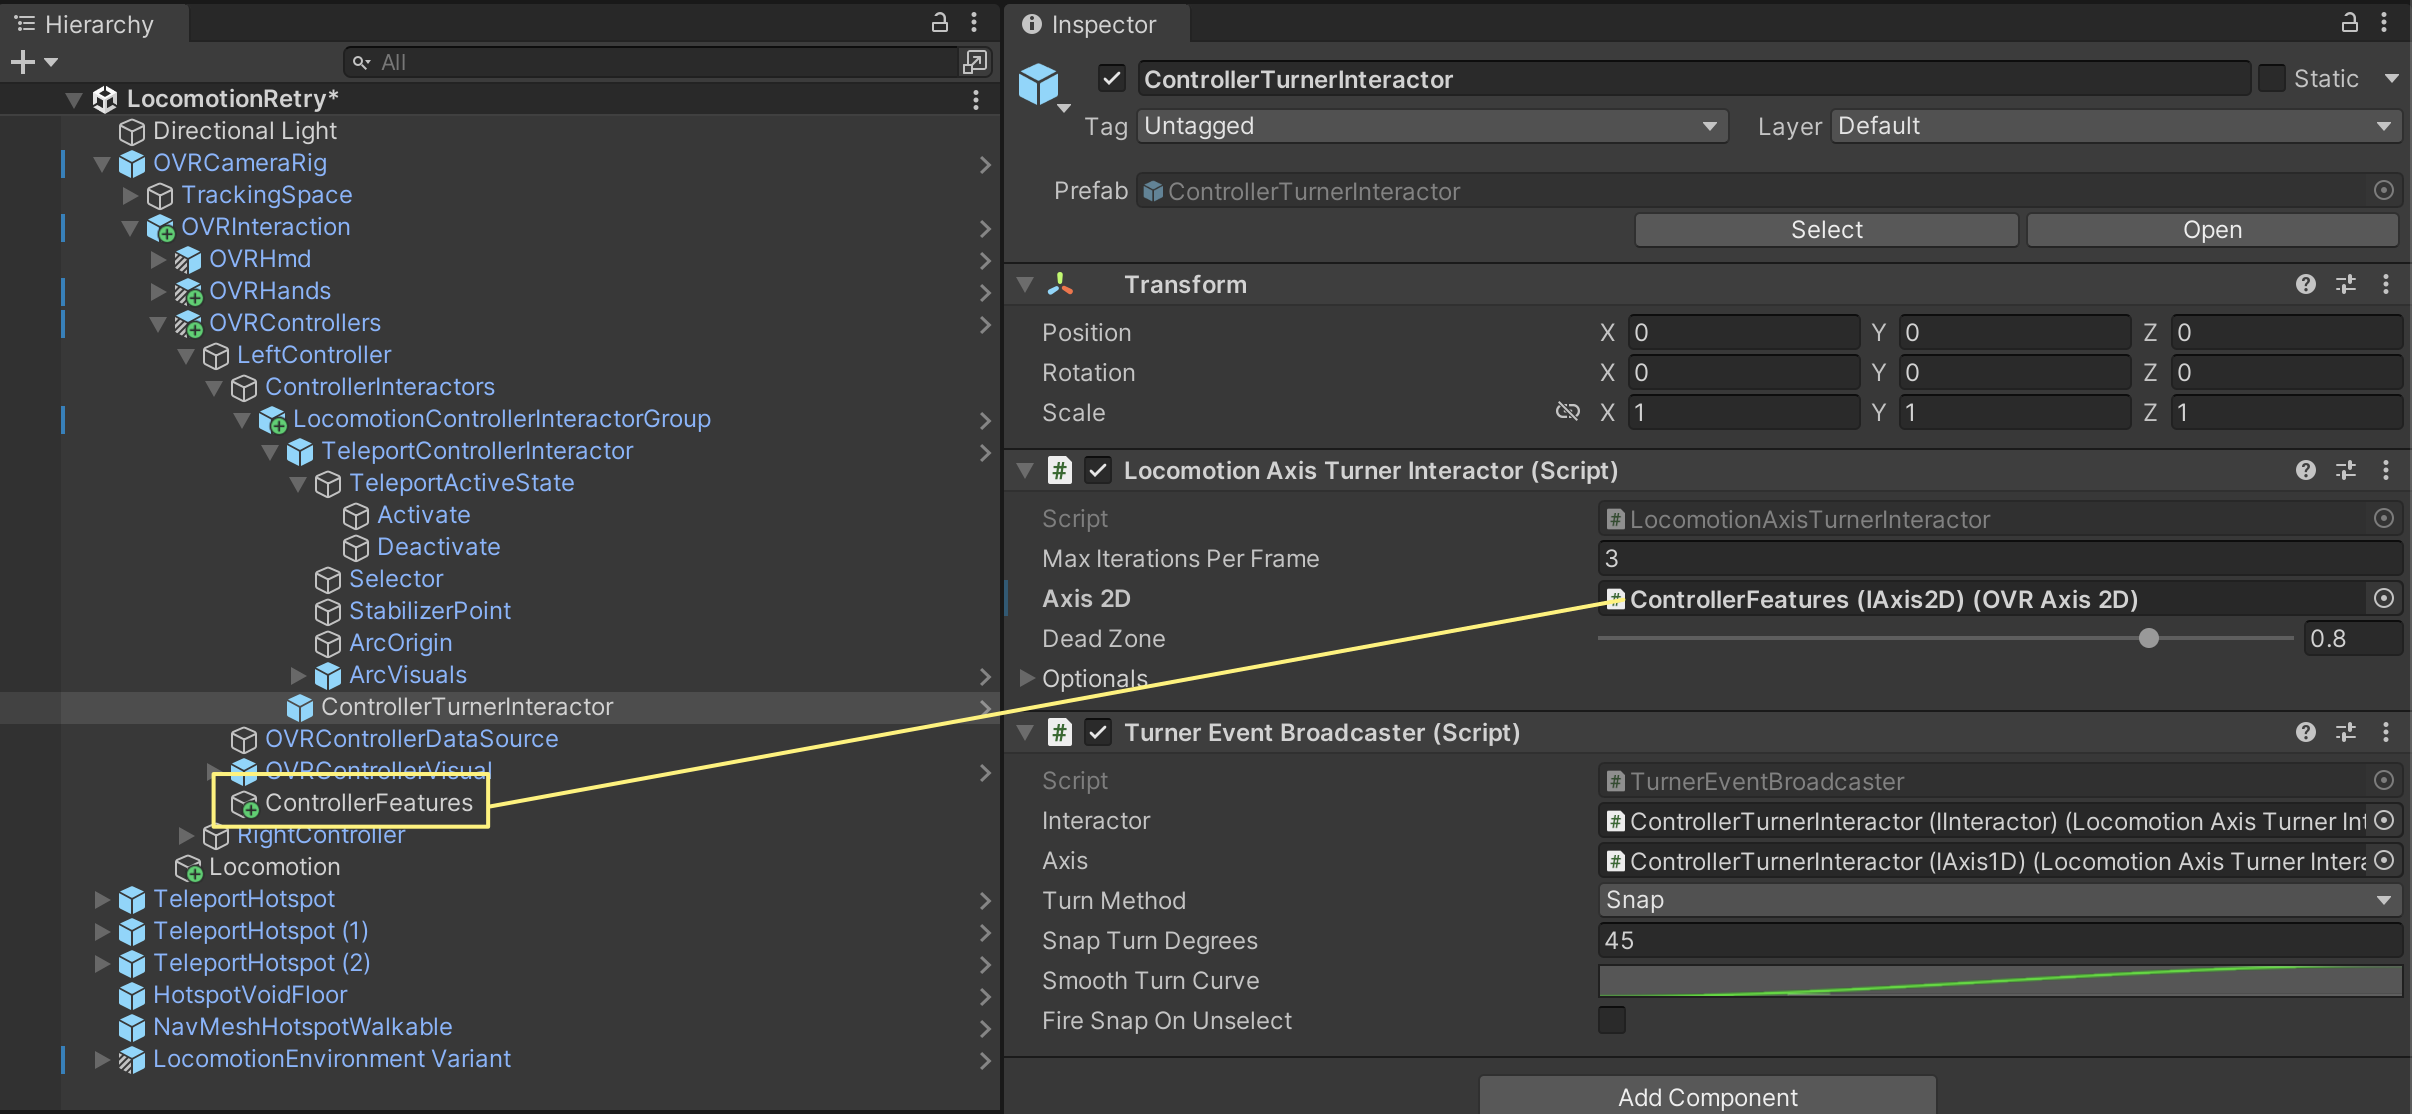
ControllerTurnerInteractor를 선택 하고 Axis 2D에 ControllerFeatures를 할당 한다
오른쪽도 동일하게 진행 한다
빌드후 결과를 확인 한다
컨트롤러와 핸드트래킹 모두 텔레포트와 스냅 턴이 가능해졌다
실제 프로젝트에 적용하기 위해서는 각 컨포넌트 스크립트를 열어보고 분석할 필요성이 보인다
'VR > Oculus Integration' 카테고리의 다른 글
| Unity 2022.3.5f1 + Oculus Integration 56.0 (RayExamples) (0) | 2023.10.04 |
|---|---|
| Unity 2022.3.5f1 + Oculus Integration 56.0 (Create a Curved or Flat UI) (0) | 2023.10.04 |
| Unity 2022.3.5f1 + Oculus Integration 56.0 (Create Locomotion Interactions) (0) | 2023.10.02 |
| VR Locomotion Design Guide (0) | 2023.10.02 |
| Unity 2022.3.5f1 + Oculus Integration 56.0 (Create Poke Interactions) (0) | 2023.09.27 |