

[OpenXR] XR Ray Interactor / XR Interaction Toolkit 2.4.3 (2024-01-04방송)
VR/XR Interaction Toolkit 2024. 1. 4. 17:57https://youtu.be/Gmh4mTqo92g?list=PLTFRwWXfOIYBIPKhWi-ZO_ITXqtNuqj6j
리소스
https://assetstore.unity.com/packages/3d/props/food/japanese-food-sushi-free-158209
Japanese food - Sushi Free | 3D 음식 | Unity Asset Store
Elevate your workflow with the Japanese food - Sushi Free asset from Brushzim. Find this & other 음식 options on the Unity Asset Store.
assetstore.unity.com
https://assetstore.unity.com/packages/3d/props/electronics/flashlight-18972
Flashlight | 3D 전자제품 | Unity Asset Store
Elevate your workflow with the Flashlight asset from RRFreelance. Find this & other 전자제품 options on the Unity Asset Store.
assetstore.unity.com
지난 시간에 이어 오늘은 XR Ray Interactor 예제를 만들어 보겠습니다.
새 씬을 만들고 메인 카메라를 제거후 XR Origin을 생성 합니다.

Left / Right Controller를 선택후 XR Controller를 제외한 나머지 컴포넌트들을 지웁니다.


Left Controller를 선택후 빈오브젝트 (Visual)를 생성하고 컨트롤러 모델을 부착 합니다.


XR Controller의 Model에 컨트롤러 모델을 넣어 줍니다.

오른손도 동일하게 작업 합니다.


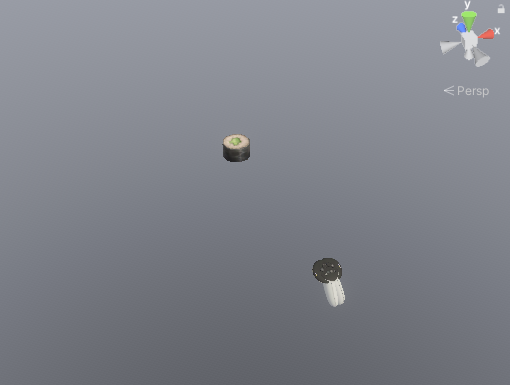
실행후 결과를 확인 합니다.
2단계
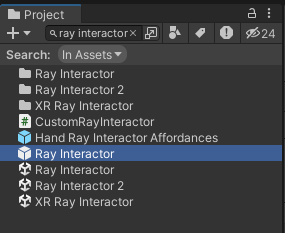
프로젝트 창에서 Ray Interactor를 검색해 프리팹을 Left / Right Controller자식으로 넣어줍니다.

마키 만들기
다음과 같은 구조로 만들어 줍니다.

위치를 적당히 잡아 줍니다.
Maki를 선택하고 Rigidbody를 부착후 use Gravity를 비활성화 합니다.


이어서 XR Grab Interactable컴포넌트를 부착 합니다.

Throw On Detach는 체크 해제 합니다.

마키 메쉬를 선택후 메쉬 콜라이더를 부착 하고 convex를 체크 합니다.


실행후 결과를 확인 합니다.
3단계
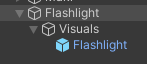
다음과 같은 구조로 손전등을 만들어 줍니다.
위치와 크기를 조절 합니다.

Flashlight를 선택하고 빈오브젝트 (Collider) 를 생성 하고 BoxCollider를 부착 합니다.


Flashlight를 선택하고 Rigidbody를 부착 하고 use gravity는 체크 해제 합니다.


이어서 XR Grab Interactable컴포넌트를 부착 합니다.
Throw on Detach는 체크 해제 합니다.

실행후 결과를 확인 합니다.
Left Controller의 Ray Interactor를 선택 하고

Ray Interactor컴포넌트의 Force Grab을 체크 하고 Anchor Control은 체크 해제 합니다.

Force Grab
Force grab moves the object to your hand rather than interacting with it at a distance.
Anchor Control
Allows the user to move the attach anchor point using the joystick.
실행하고 결과를 확인 합니다.
Hide Controller on Select 를 체크 하면 그립 했을때 컨트롤러를 숨깁니다.

손전등의 메쉬를 선택해 X 축으로 90도 회전 합니다.


콜라이더도 위와 같은 방법으로 회전 시킵니다.

실행후 결과를 확인 합니다.
Flashlight 스크립트를 생성하고 다음과 같이 작성후 Flashlight게임 오브젝트에 부착 합니다.
using System.Collections;
using System.Collections.Generic;
using UnityEngine;
using UnityEngine.XR.Interaction.Toolkit;

public class Flashlight : MonoBehaviour
{
    public void Activated(ActivateEventArgs args)
    {
        Debug.LogFormat("Activated: {0}", args.interactorObject);
    }

    public void Deactivated(DeactivateEventArgs args)
    {
        Debug.LogFormat("Deactivated: {0}", args.interactorObject);
    }
}

Flashlight를 선택하고 이벤트가 발생하면 호출되는 메서드를 연결해줍니다.
Activated 이벤트는 그립하고 트리거를 입력 하면 호출 됩니다. (Deactivated는 반대)

실행후 손전등을 그립 하고 인덱스 트리거를 땡겨 봅니다.

이제 Flashlight를 다음과 같이 수정 합니다.
using System.Collections;
using System.Collections.Generic;
using UnityEngine;
using UnityEngine.XR.Interaction.Toolkit;

public class Flashlight : MonoBehaviour
{
    public Material material; // 렌더러의 메터리얼
    public GameObject light;

    private bool isOn = false;
    public void Activated(ActivateEventArgs args)
    {
        this.isOn = !isOn;

        if (isOn)
        {
            this.ActivateEmission();
            this.light.SetActive(true);
        }
        else
        {
            DeactivateEmission();
            this.light.SetActive(false);
        }
    }

    public void ActivateEmission()
    {
        if (material != null)
        {
            material.EnableKeyword("_EMISSION");
            material.SetColor("_EmissionColor", Color.yellow); // 원하는 색상으로 설정 가능
        }
    }

    public void DeactivateEmission()
    {
        if (material != null)
        {
            material.DisableKeyword("_EMISSION");
        }
    }
}
메터리얼을 넣어주고

스폿 라이트를 생성 합니다.

다음과 같이 설정하고
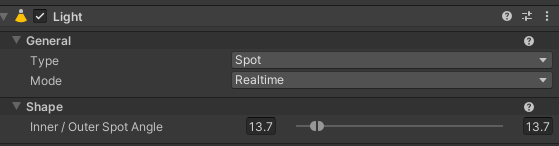

색상과 Shape를 잘 설정해서 테스트 해봅니다.

Flshlight를 선택해 프로퍼티에 넣어줍니다.

스폿 라이트를 비활성화 하고

이제 실행후 결과를 확인 합니다.
참고
https://docs.unity3d.com/Packages/com.unity.xr.interaction.toolkit@2.4/manual/xr-ray-interactor.html
'VR > XR Interaction Toolkit' 카테고리의 다른 글
| XR Poke Interactor (1월 2주차 방송 예정) (0) | 2024.01.08 |
|---|---|
| Push Button 커스텀 (0) | 2024.01.07 |
| [OpenXR] XR Interaction Toolkit 2.4.3 / XR Ray Interaction (0) | 2024.01.04 |
| [OpenXR] XR Slot Interactor (2024-01-03방송분) (0) | 2024.01.03 |
| [OpenXR] XRGrabInteractable (Kinematic/Instantaneous/Velocity Tracked) (0) | 2024.01.03 |