

Unity 2022.3.5f1 Google VR Cardboard - 04
VR/Google Cardboard VR (GVR) 2023. 9. 15. 17:17레티클 구현
VR환경에서 특정 개체나 메뉴를 시선으로 응시 하려면 마우스 커서와 같은 조준점이 필요함
이런 조준점을 레티클(Reticle)이라고 함
바라보는 시선의 중앙에 응시점이 생기며 특정 객체를 응시 하면 크기가 변하거나 색상이 변해 응시 하고 있다고 사용자에게 알려줌
레티클을 구현 하는 방법은 Google VR SDK에서 제공 하는 기능을 사용하거나 유니티의 고유 기능을 사용해 직접 구현 할수 있음
GvrReticlePointer 프리팹을 Main Camera자식으로 넣는다

메터리얼의 색을 변경 한다

플레이를 해보면 점이 보임

레티클 반응 만들기
특정 객체를 응시 했을때 레티클이 커지게 로직을 추가
리소스를 추가 한다

적당한 위치에 배치 한다

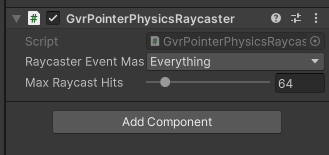
레티클이로 이 상자를 응시 했을때 레티클이 커지려면 GvrPointerPhysicsRaycaster 컴포넌트 와 GvrEventSystem프리팹이 필요 하다
MainCamera를 선택하고GvrPointerPhysicsRaycaster 를 부착 한다
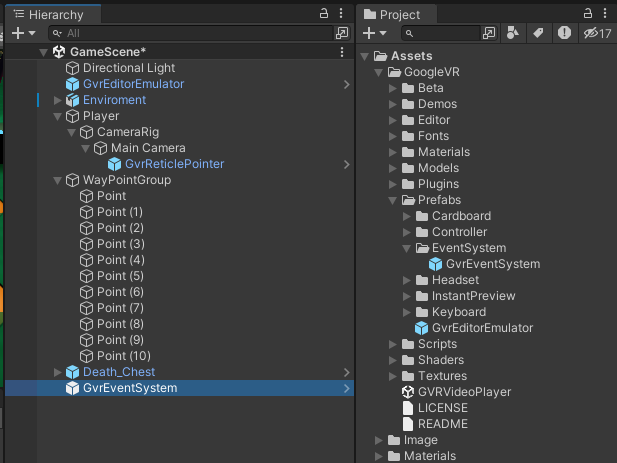
GvrEventSystem프리팹을 씬으로 가져온다
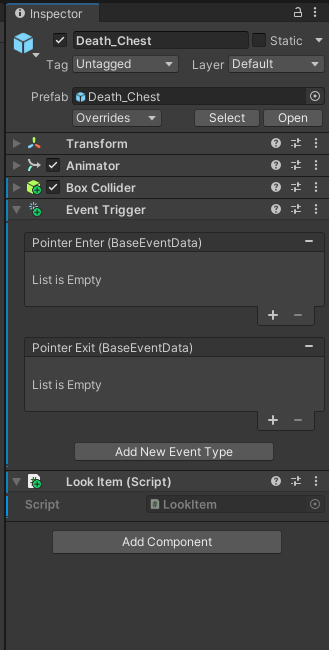
상자를 선택해 BoxCollider를 부착 하고


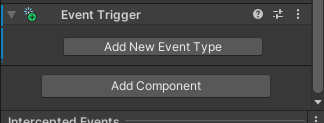
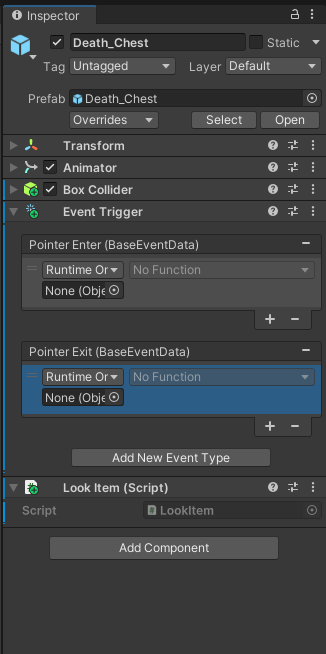
레이에 닿은 객체가 이벤트에 반응 하려면 Event Trigger 컴포넌트가 필요하다
이 컴포넌트는 어떤 이벤트가 전달 될때 특정 함수를 실행 시킬수 있다
즉 GvrPointerPhysicsRaycaster에서 발사한 레이가 Death_Chest에 닿았을때 OnPointerEnter이벤트를 전달 하면
EventTrigger컴포넌트에서 특정 기능을 실행한다
Death_Chest를 선택 하고 EventTrigger컴포넌트를 부착 한다

실행후 Alt를 누른채로 시선을 조정해 이동하다가 상자를 응시 하면 레티클이 커지는지 확인하자

응시 이벤트 처리
레티클로 상자를 응시 했을때와 다른곳을 응시 했을때 전달되는 이벤트에 따라 특정 함수를 호출 할수 있다
LookItem이름으로 스크립트를 만들자

using System.Collections;
using System.Collections.Generic;
using UnityEngine;

public class LookItem : MonoBehaviour
{
    public void OnLookItemBox(bool isLookAt)
    {
        Debug.Log(isLookAt);
    }
}
작성한 스크립트를 Death_Chest에 추가 한다

EventTrigger컴포넌트의 Add New Event Type 버튼을 눌러 PointerEnter, PointerExit 이벤트를 추가 하자

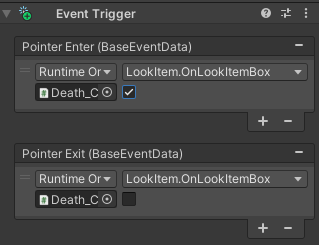
+버튼을 눌러 연결할 엔트리를 생성하고 Object속성에 Death_Chest를 할당한다
No Function을 선택 하고 해당 이벤트가 발생했을때 호출될 메서드를 설정 한다


OnLookItemBox함수는 bool타입의 파라미터를 전달받으므로 체크 박스가 표시 된다
PointerEnter이벤트에는 체크를 하고 PointerExit에는 체크해제 하자
실행후 결과를 확인 한다
응시하면 true가 출력 되고 다른곳을 응시 하면 false가 출력된다
이제 상자를 응시 하면 이동을 정지 하고 다른곳을 응시 하면 다시 이동하게 수정하자
MoveCtrl스크립트를 수정 한다

using System.Collections;
using System.Collections.Generic;
using Unity.VisualScripting;
using UnityEngine;
public class MoveCtrl : MonoBehaviour
{
public enum eMoveType
{
WAY_POINT,
LOOK_AT
}
public eMoveType moveType = eMoveType.WAY_POINT; //이동방식
public float speed = 1.0f; //이동속도
public float damping = 3.0f; //회전 속도
[SerializeField] private Transform[] points;
private int nextIdx = 1; //다음에 이동해야할 인덱스
private CharacterController controller;
private Transform camTrans;
public static bool isStopped = false;
void Start()
{
GameObject wayPointGroup = GameObject.Find("WayPointGroup");
if (wayPointGroup != null)
{
this.points = wayPointGroup.GetComponentsInChildren<Transform>();
}
// Transform[] childTransforms = wayPointGroup.GetComponentsInChildren<Transform>();
// List<Transform> childList = new List<Transform>(childTransforms);
// childList.Remove(wayPointGroup.transform); // WayPointGroup의 Transform 제거
// this.points = childList.ToArray();
this.controller = this.GetComponent<CharacterController>();
this.camTrans = Camera.main.GetComponent<Transform>();
}
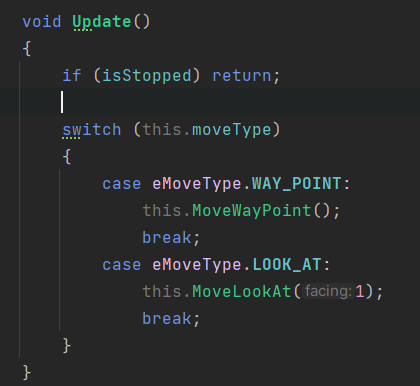
void Update()
{
if (isStopped) return;
switch (this.moveType)
{
case eMoveType.WAY_POINT:
this.MoveWayPoint();
break;
case eMoveType.LOOK_AT:
this.MoveLookAt(1);
break;
}
}
private void MoveLookAt(int facing)
{
Vector3 heading = this.camTrans.forward;
heading.y = 0.0f;
Debug.DrawRay(this.transform.position, heading.normalized * 1.0f, Color.red);
this.controller.SimpleMove(heading * this.speed * facing);
}
private void MoveWayPoint()
{
Vector3 dir = this.points[this.nextIdx].position - this.transform.position;
Quaternion rot = Quaternion.LookRotation(dir);
this.transform.rotation = Quaternion.Slerp(this.transform.rotation, rot, Time.deltaTime * damping);
this.transform.Translate(Vector3.forward * Time.deltaTime * this.speed);
}
void OnTriggerEnter(Collider col)
{
if (col.CompareTag("WayPoint"))
{
this.nextIdx = (++nextIdx >= points.Length) ? 1 : nextIdx;
//this.nextIdx = (nextIdx + 1) % points.Length;
}
}
}
다음 LookItem스크립트도 수정 한다
using System.Collections;
using System.Collections.Generic;
using UnityEngine;

public class LookItem : MonoBehaviour
{
    public void OnLookItemBox(bool isLookAt)
    {
        Debug.Log(isLookAt);
        MoveCtrl.isStopped = isLookAt;
    }
}
실행후 결과를 확인 한다
상자를 응시 해보자
레티클이 커지면서 이동을 정지 한다
반대로 상자 이외 다른곳을 응시 하면 레티클이 원래대로 돌아오고 이동을 재개 한다
앞서 구현한 방식은 EventTrigger컴포넌트에서 이벤트가 발생 하면 실행할 함수를 연결하는 방식이다
이번에는 연결 하지 말고 스크립트로 직접 구현해보자
- 버튼을 눌러 이벤트를 제거 한다

LookItem스크립트를 수정한다
using System.Collections;
using System.Collections.Generic;
using UnityEngine;
using UnityEngine.EventSystems;
public class LookItem : MonoBehaviour, IPointerEnterHandler, IPointerExitHandler, IGvrPointerHoverHandler
{
    public void OnPointerEnter(PointerEventData eventData)
    {
        MoveCtrl.isStopped = true;
    }

    public void OnPointerExit(PointerEventData eventData)
    {
        MoveCtrl.isStopped = false;
    }

    public void OnGvrPointerHover(PointerEventData eventData)
    {
        Debug.Log("Reticle On!");
    }
}
실행후 결과를 확인 한다
OnGvrPointerHover메서드는 응시 할때 지속적으로 호출 되는것을 확인할수 있다
'VR > Google Cardboard VR (GVR)' 카테고리의 다른 글
| Unity 2022.3.5f1 Google VR Cardboard - 05 (0) | 2023.09.15 |
|---|---|
| Unity 2022.3.5f1 Google VR Cardboard - 03 (0) | 2023.09.15 |
| Unity 2022.3.5f1 Google VR Cardboard - 02 (0) | 2023.09.15 |
| Unity 2022.3.5f1 Google VR Cardboard - 01 (0) | 2023.09.15 |