


Create Poke Interactions
VR/Oculus Integration 2023. 12. 6. 09:56기본 핸드 트래킹 만들기

HandPokeInteractor 찾아 넣기

Poke Interactable 오브젝트 추가 하기
빈 오브젝트를 만들기 (Button)

카메라 앞으로 이동

빈 오브젝트 만들고 다음과 같은 구조로 만들기

ButtonVisuals는 Plane 임
Add a plane to Visuals named ButtonVisual by right-clicking Visuals and then selecting 3D Object > Plane.


Button오브젝트를 선택 하고 Poke Interactable 컴포넌트를 부착

Surface 오브젝트를 선택하고 Plane Surface, Clipped Plane Surface, Bounds Clipper 컴포넌트를 부착 한다

ButtonVisual 오브젝트를 선택 하고 Plane (Mesh Filter) and Mesh Collider 를 제거 한다

다음 컴포넌트를 추가 한다
Poke Interactable Visual,
Mesh Filter,
Material Property Block Editor,
Rounded Box Properties,
Interactable Color Visual

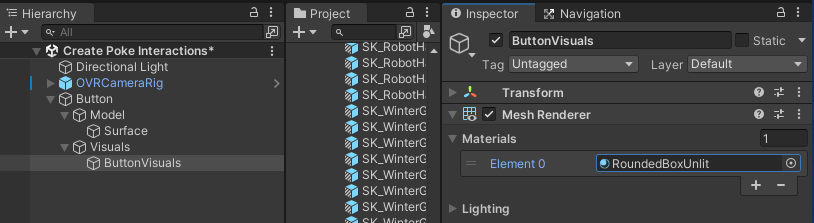
MeshRenderer컴포넌트를 선택해 Material에 RoundedBoxUnlit 를 추가 한다
Poke Interactable Visual 컴포넌트의 Poke Interactable 에 Button 을 Button Base Transform 에 Surface 할당 한다

MeshFilter 컴포넌트를 선택해 Quad 를 추가 한다
Mesh Filter 구성 요소에서 Object Picker 버튼(입력 필드 오른쪽에 있는 작은 둥근 버튼)을 클릭하고 Quad를 검색하여 Mesh 속성을 Quad로 설정합니다.
쿼드는 버튼을 직사각형으로 만듭니다. 그러나 다른 모양을 사용하고 싶다면 다른 옵션을 선택할 수 있습니다.

Surface 를 선택 하고 Inspector 아래 Transform 구성 요소의 Scale 속성에서 Z를 0.001로 설정합니다.

Clipped Plane Surface 컴포넌트의 Plane Surface 에 Surface를 할당 한다

동일한 구성 요소에서 +를 클릭하여 Clippers 목록에 요소를 추가합니다.

Set the element to Surface.

Button 게임 오브젝트를 선택하고 Poke Interactable component 의 Surface Patch 프로퍼티에 Surface 를 할당한다

Visuals 를 선택후 Z축에서 비주얼을 이동하여 모델 게임 오브젝트보다 카메라에 약간 더 가까워지게 합니다.
이렇게 하면 버튼을 찔렀을 때 버튼이 시각적으로 뒤로 움직일 수 있습니다.

ButtonVisuals 오브젝트를 선택후 Interactable Color Visual 컴포넌트의 Interactable View 프로퍼티에 Button오브젝트를 할당한다


Editor 프로퍼티에 ButtonVisuals 오브젝트를 할당한다

이벤트를 받고 싶다면 다음과 같이 작성하자
using System;
using System.Collections;
using System.Collections.Generic;
using Oculus.Interaction;
using UnityEngine;

public class Test : MonoBehaviour
{
    public PokeInteractable pokeInteractable;

    private void Start()
    {
        this.pokeInteractable.WhenPointerEventRaised += (evt) =>
        {
            if (evt.Type == PointerEventType.Select)
            {
                Debug.LogFormat("버튼이 선택 되었습니다.");
            }
        };
    }
}

참고
https://developer.oculus.com/documentation/unity/unity-isdk-pointer-events/
https://developer.oculus.com/documentation/unity/unity-isdk-create-poke-interactions/
'VR > Oculus Integration' 카테고리의 다른 글
| Create a Curved UI (0) | 2023.12.08 |
|---|---|
| Create a Flat UI (0) | 2023.12.06 |
| Create Locomotion Interactions (0) | 2023.12.05 |
| Meta Quest Developer Hub for Windows (0) | 2023.11.22 |
| Meta Avatars SDK (0) | 2023.11.22 |