


인생 유니티 AR/VR 교과서 01 (Oculus Intergraction Setting)
카테고리 없음 2023. 9. 17. 17:44시작 하기 앞서 책 총평
- 오큘러스, 스팀vr, 하이브까지 커버 하느라 정신 없는 책임
- XR Toolkit이 아닌 Oculus Intergration을 사용함
- 코드설명이 부실 함
일단 수업 교재로 정했으니 시작은 해봄
1. 오큘러스 소프트웨어 설치
https://www.meta.com/kr/quest/setup/?utm_source=www.meta.com&utm_medium=dollyredirect
Quest 설정하기: Quest, Quest 2, Link, Rift S 및 Rift | Meta Quest
www.meta.com
2. 프로젝트 만들기
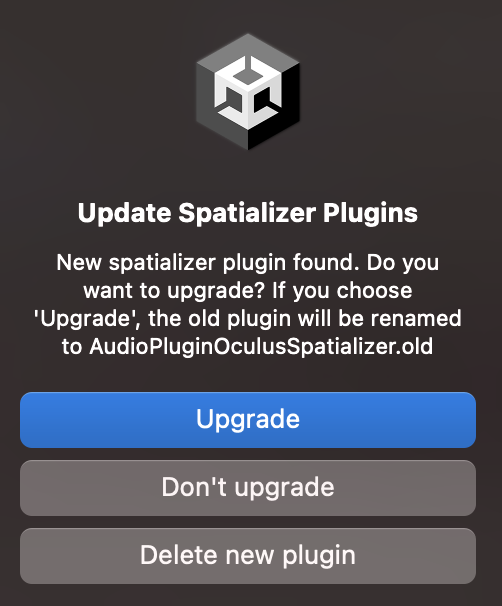
3. Oculus Intergration SDK를 설치
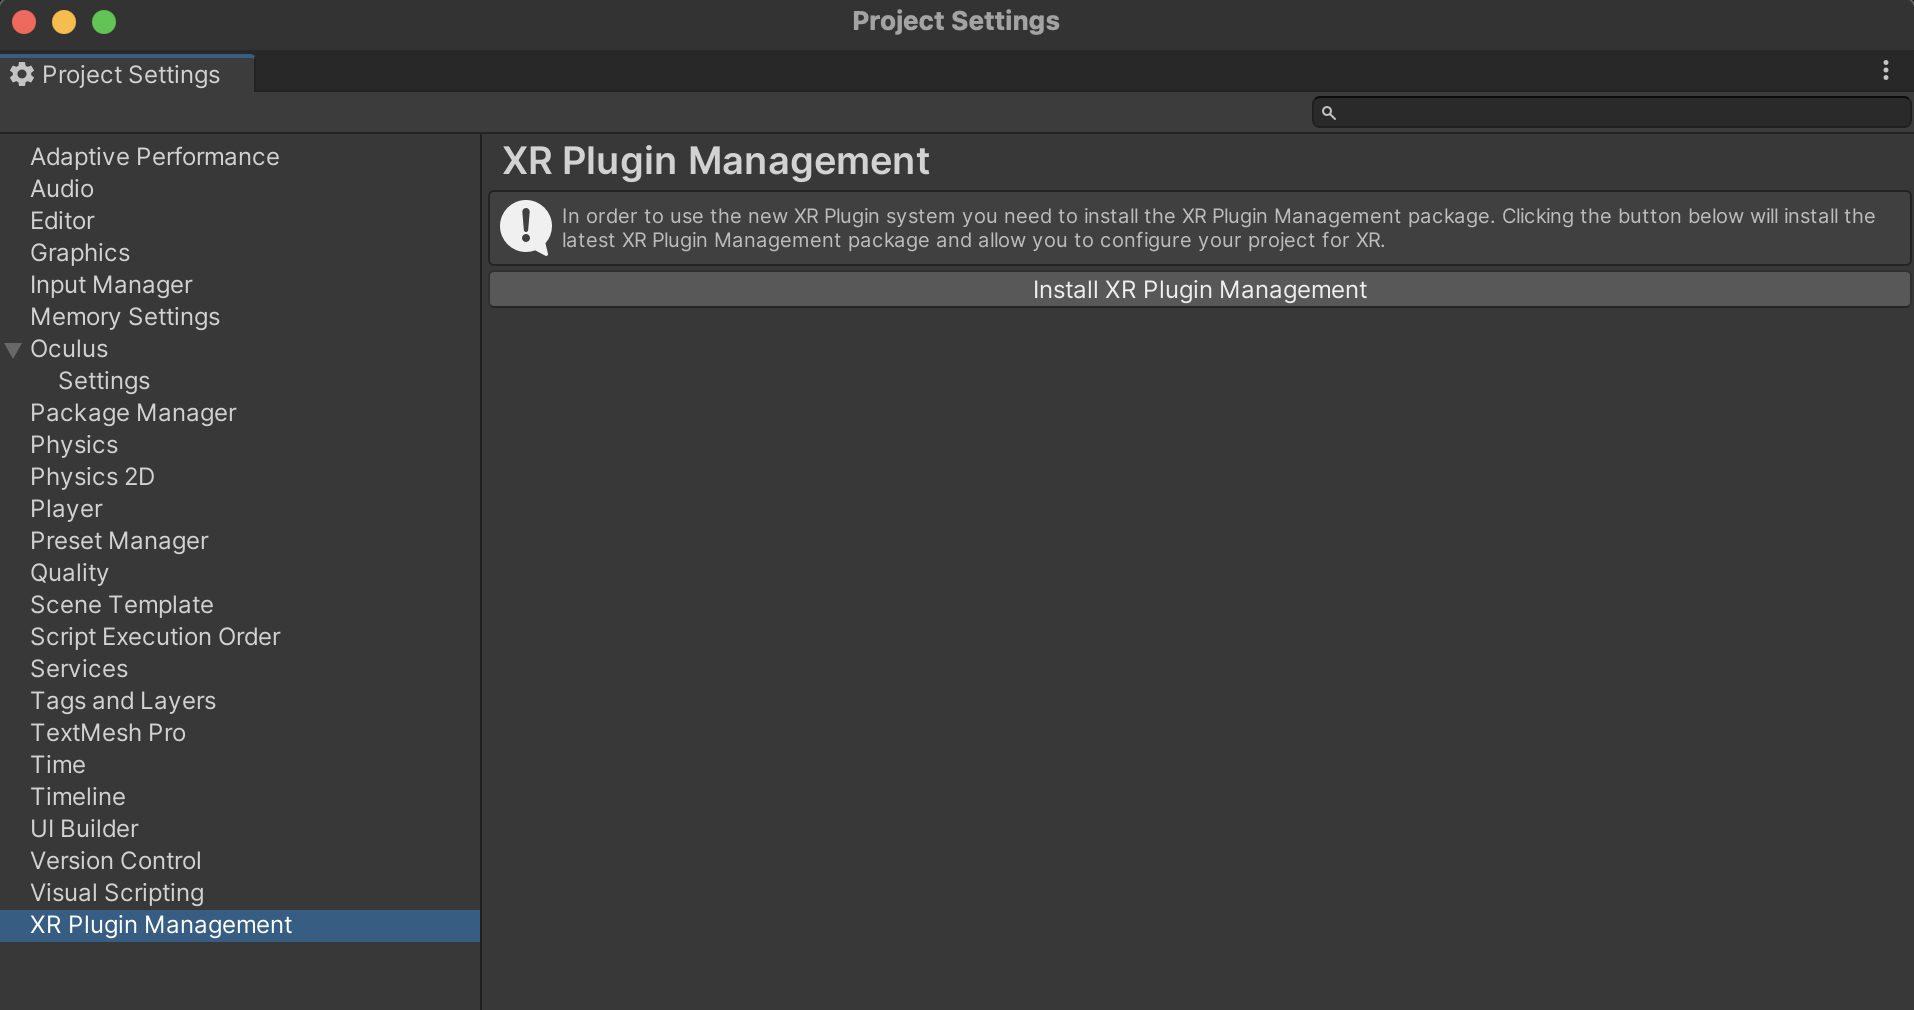
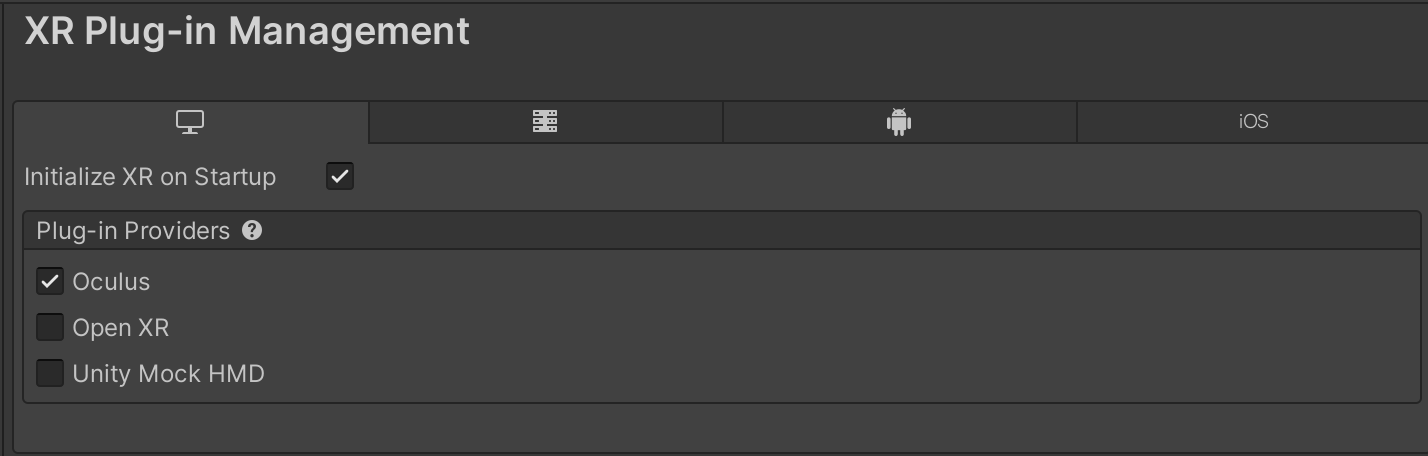
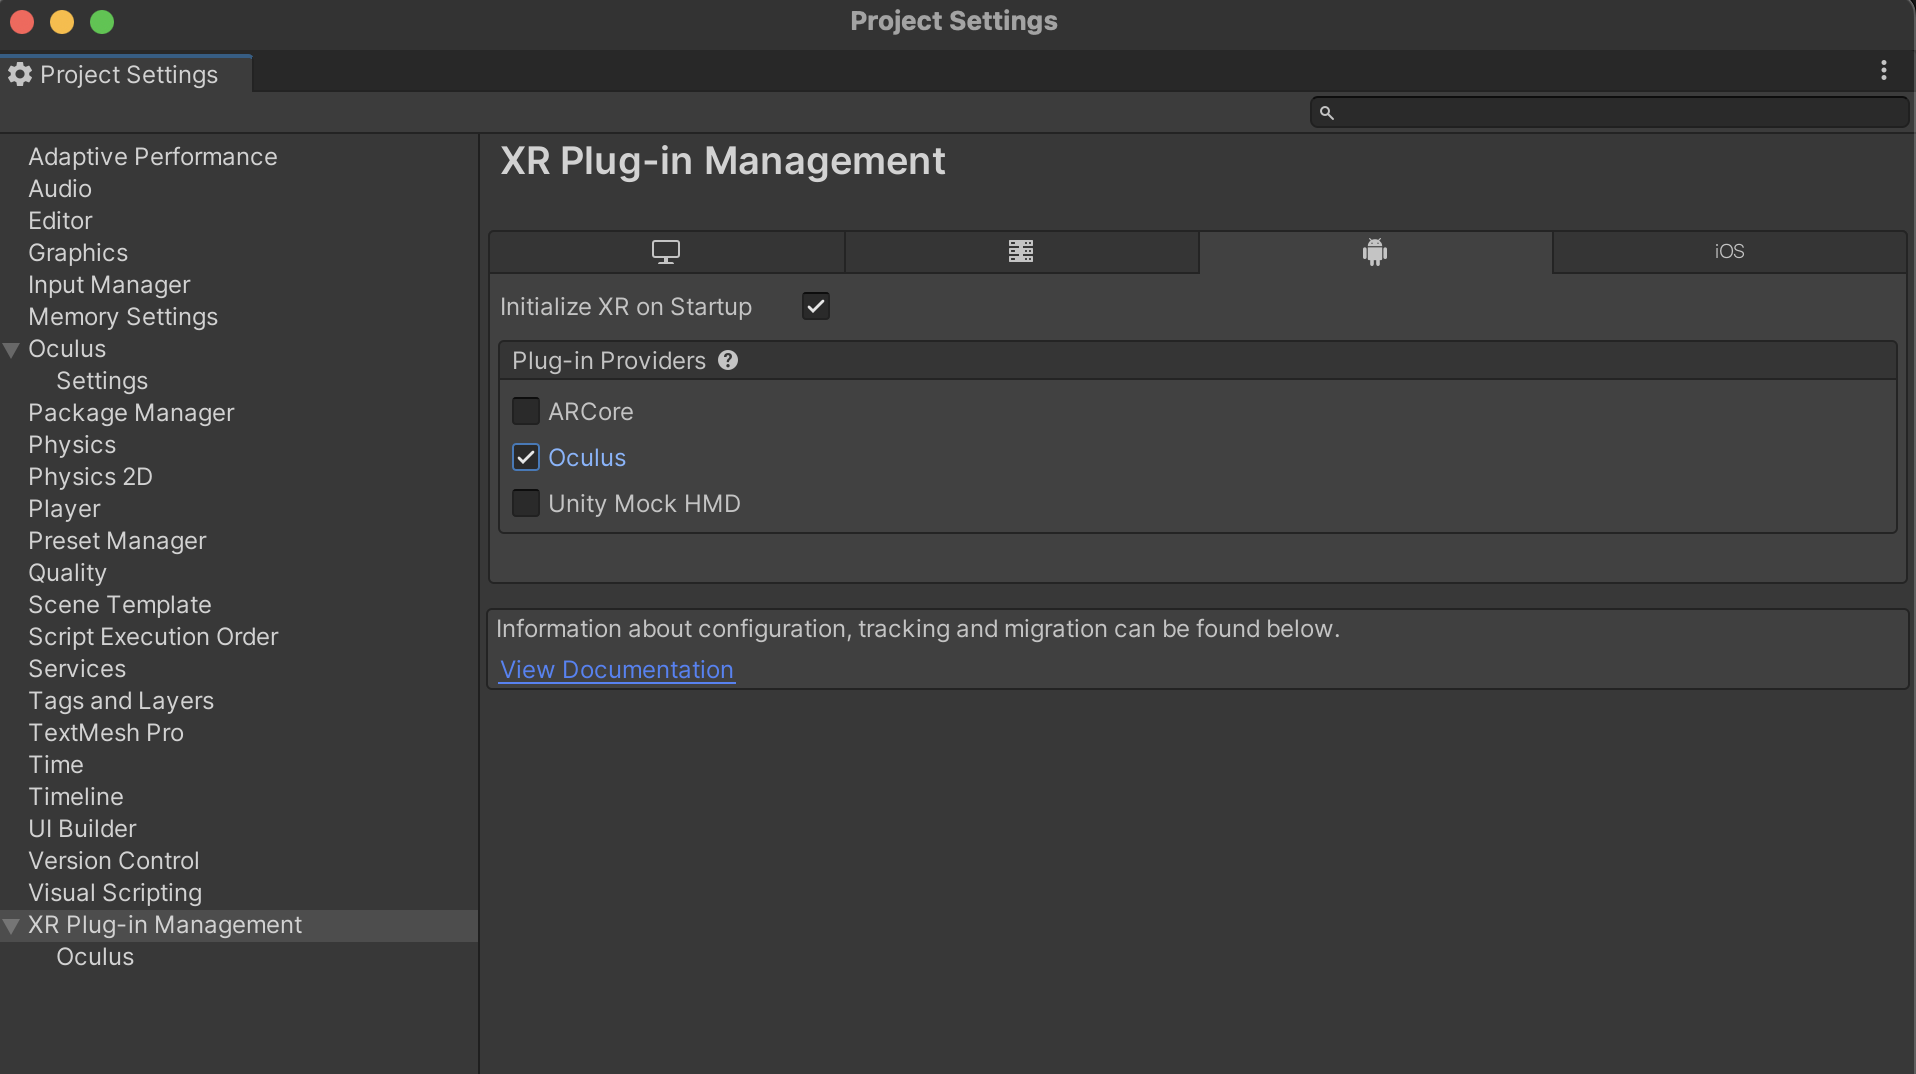
4. XR Plug-in Management 설치
5. Scene 구성
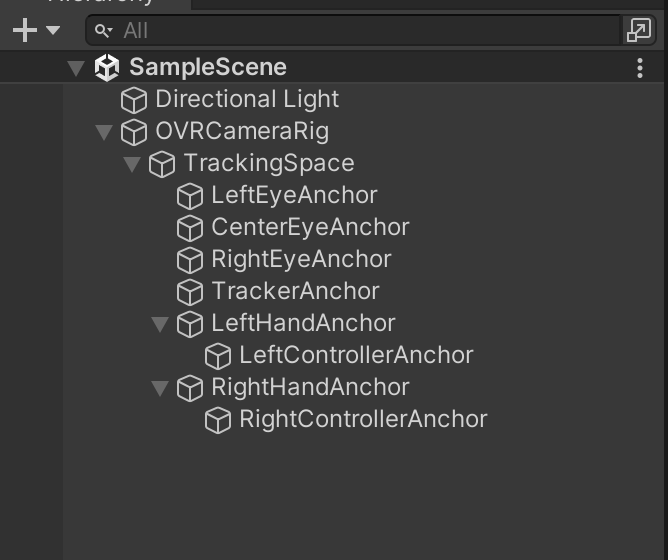
- OVRCameraRig를 하이어라키에 놓고 MainCamera를 제거
6. 헤드셋을 착용
7. 링크 케이블을 오큘러스와 pc에 연결후 오른쪽 컨트롤러의 홈 버튼 > 설정 > 빠른메뉴 > Oculus Link를 선택
8. 링크 화면으로 넘어가면 유니티 에디터에서 플레이 버튼을 누른후 잘 동작 하는지 확인
* 호환이라 그런가 난 케이블 연결이 잘 안됨

오큘러스 Intergration 패키지 설치
https://assetstore.unity.com/packages/tools/integration/oculus-integration-82022
Oculus Integration | 기능 통합 | Unity Asset Store
Use the Oculus Integration from Oculus on your next project. Find this integration tool & more on the Unity Asset Store.
assetstore.unity.com
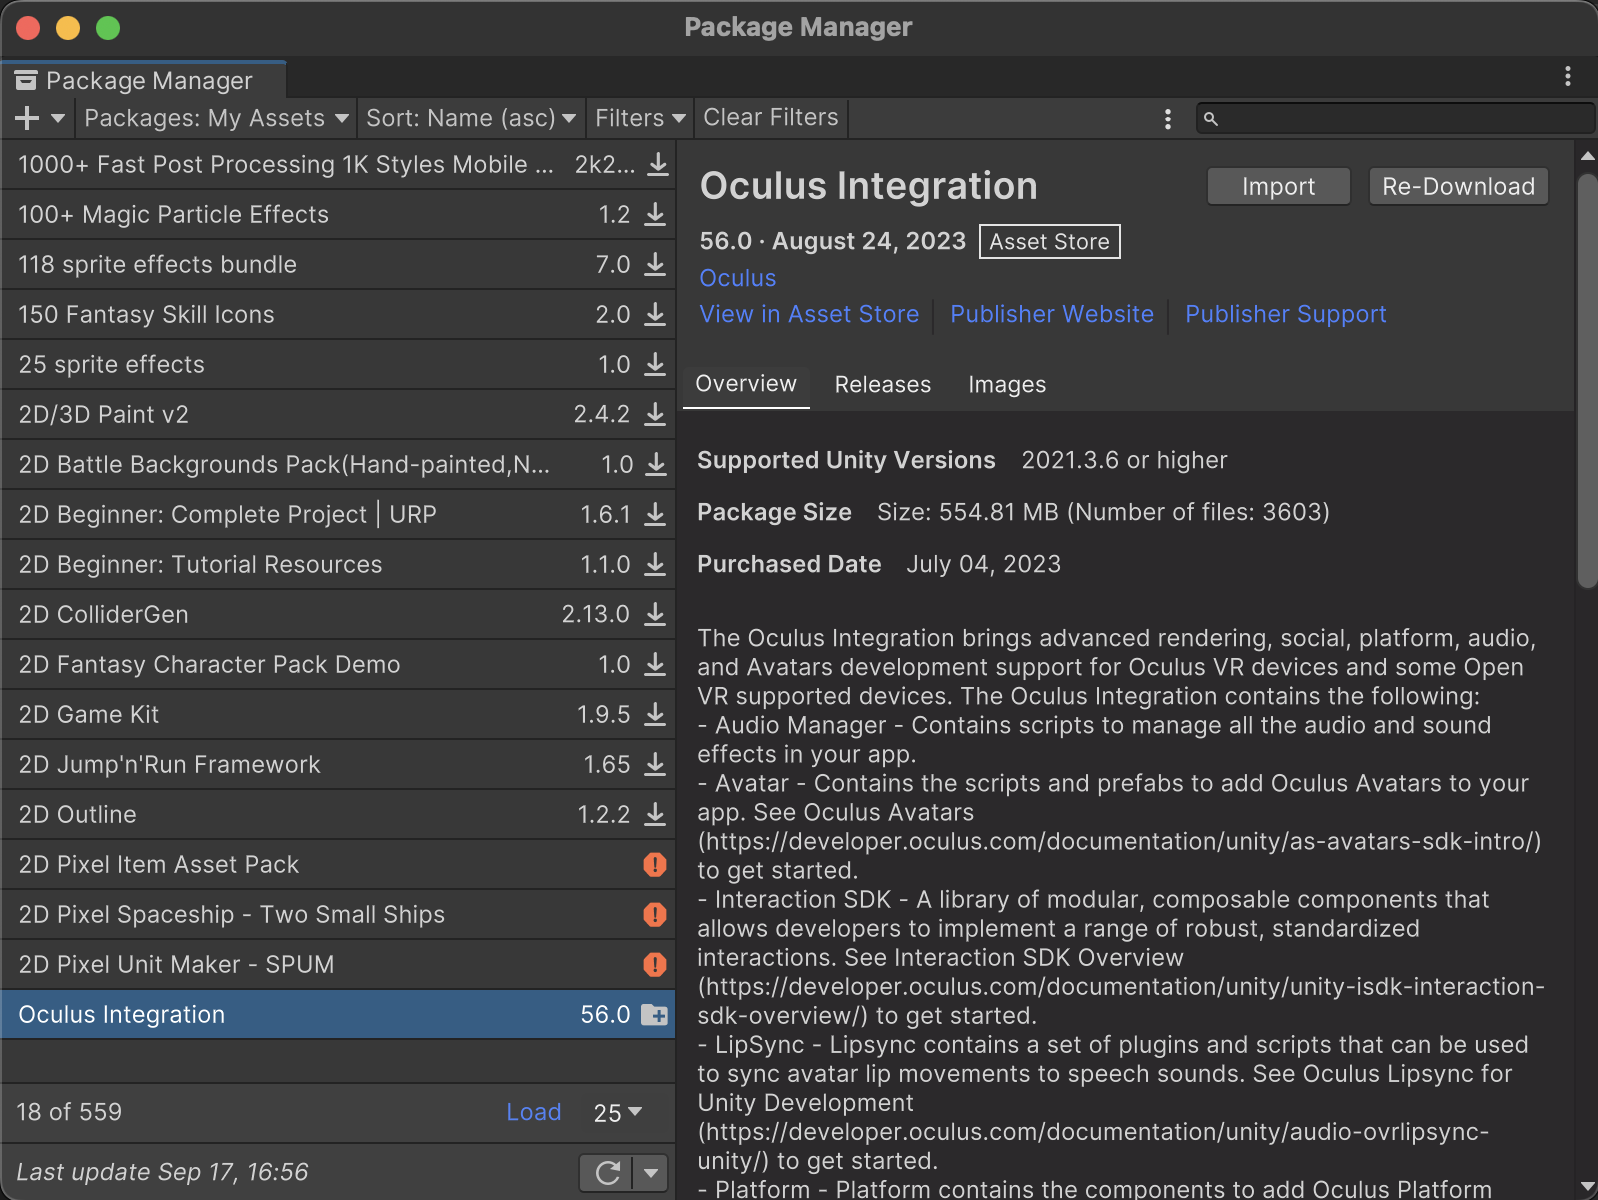
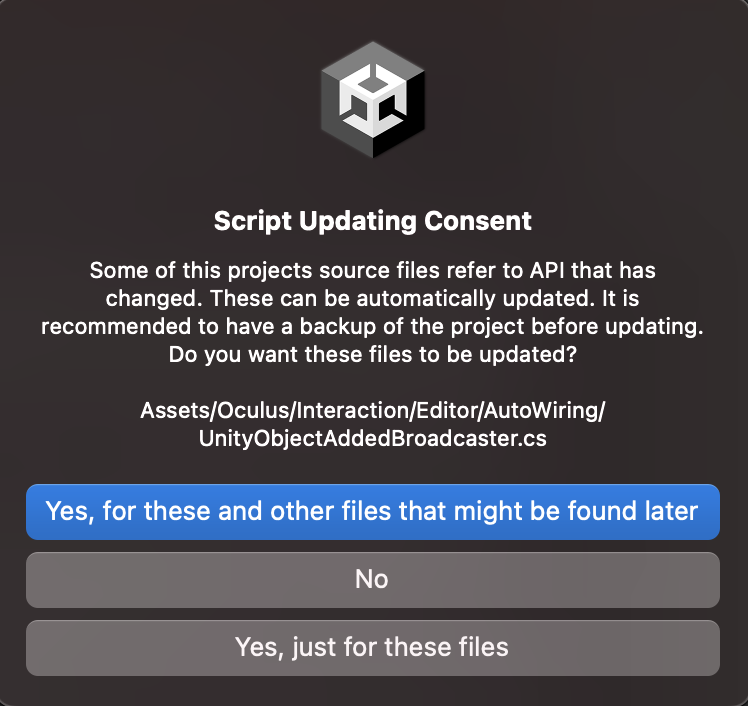
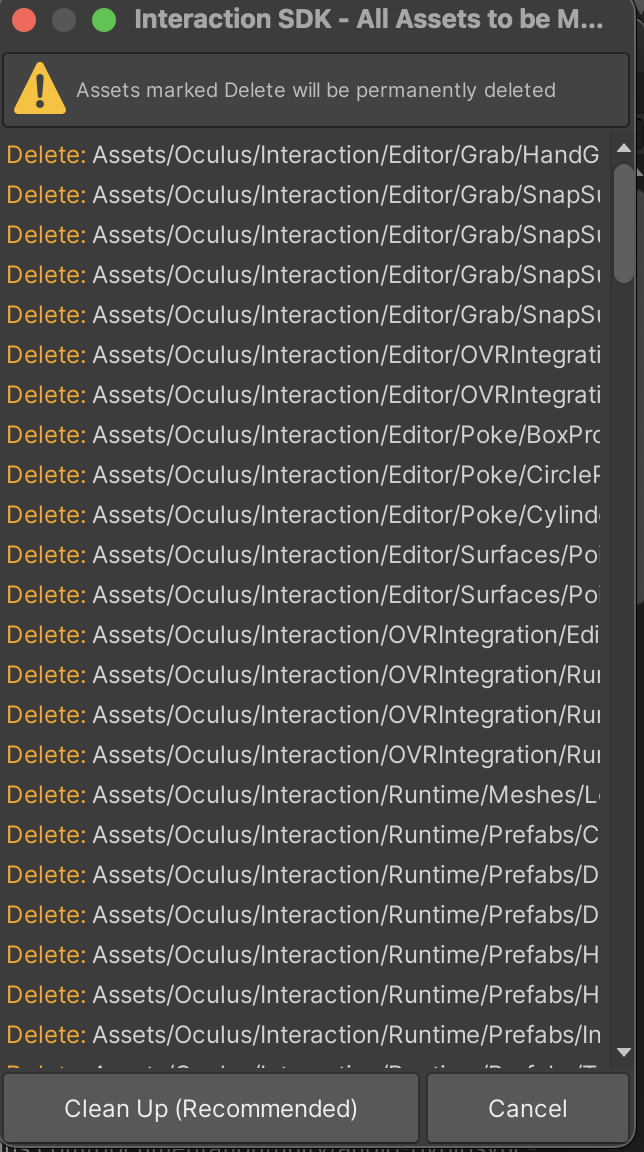

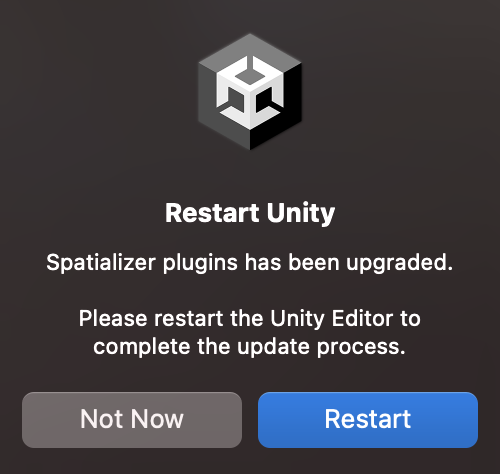

유니티 에디터가 재시작됨
링크케이블 연결시 오큘러스 PC 앱이 설치 되고 실행 상태여야 함
1060 그래픽카드 권장 사항
Requirements to use Meta Quest Link
www.meta.com
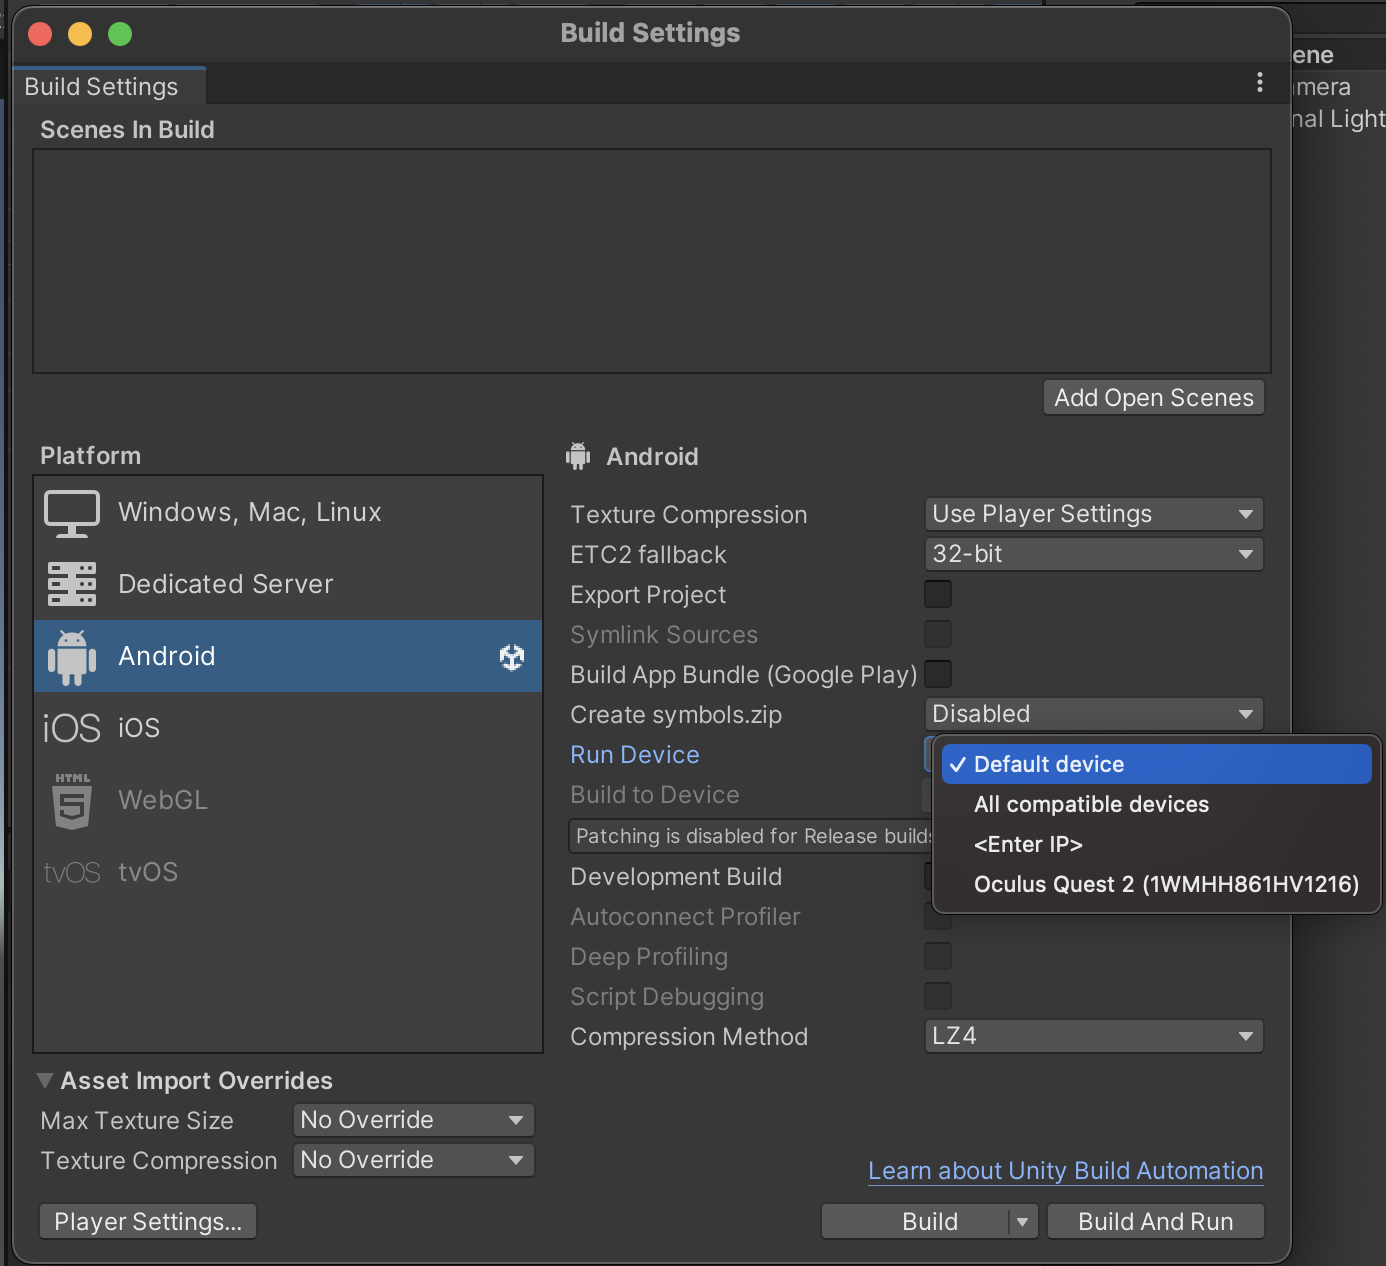
사양이 딸리면 Android플랫폼 변경후 빌드 해서 테스트 해보면 됨
좀 귀찮긴 하지만...
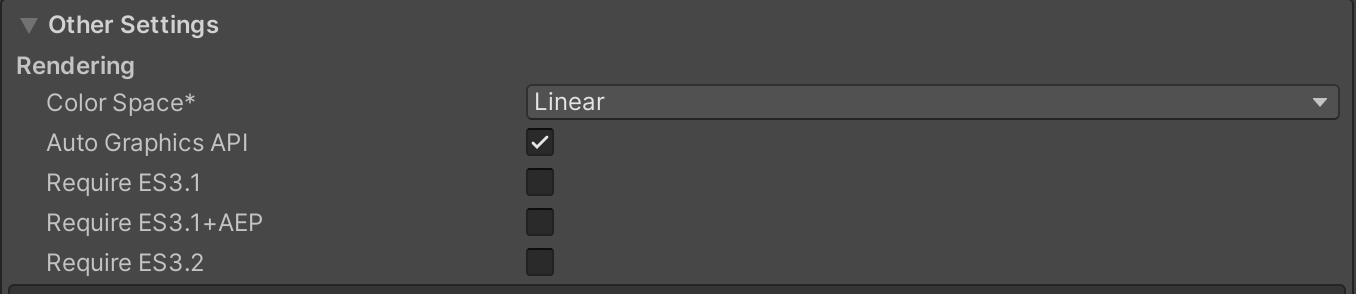
Unity에서 Color Space(색상 공간) 설정에서 "Gamma"와 "Linear" 간의 주요 차이점은 렌더링 및 색상 처리 방식에 있습니다. 이 두 모드는 게임의 시각적 품질과 조명 처리에 영향을 미치며, 게임의 색상 및 빛의 표현을 다르게 합니다.
- Gamma Space(감마 색상 공간):
- 이전 Unity 버전에서 사용되던 기본 색상 공간입니다.
- 색상 값은 감마 보정(Gamma correction)이 적용되어 저장됩니다. 이는 색상 값이 실제 빛의 밝기와 다르게 해석되는 것을 의미합니다.
- 조명 계산 및 색상 블렌딩에서 감마 보정을 고려합니다.
- Linear Space(선형 색상 공간):
- 실제 빛의 물리적 모델을 더 잘 반영하기 위해 개발된 색상 공간입니다.
- 색상 값은 감마 보정 없이 직선적으로 저장됩니다. 이로써 색상 값은 빛의 실제 밝기와 일치합니다.
- 물리 기반 렌더링(PBR) 및 조명 계산에서 주로 사용됩니다.
- 선형 색상 공간은 색상 간 조명 계산이 정확하게 이루어지므로 시각적으로 현실감 있는 조명 및 재질을 얻을 수 있습니다.
일반적으로, 실제로 현실적인 조명 및 재질 효과를 원한다면 선형 색상 공간을 사용하는 것이 좋습니다. 그러나 모든 프로젝트에 적합한 것은 아니며, 이전 프로젝트에서 감마 색상 공간을 사용한 경우 호환성 문제를 피하기 위해 그대로 사용할 수도 있습니다. 그러나 새로운 프로젝트를 시작하거나 렌더링 품질을 향상시키고자 하는 경우, 선형 색상 공간을 고려해보는 것이 좋습니다.
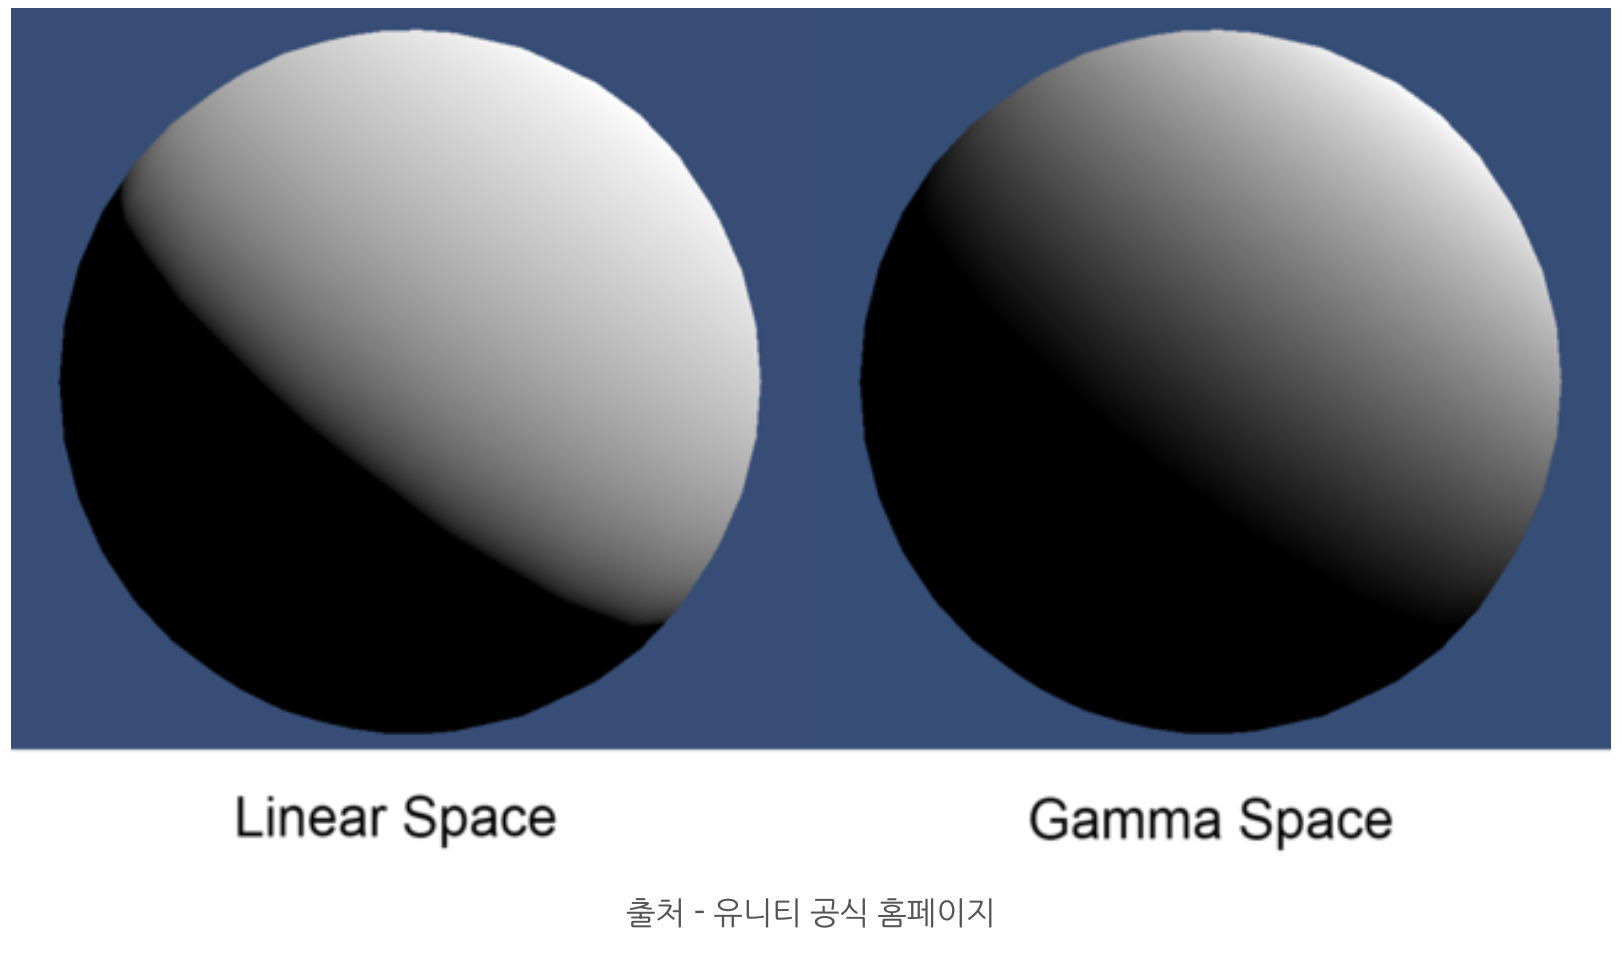
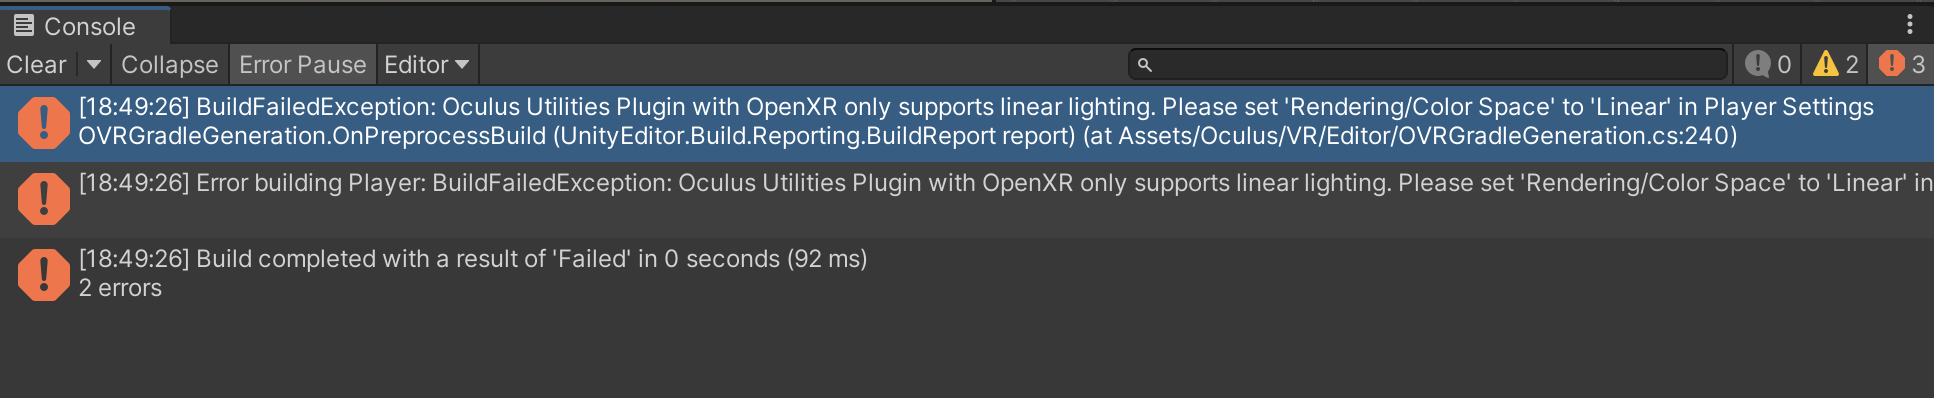
결론부터 말하자면 Linear가 기본으로 바뀐 이유는 Linear가 실제의 색을 표현하기 때문이다.
참고 : https://m.blog.naver.com/cdw0424/221827528747
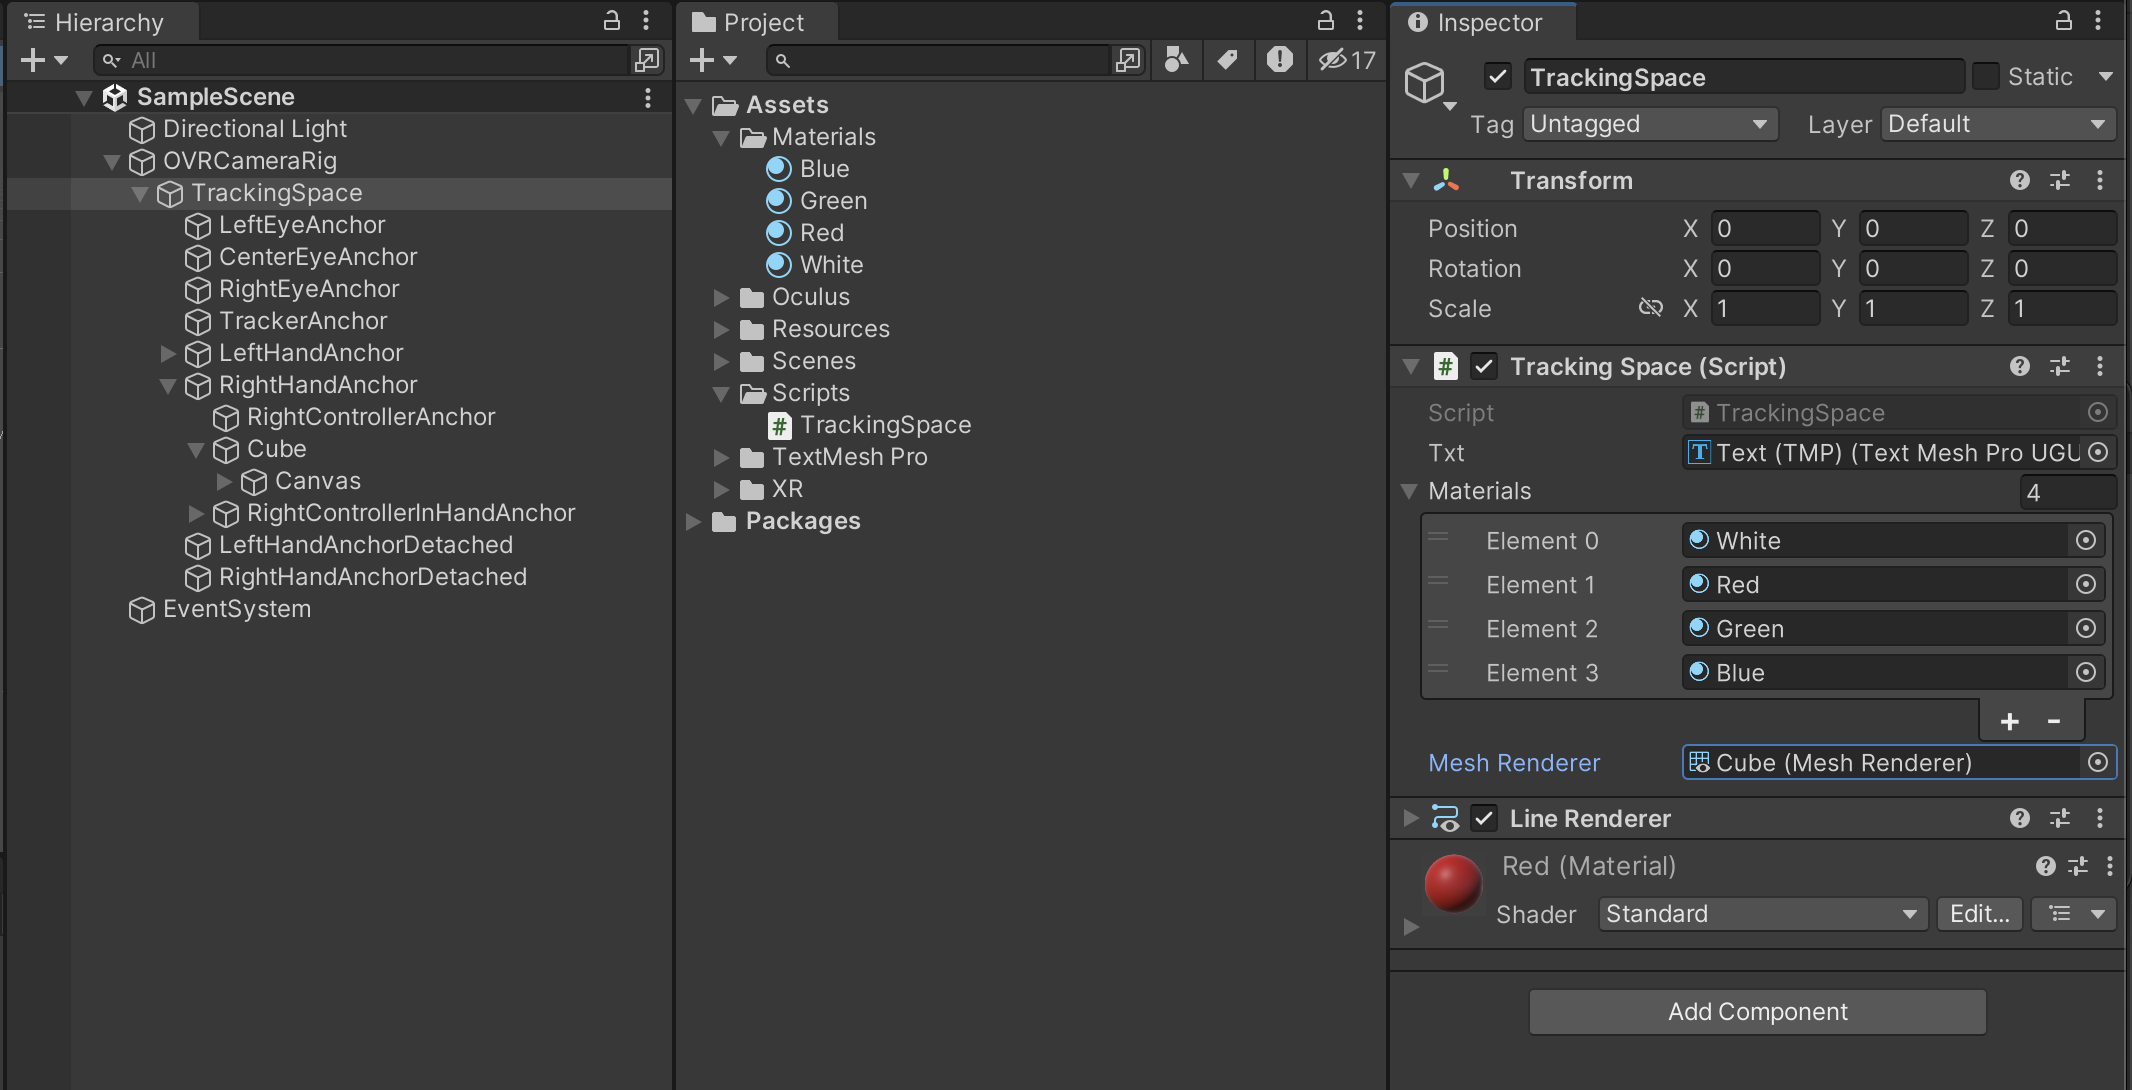
OVRCameraRig를 하이어라키에 놓는다

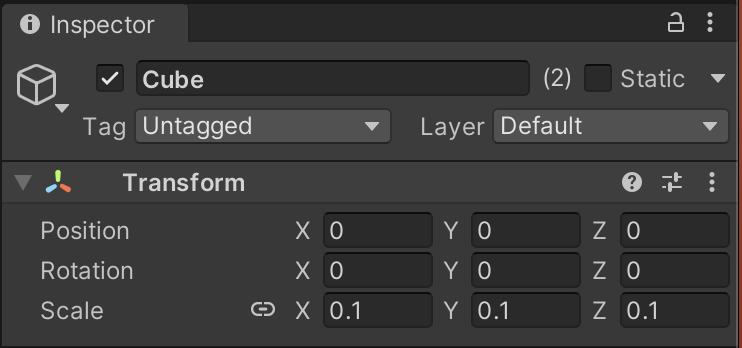

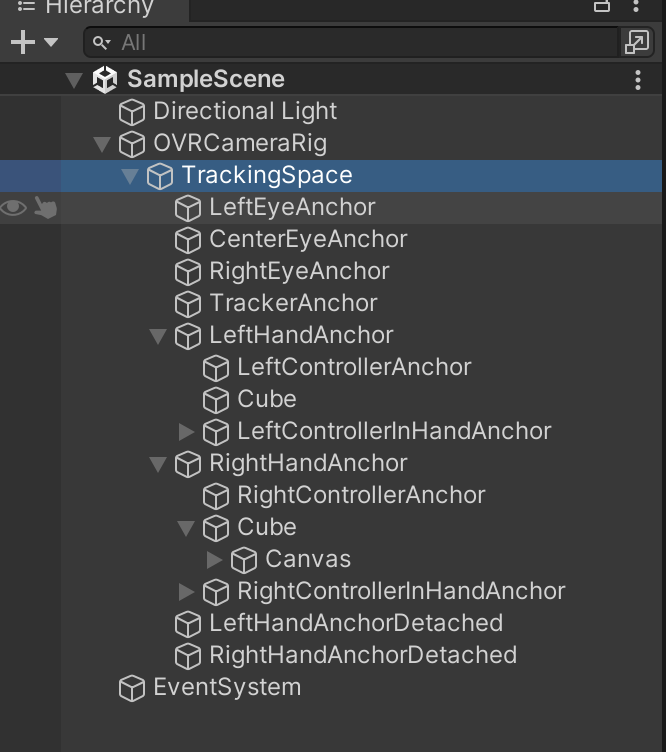
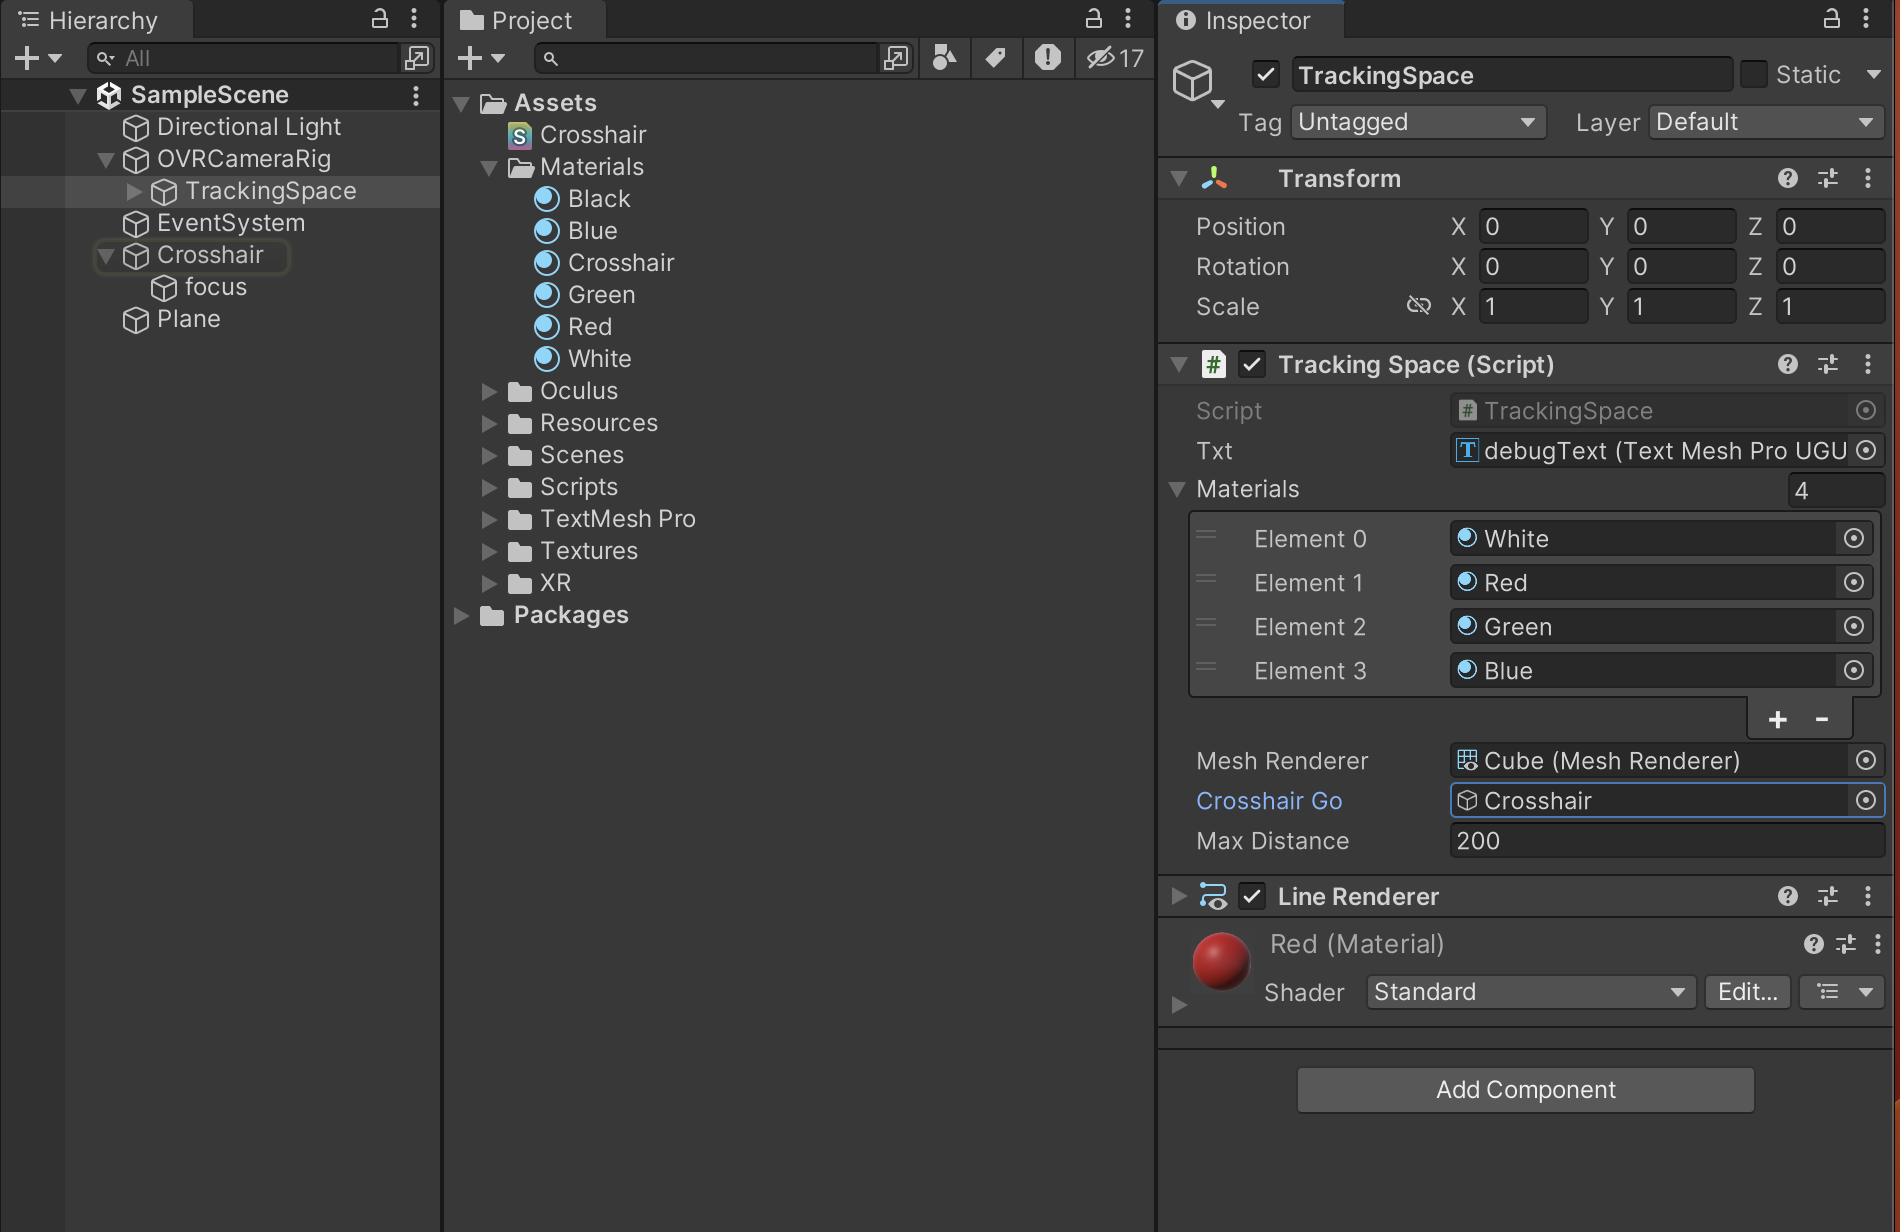
다음 스크립트를 작성해 TrackingSpace에 부착 한다
using System.Collections;
using System.Collections.Generic;
using UnityEngine;
using TMPro;

public class TrackingSpace : MonoBehaviour
{
    [SerializeField] private TMP_Text txt;

    // Start is called before the first frame update
    void Start()
    {

    }

    // Update is called once per frame
    void Update()
    {
        Vector3 pos = OVRInput.GetLocalControllerPosition(OVRInput.Controller.RTouch);
                pos = this.transform.TransformPoint(pos);

                this.txt.text = pos.ToString();

    }
}
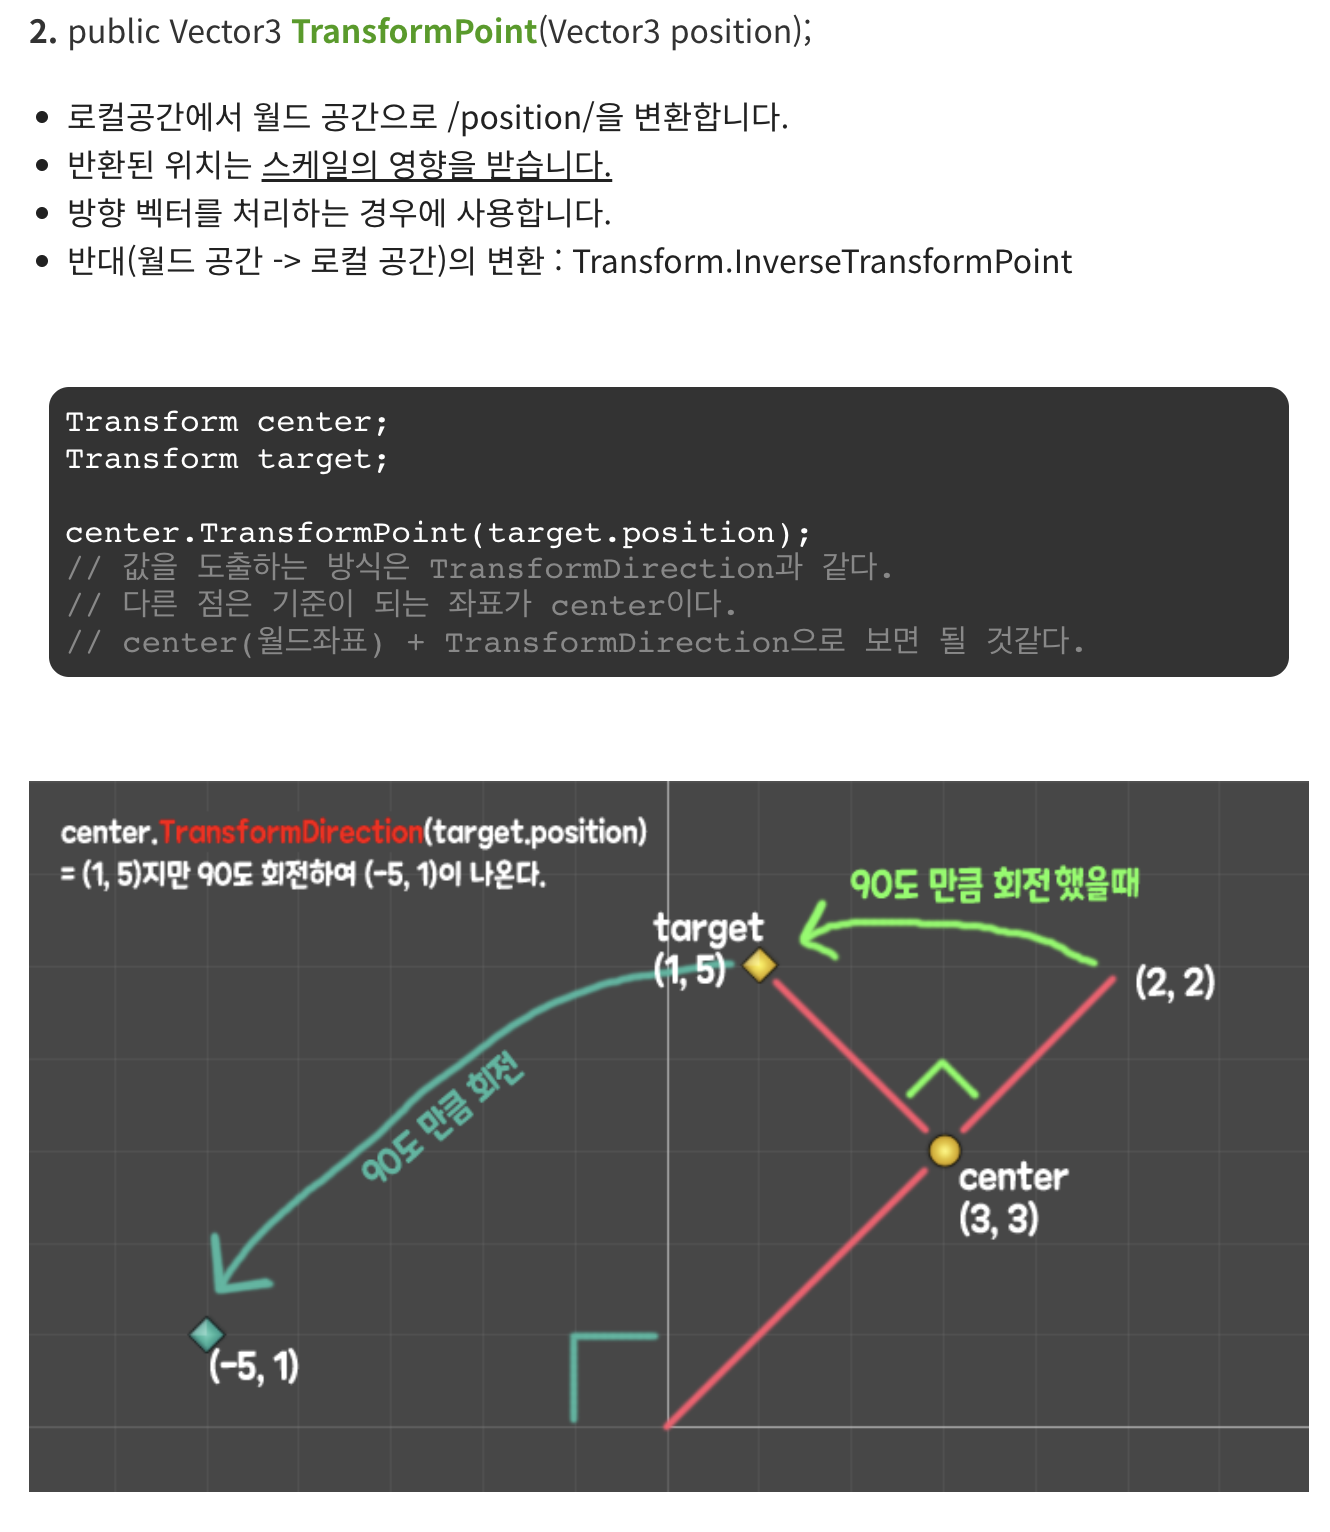
https://docs.unity3d.com/ScriptReference/Transform.TransformPoint.html
Unity - Scripting API: Transform.TransformPoint
Success! Thank you for helping us improve the quality of Unity Documentation. Although we cannot accept all submissions, we do read each suggested change from our users and will make updates where applicable. Close
docs.unity3d.com
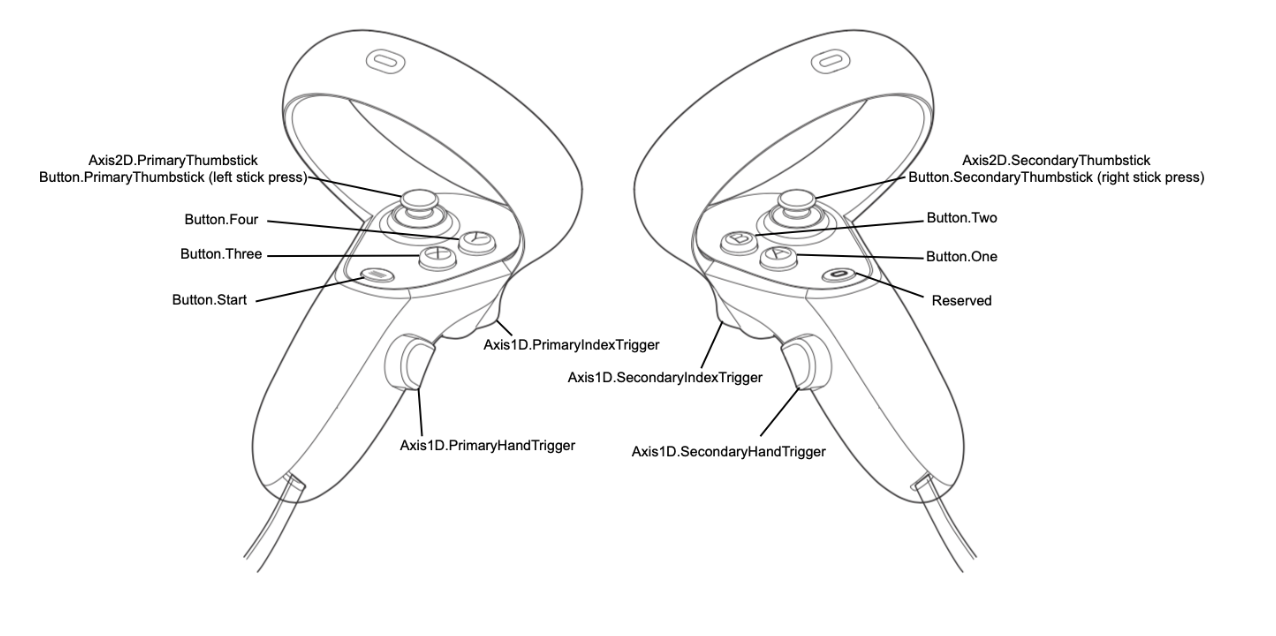
OVRInput클래스의 GetLocalControllerPosition함수를 사용해 컨트롤러의 로컬 위치를 알수 있음
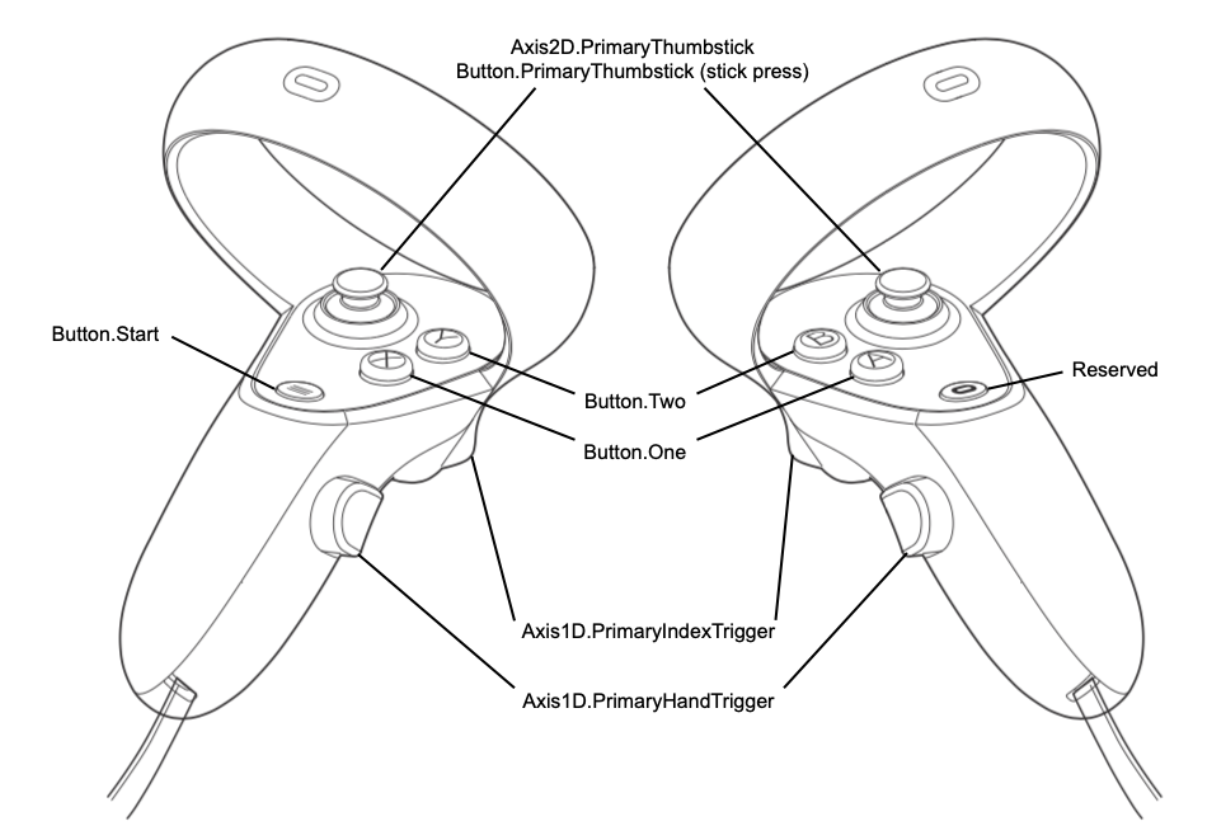
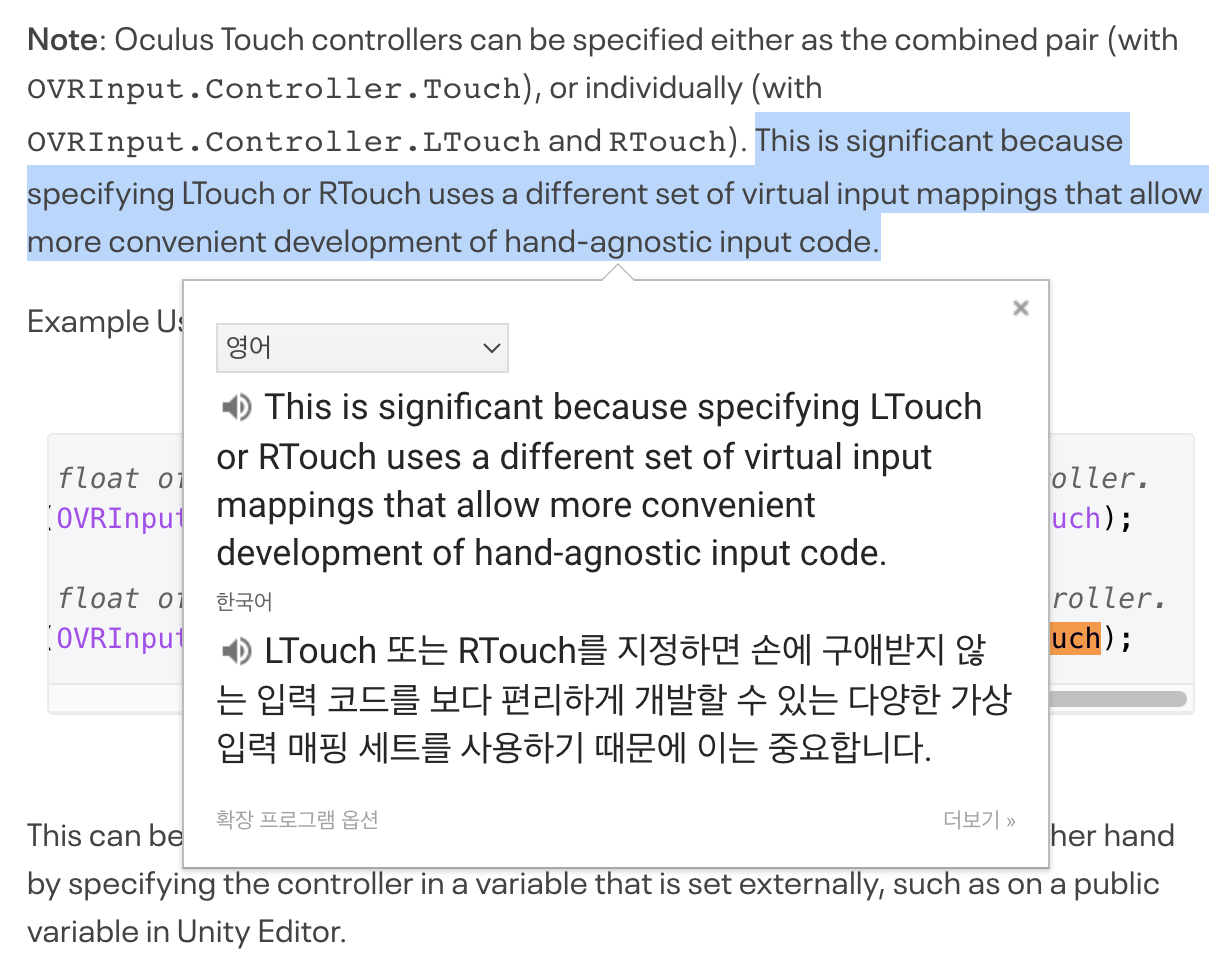
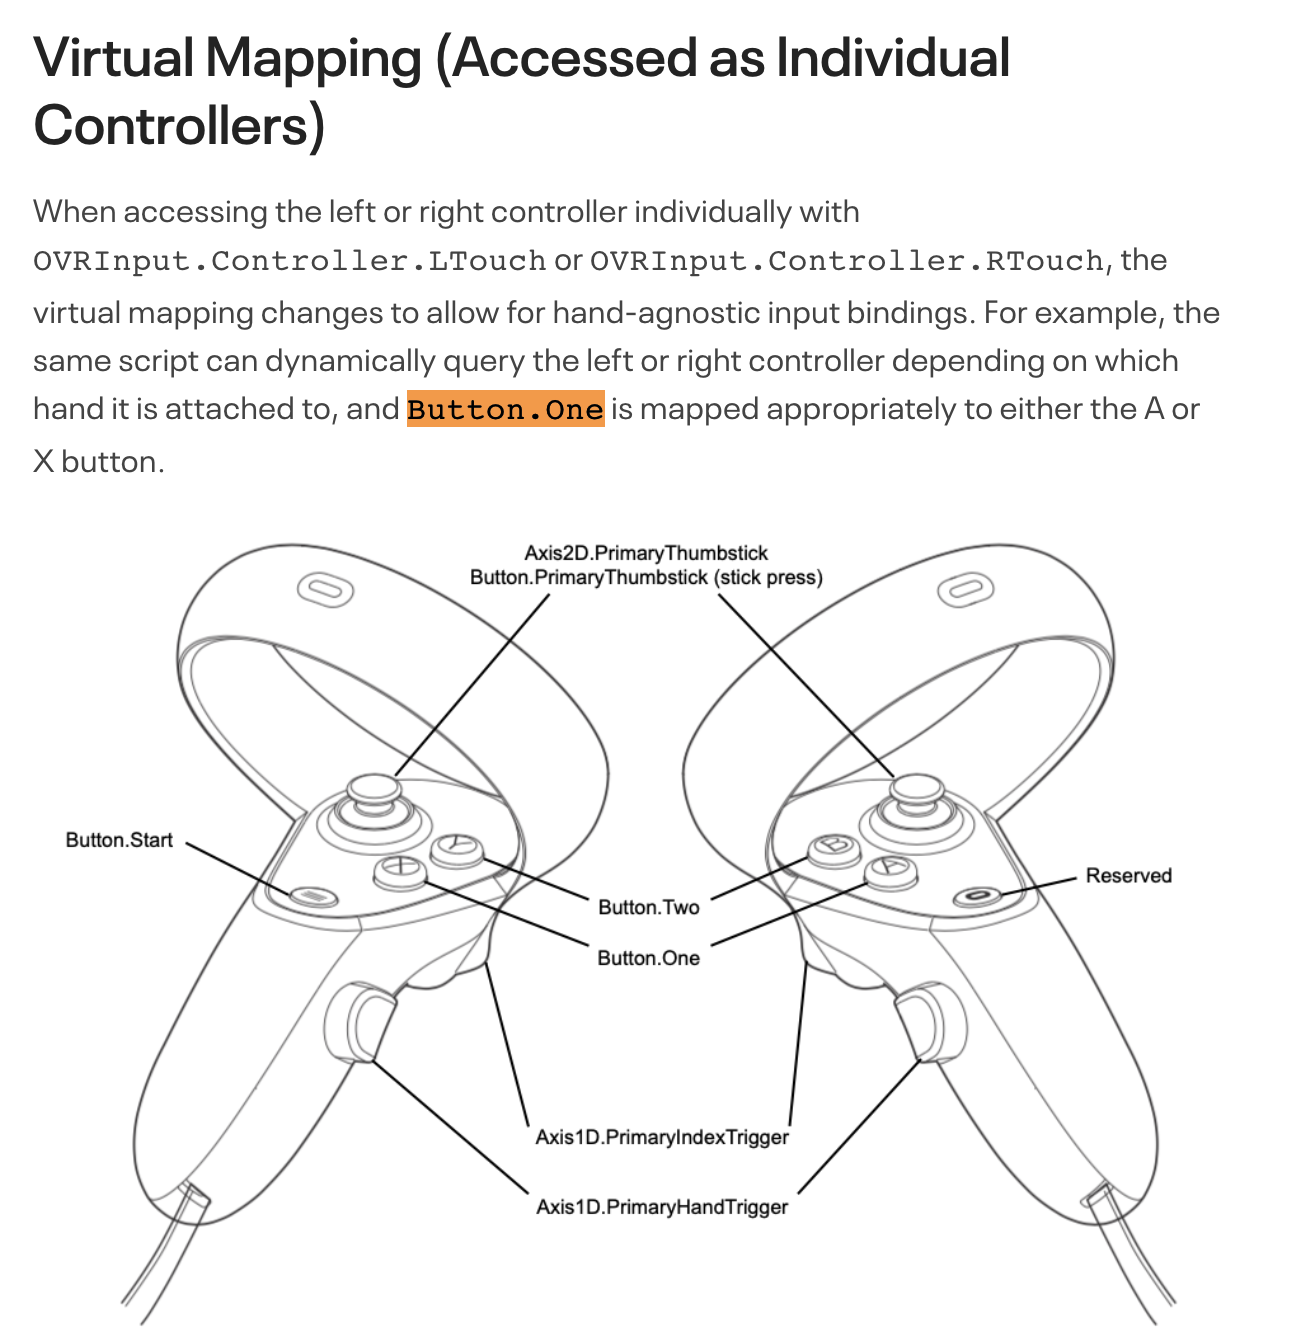
Virtual Mapping (Accessed as Individual Controllers)
When accessing the left or right controller individually with OVRInput.Controller.LTouch or OVRInput.Controller.RTouch, the virtual mapping changes to allow for hand-agnostic input bindings. For example, the same script can dynamically query the left or right controller depending on which hand it is attached to, and Button.One is mapped appropriately to either the A or X button.
RHandDirection 구현
- 컨트롤러의 바향은 OvrInput클래스의 GetLocalControllerRotation 함수를 이용함
- 이 함수는 로컬 방향을 쿼터니언으로 반환
- 전방 벡터를 얻기 위해 이 쿼터니언에 Vector3.forward값을 곱해 Vector3타입의 방햐을 구할수 있음
- TransformDirection 함수를 사용해 로컬 방향을 월드 방향으로 바꿔 리턴
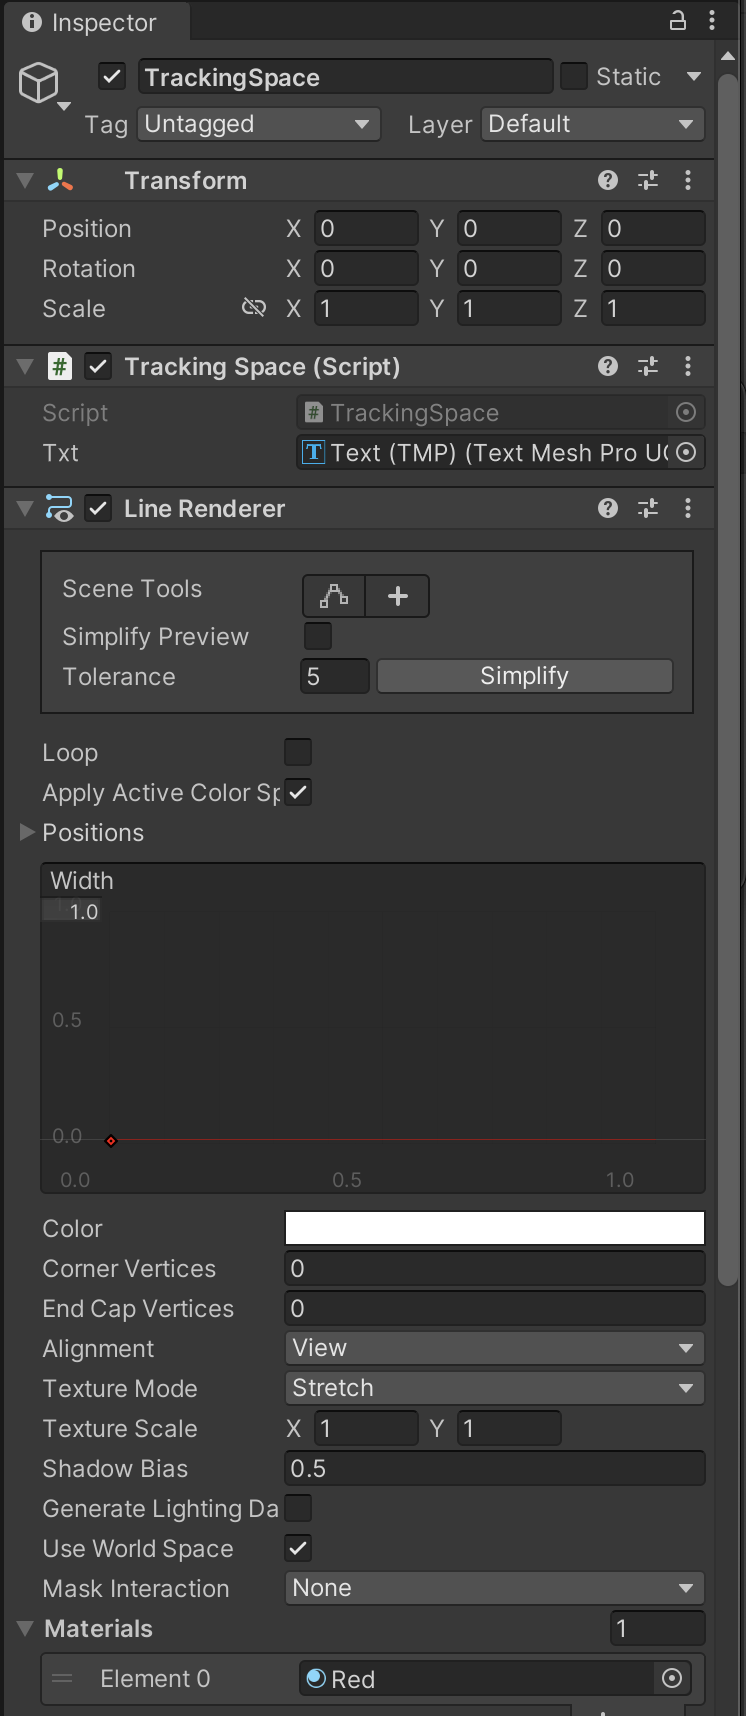
TrackingSpace에 LineRenderer컴포넌트를 추가하고 다음과 같이 스크립트를 작성해 테스트 한다
using System.Collections;
using System.Collections.Generic;
using UnityEngine;
using TMPro;

public class TrackingSpace : MonoBehaviour
{
    [SerializeField] private TMP_Text txt;

    private LineRenderer lineRenderer;
    // Start is called before the first frame update
    void Start()
    {
        this.lineRenderer = this.GetComponent<LineRenderer>();
        this.lineRenderer.positionCount = 2;

    }

    // Update is called once per frame
    void Update()
    {
        Vector3 pos = OVRInput.GetLocalControllerPosition(OVRInput.Controller.RTouch);
        pos = this.transform.TransformPoint(pos);

        this.txt.text = pos.ToString();

        Quaternion rot = OVRInput.GetLocalControllerRotation(OVRInput.Controller.RTouch);
        Vector3 dir = rot * Vector3.forward;
        dir = this.transform.TransformDirection(dir);


        this.lineRenderer.SetPosition(0, pos);
        this.lineRenderer.SetPosition(1, pos + dir * 5f);

    }
}
Virtual Mapping (Accessed as Individual Controllers)
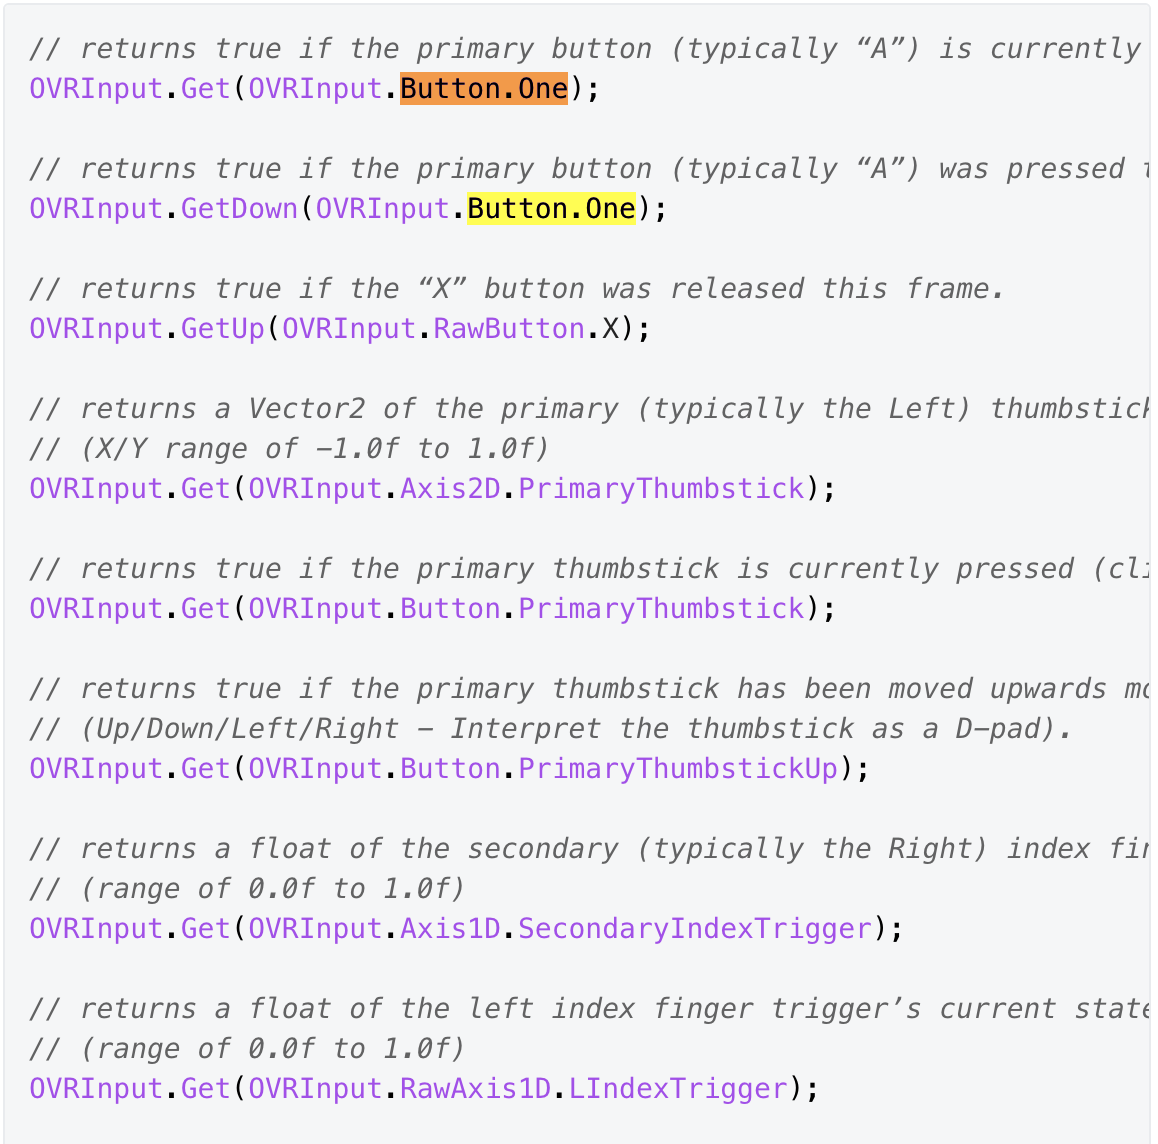
Get, GetDown, GetUp함수 구현하기
- 버튼을 누르면 메터리얼을 변경시켜 테스트 해보자
using System.Collections;
using System.Collections.Generic;
using UnityEngine;
using TMPro;

public class TrackingSpace : MonoBehaviour
{
    [SerializeField] private TMP_Text txt;

    [SerializeField] private Material[] materials;
    [SerializeField] private MeshRenderer meshRenderer;

    private LineRenderer lineRenderer;
    // Start is called before the first frame update
    void Start()
    {
        this.lineRenderer = this.GetComponent<LineRenderer>();
        this.lineRenderer.positionCount = 2;

    }

    // Update is called once per frame
    void Update()
    {
        Vector3 pos = OVRInput.GetLocalControllerPosition(OVRInput.Controller.RTouch);
        pos = this.transform.TransformPoint(pos);

        this.txt.text = pos.ToString();

        Quaternion rot = OVRInput.GetLocalControllerRotation(OVRInput.Controller.RTouch);
        Vector3 dir = rot * Vector3.forward;
        dir = this.transform.TransformDirection(dir);


        this.lineRenderer.SetPosition(0, pos);
        this.lineRenderer.SetPosition(1, pos + dir * 5f);

        // returns true if the primary button (typically “A”) is currently pressed.
        if (OVRInput.Get(OVRInput.Button.One))
        {
            this.meshRenderer.material = this.materials[3]; //blue
        }

        // returns true if the primary button (typically “A”) was pressed this frame.
        if (OVRInput.GetDown(OVRInput.Button.One))
        {
            this.meshRenderer.material = this.materials[1]; //red
        }

        // returns true if the “X” button was released this frame.
        if (OVRInput.GetUp(OVRInput.RawButton.X))
        {
            this.meshRenderer.material = this.materials[0]; //white
        }

    }
}
빌드후 테스트 A 버튼을 누르면 빨간 > 파랑으로 변하고 왼쪽 컨트롤러의 x버튼을 누르면 white메터리얼로 변경 된다
Axis 가져오기 (Horizontal, Vertical)
using System.Collections;
using System.Collections.Generic;
using UnityEngine;
using TMPro;

public class TrackingSpace : MonoBehaviour
{
    [SerializeField] private TMP_Text txt;

    [SerializeField] private Material[] materials;
    [SerializeField] private MeshRenderer meshRenderer;

    private LineRenderer lineRenderer;
    // Start is called before the first frame update
    void Start()
    {
        this.lineRenderer = this.GetComponent<LineRenderer>();
        this.lineRenderer.positionCount = 2;

    }

    // Update is called once per frame
    void Update()
    {
        Vector3 pos = OVRInput.GetLocalControllerPosition(OVRInput.Controller.RTouch);
        pos = this.transform.TransformPoint(pos);

        //this.txt.text = pos.ToString();

        Quaternion rot = OVRInput.GetLocalControllerRotation(OVRInput.Controller.RTouch);
        Vector3 dir = rot * Vector3.forward;
        dir = this.transform.TransformDirection(dir);


        this.lineRenderer.SetPosition(0, pos);
        this.lineRenderer.SetPosition(1, pos + dir * 5f);

        // returns true if the primary button (typically “A”) is currently pressed.
        if (OVRInput.Get(OVRInput.Button.One))
        {
            this.meshRenderer.material = this.materials[3]; //blue
        }

        // returns true if the primary button (typically “A”) was pressed this frame.
        if (OVRInput.GetDown(OVRInput.Button.One))
        {
            this.meshRenderer.material = this.materials[1]; //red
        }

        // returns true if the “X” button was released this frame.
        if (OVRInput.GetUp(OVRInput.RawButton.X))
        {
            this.meshRenderer.material = this.materials[0]; //white
        }


        // 오른손 컨트롤러의 주요 써클 패드 입력을 가져옵니다.
        Vector2 axis = OVRInput.Get(OVRInput.Axis2D.PrimaryThumbstick, OVRInput.Controller.RTouch);

        // 패드의 X 좌표를 텍스트로 출력합니다.
        txt.text = "Thumbstick Input - X: " + axis.x.ToString();
    }
}
진동
https://developer.oculus.com/documentation/unity/unity-haptics/
Haptic Feedback | Oculus Developers
developer.oculus.com
SetControllerVibration 메서드는 2초간 진동후 종료 되는 함수이기 때문에 원하는 시간동안 진동을 표현 하고자 하면 코루틴을 사용하면 된다
duratioon : 지속시간
frequency : 빈도
amplitude : 진동 크기
hand : RTouch or LTouch
TrackingSpace 스크립트에 인덱스 버튼을 누르면 2초간 진동 하게 추가 한다
//진동
if (OVRInput.GetDown(OVRInput.Button.PrimaryIndexTrigger, OVRInput.Controller.RTouch))
{
    this.StartCoroutine(this.CoVibration(2, 1, 1, OVRInput.Controller.RTouch));
}
IEnumerator CoVibration(float duration, float frequency, float amplitude, OVRInput.Controller hand)
{
float currentTime = 0;
while (currentTime < duration)
{
currentTime += Time.deltaTime;
OVRInput.SetControllerVibration(frequency,amplitude,hand);
yield return null;
}
OVRInput.SetControllerVibration(0,0,hand);
}실행후 오른쪽 컨트롤러의 인덱스 버튼을 눌러 진동이 2초간 잘 동작 하는지 확인해보자
원하는 방향으로 중심을 재설정 하기
- 카메라가 바라보는 방향을 기준ㅇ으로 센터를 잡는다
Touch Tracking
컨트롤러 포즈는 추적 시스템에 의해 반환되며 헤드셋과 동시에 예측됩니다.
이러한 포즈는 초기 중심 눈 포즈를 기준으로 헤드셋과 동일한 좌표 프레임으로 보고되며 3D 세계에서 손이나 개체를 렌더링하는 데 사용할 수 있습니다.
또한 머리 및 눈 포즈와 유사하게 OVRManager.display.RecenterPose()에 의해 재설정됩니다.
if (OVRInput.GetDown(OVRInput.Button.PrimaryHandTrigger, OVRInput.Controller.RTouch))
{
    //Recenter
    txt.text = "Recenter";
    this.meshRenderer.material = this.materials[2]; //white
    OVRManager.display.RecenterPose();
}
실행후
How To Recenter in VR
다음 영상 참고 : https://youtu.be/NOCXB_ETKrM
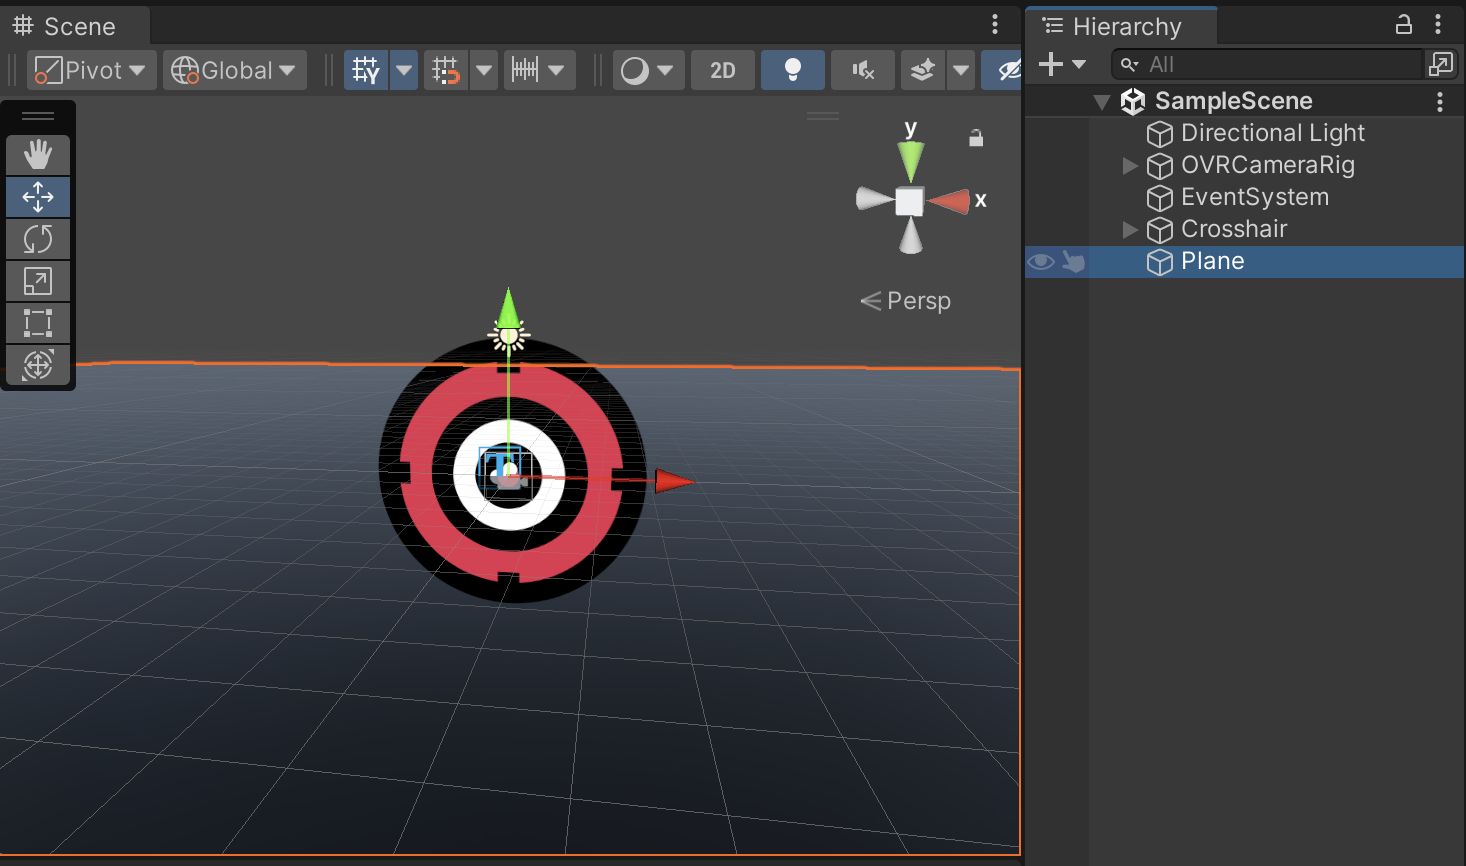
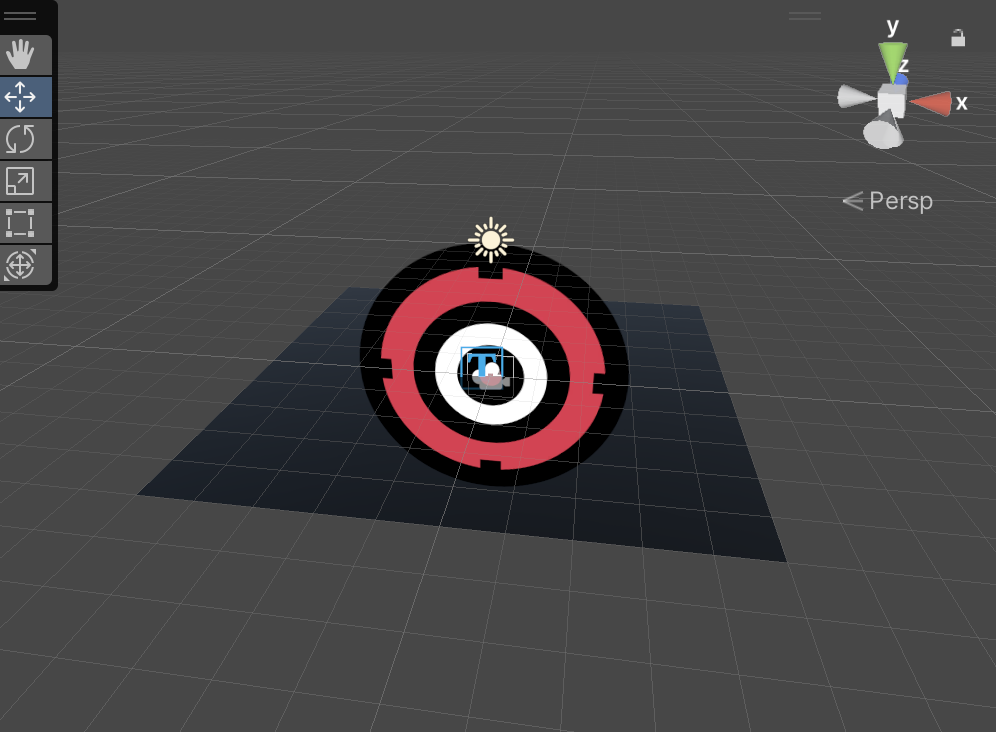
크로스헤어 만들기
목표 : 광선 레이가 닿는 곳에 크로스헤어를 위치
1. 광선 레이 만들기
2. 레이 쏘기
3. 부딪힌점이 있다면 크로스헤어 위치 시키기
4. 부딪히지 않앗다면 허공ㅇ에 크로스헤어 위치 시키기
https://docs.unity3d.com/ScriptReference/Plane.html
https://docs.unity3d.com/ScriptReference/Plane.Raycast.html
Unity - Scripting API: Plane.Raycast
This function sets enter to the distance along the ray, where it intersects the plane. If the ray is parallel to the plane, function returns false and sets enter to zero. If the ray is pointing in the opposite direction than the plane, function returns fal
docs.unity3d.com
using UnityEngine;
using UnityEngine.UI;
using System.Collections;
using TMPro;
using Oculus;

public class TrackingSpace : MonoBehaviour
{
    [SerializeField] private TMP_Text txt;
    [SerializeField] private Material[] materials;
    [SerializeField] private MeshRenderer meshRenderer;
    [SerializeField] private GameObject crosshairGo;
    private LineRenderer lineRenderer;
    private Vector3 originScale = Vector3.one * 0.005f;

    [SerializeField] private float maxDistance = 200f;

    private void Start()
    {
        lineRenderer = GetComponent<LineRenderer>();
        lineRenderer.positionCount = 2;
    }

    private void Update()
    {
        HandleControllerInput();
    }

    private void HandleControllerInput()
    {
        // Get the local position and rotation of the right controller.
        Vector3 controllerPos = OVRInput.GetLocalControllerPosition(OVRInput.Controller.RTouch);
        controllerPos = transform.TransformPoint(controllerPos);
        Quaternion controllerRot = OVRInput.GetLocalControllerRotation(OVRInput.Controller.RTouch);
        Vector3 controllerDir = controllerRot * Vector3.forward;
        controllerDir = transform.TransformDirection(controllerDir);

        // Update the line renderer to show controller direction.
        lineRenderer.SetPosition(0, controllerPos);
        lineRenderer.SetPosition(1, controllerPos + controllerDir * 5f);

        // Handle button inputs.
        HandleButtonInput();

        // Handle haptic feedback.
        HandleHapticFeedback();

        // Draw crosshair.
        DrawCrosshair(controllerPos, controllerDir);
    }

    private void HandleButtonInput()
    {
        // Handle button presses.
        if (OVRInput.GetDown(OVRInput.Button.One))
        {
            meshRenderer.material = materials[1]; // Red material
        }
        else if (OVRInput.GetUp(OVRInput.RawButton.X))
        {
            meshRenderer.material = materials[0]; // White material
        }

        // Handle controller thumbstick input.
        Vector2 thumbstickInput = OVRInput.Get(OVRInput.Axis2D.PrimaryThumbstick, OVRInput.Controller.RTouch);
        // txt.text = "Thumbstick Input - X: " + thumbstickInput.x.ToString();

        // Handle controller recentering.
        if (OVRInput.GetDown(OVRInput.Button.PrimaryHandTrigger, OVRInput.Controller.RTouch))
        {
            txt.text = "Recenter";
            meshRenderer.material = materials[2]; // White material
            OVRManager.display.RecenterPose();
        }
    }

    private void HandleHapticFeedback()
    {
        if (OVRInput.GetDown(OVRInput.Button.PrimaryIndexTrigger, OVRInput.Controller.RTouch))
        {
            StartCoroutine(CoVibration(0.01f, 1, 1, OVRInput.Controller.RTouch));
        }
    }

    IEnumerator CoVibration(float duration, float frequency, float amplitude, OVRInput.Controller hand)
    {
        float currentTime = 0;
        while (currentTime < duration)
        {
            currentTime += Time.deltaTime;
            OVRInput.SetControllerVibration(frequency, amplitude, hand);
            yield return null;
        }
        OVRInput.SetControllerVibration(0, 0, hand);
    }

    private void DrawCrosshair(Vector3 controllerPos, Vector3 controllerDir)
    {
        Ray ray = new Ray(controllerPos, controllerDir);
        Plane plane = new Plane(Vector3.up, 0);
        float hitDistance = 0;

        if (plane.Raycast(ray, out hitDistance))
        {
            Vector3 crosshairPosition = ray.GetPoint(hitDistance);
            crosshairGo.transform.position = crosshairPosition;
            crosshairGo.transform.forward = -Camera.main.transform.forward;

            // Calculate the scale based on distance.
            float scaleMultiplier = Mathf.Clamp(hitDistance, 1f, maxDistance); // You can adjust 'maxDistance' as needed.
            Vector3 crosshairScale = originScale * scaleMultiplier;

            txt.text = "Distance: " + hitDistance.ToString("F2") + ", Scale: " + crosshairScale.ToString("F2");

            crosshairGo.transform.localScale = crosshairScale;
        }
    }


}
이부분을 주석 하고 실행 해보면 이거 왜 하는지 알게 됨
//crosshairGo.transform.localScale = crosshairScale;
캔버스 하나 만들고 그 아래 Image 만들고 crosshair이미지 넣어준다
그러면 Plane에 이미지가 가려지는데 ui-default.shader를 약간 수정해서 해결 할수 있다
다음 링크에서 쉐이더를 복사해 Crosshair.shader를 만들어주고 (Surface Shader) 붙여 넣자
ZTest Alway로 변경 해준다
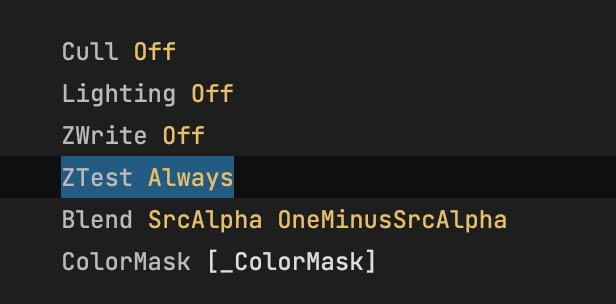
https://docs.unity.cn/kr/2020.3/Manual/SL-ZTest.html
ShaderLab 커맨드: ZTest - Unity 매뉴얼
지오메트리가 뎁스 테스트를 통과하거나 이에 실패하는 조건을 설정합니다.
docs.unity.cn
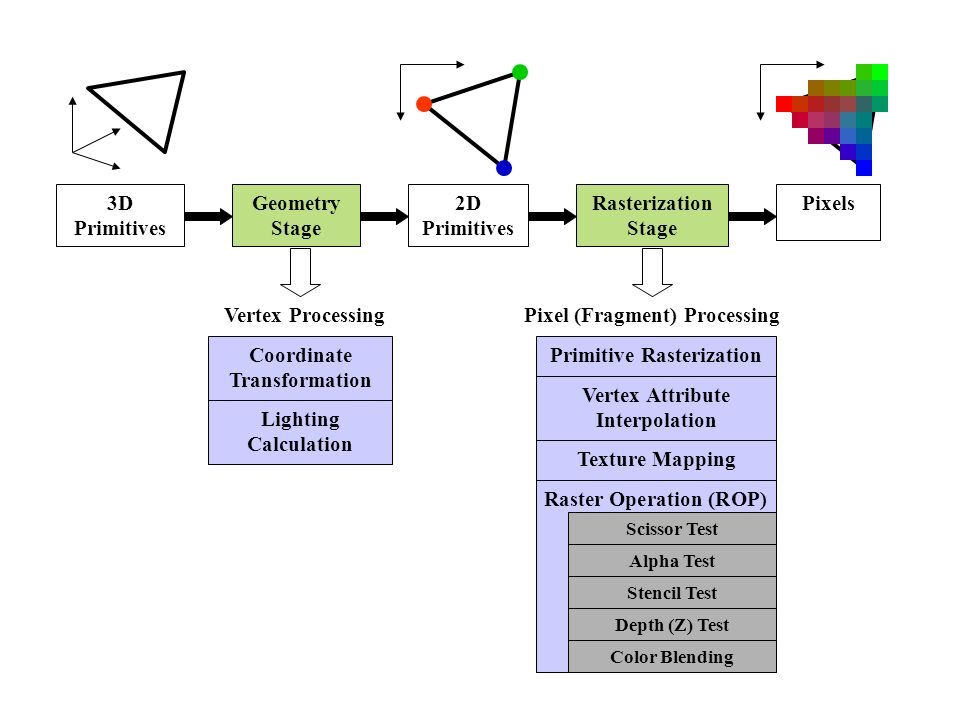
랜더링파이프라인에서 Depth Test (ZTest)는 언제 하나?
아무튼 메터리얼 만들어서 방금 수정한 셰이더 적용한다음 Crosshair오브젝트에 적용한다

마지막으로 TrackSpace스크립틍의 Crosshair(Transform)에 할당
실행후 결과를 확인 하자
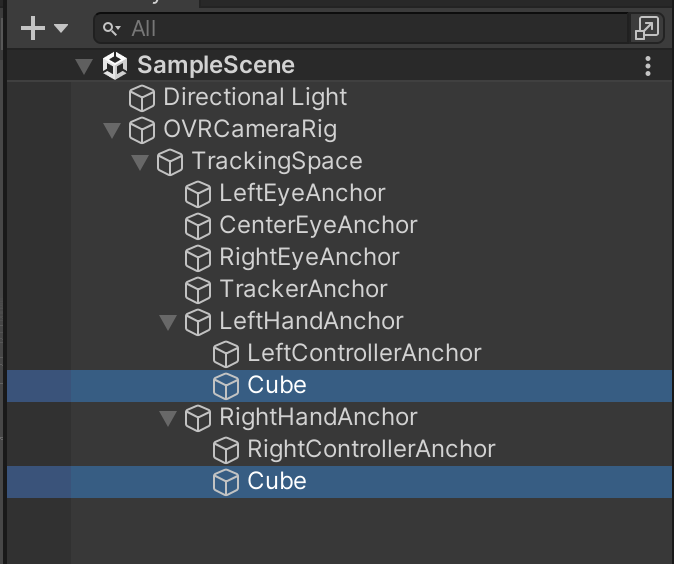
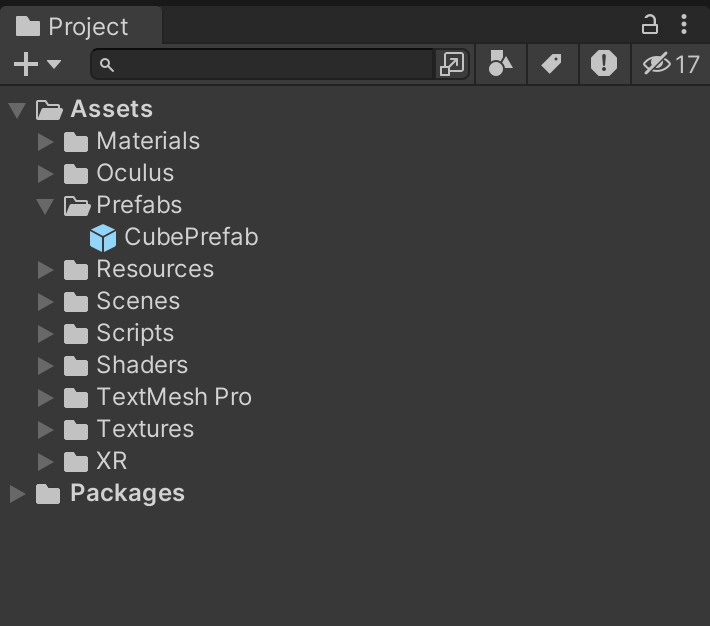
충돌지점에 박스 생성하기
Cube프리팹을 만들고
레이와 충돌검사후 큐브를 생성
 private void CreateCube(Vector3 controllerPos, Vector3 controllerDir)
    {
        Ray ray = new Ray(controllerPos, controllerDir);
        RaycastHit hit = new RaycastHit();

        if (Physics.Raycast(ray, out hit, maxDistance))
        {
            var go = Instantiate(this.cubePrefab);

            Vector3 tpos = new Vector3(hit.point.x, hit.point.y + 1, hit.point.z);
            go.transform.position = tpos;

            txt.text = "tpos: " + tpos;

            meshRenderer.material = materials[2]; // Red material
        }

    }
전체 코드
using System;
using UnityEngine;
using UnityEngine.UI;
using System.Collections;
using TMPro;
using Oculus;

public class TrackingSpace : MonoBehaviour
{
    [SerializeField] private TMP_Text txt;
    [SerializeField] private Material[] materials;
    [SerializeField] private MeshRenderer meshRenderer;
    [SerializeField] private GameObject crosshairGo;
    [SerializeField] private GameObject cubePrefab;
    private LineRenderer lineRenderer;
    private Vector3 originScale = Vector3.one * 0.005f;

    [SerializeField] private float maxDistance = 200f;

    private void Start()
    {
        lineRenderer = GetComponent<LineRenderer>();
        lineRenderer.positionCount = 2;
    }

    private void Update()
    {
        HandleControllerInput();
    }

    private void HandleControllerInput()
    {
        // Get the local position and rotation of the right controller.
        Vector3 controllerPos = OVRInput.GetLocalControllerPosition(OVRInput.Controller.RTouch);
        controllerPos = transform.TransformPoint(controllerPos);
        Quaternion controllerRot = OVRInput.GetLocalControllerRotation(OVRInput.Controller.RTouch);
        Vector3 controllerDir = controllerRot * Vector3.forward;
        controllerDir = transform.TransformDirection(controllerDir);

        // Update the line renderer to show controller direction.
        lineRenderer.SetPosition(0, controllerPos);
        lineRenderer.SetPosition(1, controllerPos + controllerDir * 5f);

        // Handle button inputs.
        HandleButtonInput();

        // Handle haptic feedback.
        HandleHapticFeedback(controllerPos, controllerDir);

        // Draw crosshair.
        DrawCrosshair(controllerPos, controllerDir);
    }

    private void CreateCube(Vector3 controllerPos, Vector3 controllerDir)
    {
        Ray ray = new Ray(controllerPos, controllerDir);
        RaycastHit hit = new RaycastHit();

        if (Physics.Raycast(ray, out hit, maxDistance))
        {
            var go = Instantiate(this.cubePrefab);

            Vector3 tpos = new Vector3(hit.point.x, hit.point.y + 1, hit.point.z);
            go.transform.position = tpos;

            txt.text = "tpos: " + tpos;

            meshRenderer.material = materials[2]; // Red material
        }

    }

    private void HandleButtonInput()
    {
        // Handle button presses.
        if (OVRInput.GetDown(OVRInput.Button.One))
        {
            meshRenderer.material = materials[1]; // Red material
        }
        else if (OVRInput.GetUp(OVRInput.RawButton.X))
        {
            meshRenderer.material = materials[0]; // White material
        }

        // Handle controller thumbstick input.
        Vector2 thumbstickInput = OVRInput.Get(OVRInput.Axis2D.PrimaryThumbstick, OVRInput.Controller.RTouch);
        // txt.text = "Thumbstick Input - X: " + thumbstickInput.x.ToString();

        // Handle controller recentering.
        if (OVRInput.GetDown(OVRInput.Button.PrimaryHandTrigger, OVRInput.Controller.RTouch))
        {
            //txt.text = "Recenter";
            meshRenderer.material = materials[2]; // White material
            OVRManager.display.RecenterPose();
        }
    }

    private void HandleHapticFeedback(Vector3 controllerPos, Vector3 controllerDir)
    {
        if (OVRInput.GetDown(OVRInput.Button.PrimaryIndexTrigger, OVRInput.Controller.RTouch))
        {
            CreateCube(controllerPos, controllerDir);

            StartCoroutine(CoVibration(0.01f, 1, 1, OVRInput.Controller.RTouch));
        }
    }

    IEnumerator CoVibration(float duration, float frequency, float amplitude, OVRInput.Controller hand)
    {
        float currentTime = 0;
        while (currentTime < duration)
        {
            currentTime += Time.deltaTime;
            OVRInput.SetControllerVibration(frequency, amplitude, hand);
            yield return null;
        }
        OVRInput.SetControllerVibration(0, 0, hand);
    }

    private void DrawCrosshair(Vector3 controllerPos, Vector3 controllerDir)
    {
        Ray ray = new Ray(controllerPos, controllerDir);
        Plane plane = new Plane(Vector3.up, 0);
        float hitDistance = 0;

        if (plane.Raycast(ray, out hitDistance))
        {
            Vector3 crosshairPosition = ray.GetPoint(hitDistance);
            crosshairGo.transform.position = crosshairPosition;
            crosshairGo.transform.forward = -Camera.main.transform.forward;

            // Calculate the scale based on distance.
            float scaleMultiplier = Mathf.Clamp(hitDistance, 1f, maxDistance); // You can adjust 'maxDistance' as needed.
            Vector3 crosshairScale = originScale * scaleMultiplier;

            //txt.text = "Distance: " + hitDistance.ToString("F2") + ", Scale: " + crosshairScale.ToString("F2");

            crosshairGo.transform.localScale = crosshairScale;
        }
    }


}